Azure Bastion: Automated Deployment using Azure Logic App
I’ve been working with Azure Bastion for a few weeks and while doing so, I noticed the resource price is pretty high for what it does. So, I decided to find a way to save costs and automate the lifecycle of the resource on demand, and still be able to use all the features that it provides. While doing some research, I stumbled upon this Reddit post which I used as a reference and decided to make some changes based on my use case. Before jumping to the solution, let’s see what Azure Bastion is.
Azure Bastion is a PaaS service provided by Microsoft that can be used to securely connect to your VMs either using RDP or SSH port over SSL, all without exposing your VMs directly to the internet. That being said, you can log in to your Windows or Linux VMs right within your browser session without assigning any Public IP address to VM itself. How cools is that?
The primary purpose of using automation is to save cost by provisioning the resource only when needed without any overhead of maintaining the lifecycle of the resource. Using a Logic App workflow for this case seems to be an ideal solution that will trigger the automation via an HTTP POST request. Based on the body of the incoming request, either “Deploy” or “Destroy”, Logic App follows the case flow of creating or removing the Bastion Host. The creation of Bastion uses the ARM template and input parameters whereas the removal of the resource is performed via an HTTP POST request to the resource URI. To simplify the authentication and permission, Logic App uses Managed Identity with permission to a resource group where Bastion will be provisioned. It would be helpful if you are at least familiar with Logic App, however, I’ll be giving step by step instructions on the whole setup.
Prerequisite
Before you deploy Bastion resources, you must deploy some necessary resources to facilitate the Bastion deployment automation. You need to have a resource group with one Virtual Network (VNet) and one Standard SKU Public IP address that will be used later in the ARM template. If you decide to follow along with the steps for deployment, make sure:
- You are familiar with Azure Portal and have an account with an active subscription to deploy resources.
- You are familiar with Azure ARM templates and Azure Logic Apps.
- You have installed Azure PowerShell or Azure CLI on your local machine. You can also use Cloud Shell alternatively.
Steps below assume that the resource group name is
ps-devshared-rgwhere you will deploy virtual network and public IP resource and Bastion host later.
Preparing Virtual Network for Bastion
The first step towards the bastion automation is to create a Virtual Network that Bastion will connect to during automated deployment. You need to create a virtual network in resource group ps-devshared-rg with a dedicated subnet for the bastion network. You can deploy the VNet using Azure Portal GUI or choose to use the following Azure CLI commands. Be sure to change the value for the following variables based on your resource naming convention: resource-group, name, vnet-name, and subnet-name.
### Azure CLI ###
#create VNet
az network vnet create --resource-group ps-devshared-rg --name MySharedVnet --address-prefix 10.0.0.0/16 --subnet-name MySubnet --subnet-prefix 10.0.0.0/24

#create bastion subnet
az network vnet subnet create --resource-group ps-devshared-rg --vnet-name MySharedVnet --name AzureBastionSubnet --address-prefixes 10.0.2.0/24
You can use Azure PowerShell command instead as described below:
### Azure PowerShell ###
#configure a default subnet
$defaultSubnet = New-AzVirtualNetworkSubnetConfig -Name default -AddressPrefix 10.0.0.0/24

#configure a bastion Subnet
$bastionSubnet = New-AzVirtualNetworkSubnetConfig -Name AzureBastionSubnet -AddressPrefix 10.0.1.0/24

#create Vnet config
$virtualNetwork = New-AzVirtualNetwork -ResourceGroupName ps-devshared-rg -Location CanadaCentral -Name MySharedVnet -AddressPrefix 10.0.0.0/16 -Subnet $defaultSubnet,$bastionSubnet
Deploying Public IP for Bastion
The next step towards the automation is to deploy a Public IP resource that Bastion Host will use. Make sure that you use "Standard" SKU of Public IP instead of Basic SKU during the deployment as Basic SKU is not supported with Bastion Host.
Use the Azure Portal GUI to perform the deployment or follow the commands below for either Azure PowerShell or Azure CLI deployment. Make sure you rename the value for the variable resource-group and name for your Public IP resource name.
### Azure CLI ###
az network public-ip create --resource-group ps-devshared-rg --name Bastion-PIP --dns-name bastioninternal --allocation-method Static --sku Standard

# OR #

### Azure PowerShell ###
$publicIpName = "Bastion-PIP"
$rgName = "ps-devshared-rg"
$location = "canadacentral"
$dnsPrefix = "bastioninternal"

$publicIp = New-AzPublicIpAddress -Name $publicIpName -ResourceGroupName $rgName -AllocationMethod Static -DomainNameLabel $dnsPrefix -Location $location -Sku Standard
Automation Setup for Bastion Deployment
Now that you have a Public IP and VNet available, it’s time to create one last resource that is the backbone of while automation. You need to deploy Azure Logic App for this purpose which will follow a logical approach of either deploying or destroying the resource based on the input.
Creating Azure Logic App Resource
Follow the steps below to create the resource using the Azure Portal.
- Navigate to Azure Portal and resource group where the VNet is deployed.
- Click "+ Add" on the top left to add a new resource.
- Search for "Logic App"
- Choose a meaningful name for your "Logic App Name" and make sure the location is set to "Region"
- Click "Review + Create"
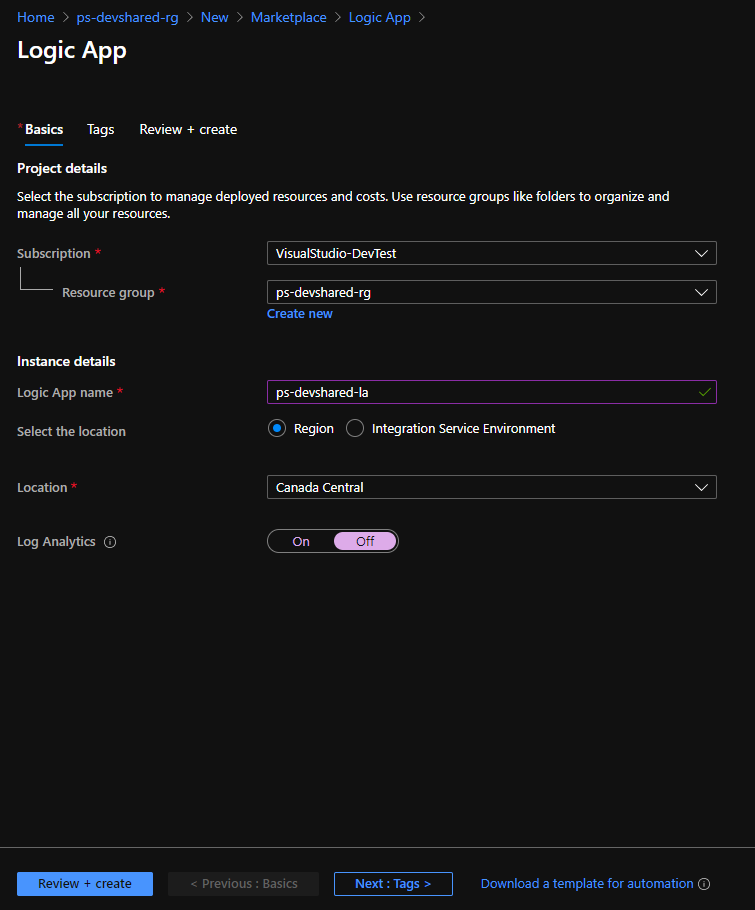
Creating Logic App
Azure Logic App CLI extension 'logic' is experimental and not covered by customer support. Please use it with discretion.
Assigning System Assigned Identity to Logic App
Now that you have the Logic App, the very next thing is to allow this resource the permissions to create and remove the bastion resource in its resource group. For that, you need to assign it the system-assigned managed identity with permissions to resource group where you would like to deploy the Bastion Host. Follow the steps below to make the necessary changes to the Logic App for Managed Identity provisioning.
- Click on the Logic App resource that you created in the last step.
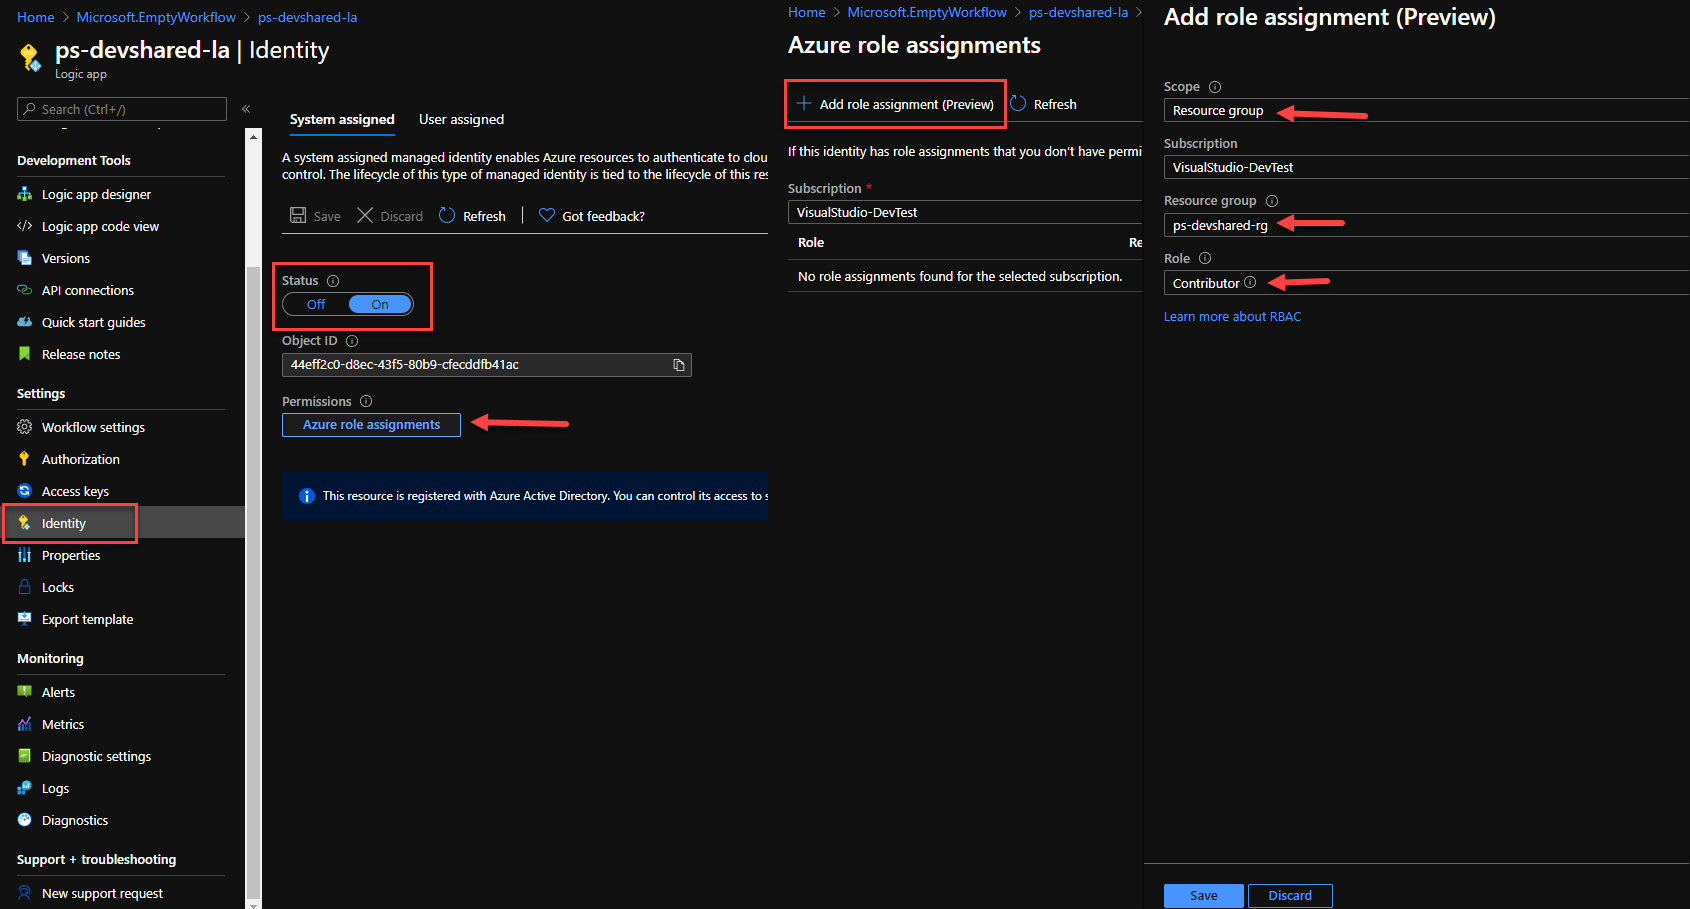
- On the left side option, select "Identity"
- Click "On" under the Status option and click "Save"
- Once saved, you would be able to click on "Azure Role Assignment" button.
- Click "+Add role assignment" and choose the appropriate resource group where you would like to deploy Bastion Host. It can be the same resource group where you've deployed VNet and Public IP for Bastion.
- Hit "Save" once done.
Assigning Managed Identity to Logic App
Creating Logic App Design
With the permissions in place for Logic App to access the resource group, let's move on to Logic App Design to create the logic for deployment. Follow the steps below to build the logic.
- Click on "Logic app designer" from left side blade and choose "Blank Logic App"
- Search for Connector "Request" and choose "When a HTTP request is received"
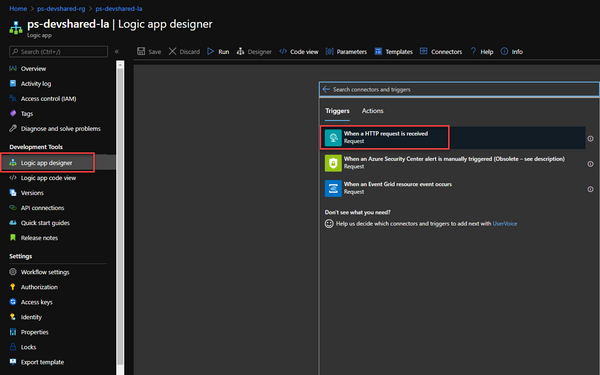
Creating a Blank Logic App
- You need to define the input that you need to receive and act on the input to either create or delete the resource. I've used the following sample JSON input which expects an object
Actionwith somevalueas body in HTTP POST request. When the request is received with{"Action":"Deploy"}as body, the logic proceeds based on the value of action in the request. Save the URL as you'll need that later to trigger the logic app and with that, paste in the following JSON in the "Request Body JSON Schema".
{
    "properties": {
        "Action": {
            "type": "string"
        }
    },
    "type": "object"
}
- The end result should look something like this.
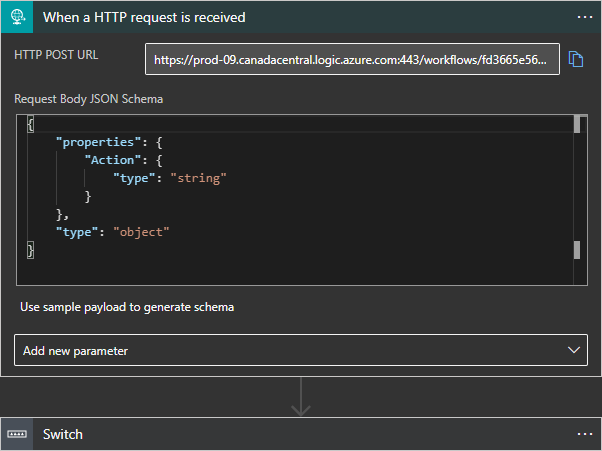
Configuring HTTP Request Connector
- Click "Next Step" button and search for "Control".
- Select "Switch" option and add "Action" variable by clicking on the field to evaluate the next steps based on the value of action from HTTP trigger.
- For the first case, I'll be using "Deploy" as a trigger to create the Bastion Host. Enter the term "Deploy" in the equals field.
- Click "Add an action" and choose "Azure Resource Manager → Create or Update a template deployment"
- Authenticate to your Azure Account by clicking "Sign In".
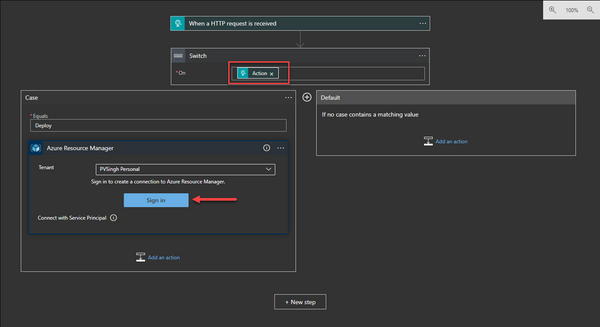
Configuring Azure Resource Manager Logic Case
- Once authenticated, fill out the variables appropriately based on the resource group where you'd like to deploy the Bastion Host.
- Click on the "Add new Parameter" and choose Parameter and Template Content to use ARM template.
- In the Parameters field, use the following JSON template. Replace all the variables with the correct value of where Public IP Address and VNet resources are deployed for your subscription. Feel free to choose any name for your
bastionHost_nameaccording to your preference. Don't forget to change the resource group nameps-devshared-rgto match your environment.
{
  "bastionHosts_name": {
    "value": "ps-dev-bastion"
  },
  "publicIPAddresses_externalid": {
    "value": "/subscriptions/{$SubID}/resourceGroups/ps-devshared-rg/providers/Microsoft.Network/publicIPAddresses/{$you-PIP-Name}"
  },
  "virtualNetworks__externalid": {
    "value": "/subscriptions/{$SubID}/resourceGroups/ps-devshared-rg/providers/Microsoft.Network/virtualNetworks/{$your-vnet-name}"
  },
  "bastion_location": {
	"value": "canadacentral"
  }
}
- In the Template Content field, use the following JSON template that will deploy the Bastion Host based on parameter input from previous field.
{
  "$schema": "https://schema.management.azure.com/schemas/2015-01-01/deploymentTemplate.json#",
  "contentVersion": "1.0.0.0",
  "parameters": {
    "bastionHosts_name": {
      "type": "String"
    },
    "publicIPAddresses_externalid": {
      "type": "String"
    },
    "virtualNetworks__externalid": {
      "type": "String"
    },
    "bastion_location":{
      "type":"String"
    }
  },
  "resources": [
    {
      "apiVersion": "2020-05-01",
      "location": "[parameters('bastion_location')]",
      "name": "[parameters('bastionHosts_name')]",
      "properties": {
        "ipConfigurations": [
          {
            "name": "IpConf",
            "properties": {
              "privateIPAllocationMethod": "Dynamic",
              "publicIPAddress": {
                "id": "[parameters('publicIPAddresses_externalid')]"
              },
              "subnet": {
                "id": "[concat(parameters('virtualNetworks__externalid'), '/subnets/AzureBastionSubnet')]"
              }
            }
          }
        ]
      },
      "type": "Microsoft.Network/bastionHosts"
    }
  ],
  "variables": {}
}
- The end result should look something like this.
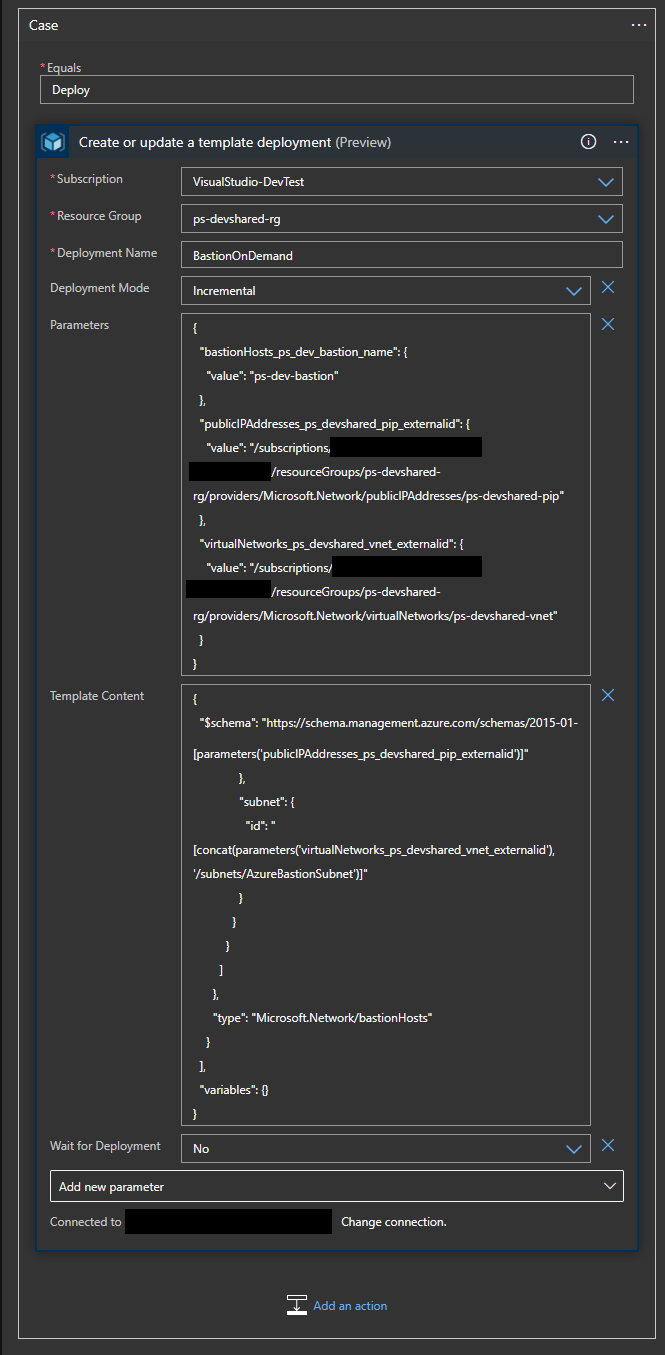
ARM Template Deployment Case
- Click on the "+" icon to create a second case for deleting the resource using HTTP trigger with different value now.
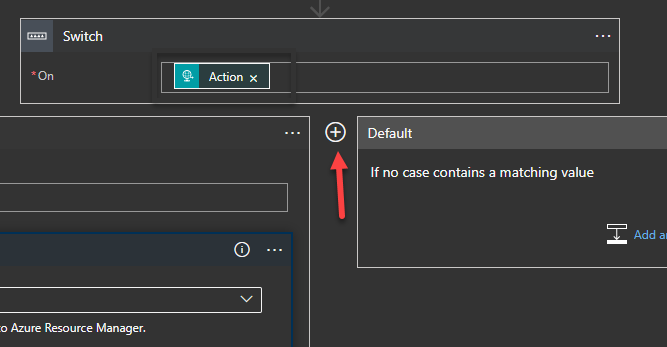
Creating new Case for Logic App
- Enter "Delete" in equals field and select "HTTP" as an action.
- On the following screen, use the "DELETE" as method and fill out the following URI. The URL includes the location of Bastion Host once deployed to identify the resource and trigger the removal. Replace the variables with correct Subscription ID, Resource group and name of Bastion Host that you chose in the last step during ARM deployment.
Delete Resource URI Endpoint
- Click "Add new parameter" and select "Authentication". Once selected, choose "Managed Identity" and "System Assigned Managed Identity" to authorize the resource removal. The end result should look something like this.
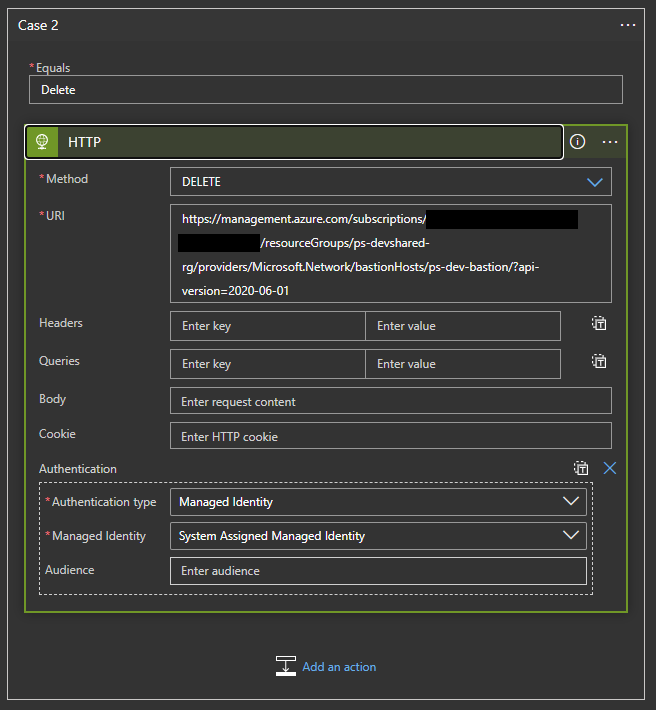
Creating Case for Deleting Bastion Host
Testing Logic App Workflow
Now that you have the Logic App setup, it's time to test the HTTP trigger. You need to use the URL that you get from the Step 3 of Creating the Logic App. You can use either cURL or PowerShell to test the logic app using the step mentioned below.
Trigger the Deployment using cURL
Run the following line in your terminal after replacing the RequestURL with the HTTP that you get from the Logic App. As you can see, the command pass Action: Deploy to the logic app as it's body, which triggers the resource build.
Replace the action value to Delete if you need to remove the resource after deployment.
cURL request to trigger Logic App
Trigger the Deployment using PowerShell
If you prefer using PowerShell, use the following commands to trigger the logic app. Be sure to change the RequestURL with your own Logic App HTTP trigger URL.
$headers = New-Object "System.Collections.Generic.Dictionary[[String],[String]]"
$headers.Add("Content-Type", "application/json")
$body = "{`"Action`":`"Deploy`"}"

$RequestURL = "Your URL Here"

$response = Invoke-RestMethod $RequestURL -Method 'POST' -Headers $headers -Body $body
Confirming Logic App Trigger Runs
Since you won't see any confirmation in the terminal itself, you can however refer to Logic App Run history to see the triggers. Navigate to your Logic App and you should be able to see the "Runs History" on the bottom of the screen with it's run status. You should refer to this to troubleshoot any failed runs by selecting any of the triggers and looking at the workflow.
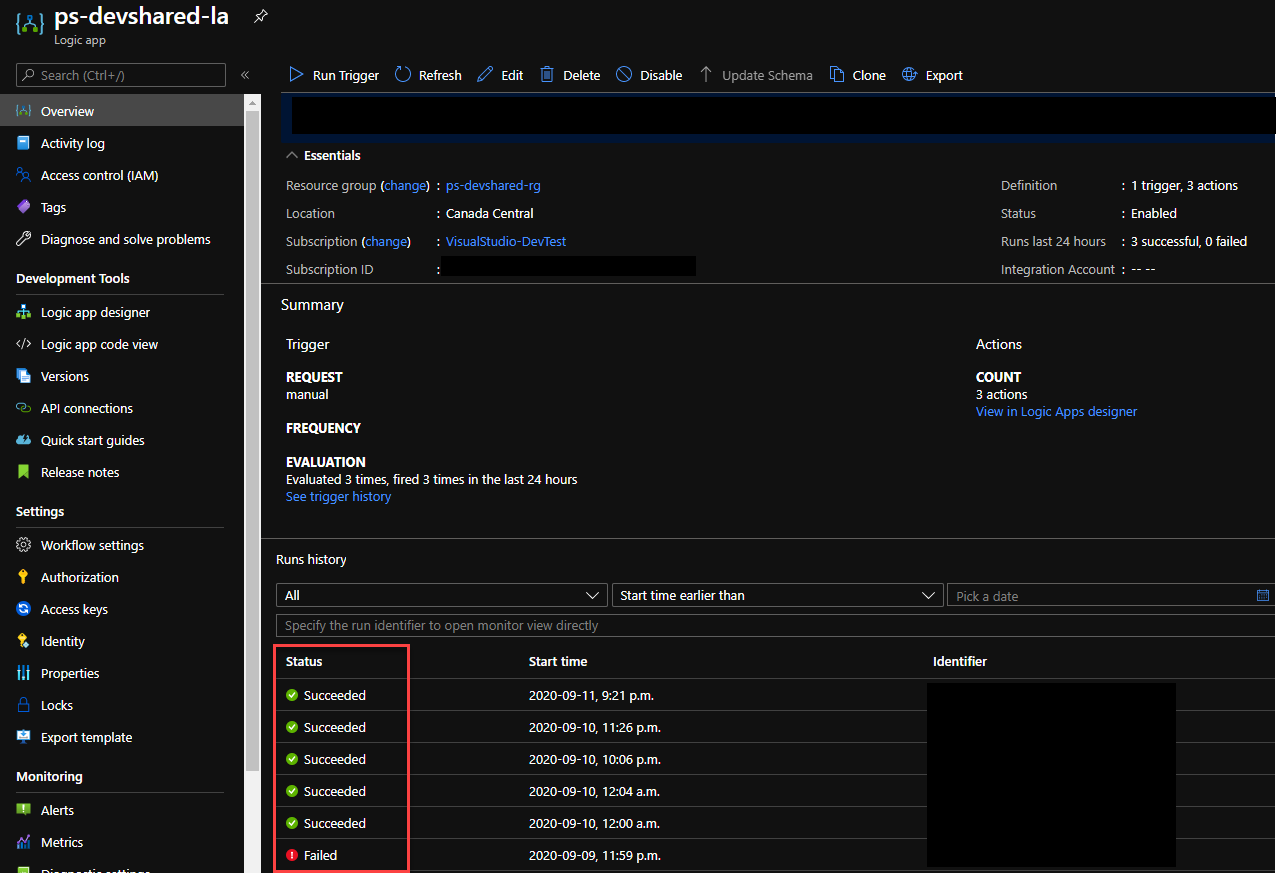
Logic App Runs History
As a successful trigger runs, you should be able to see the resource deployed and getting updated as shown in the screenshot below.
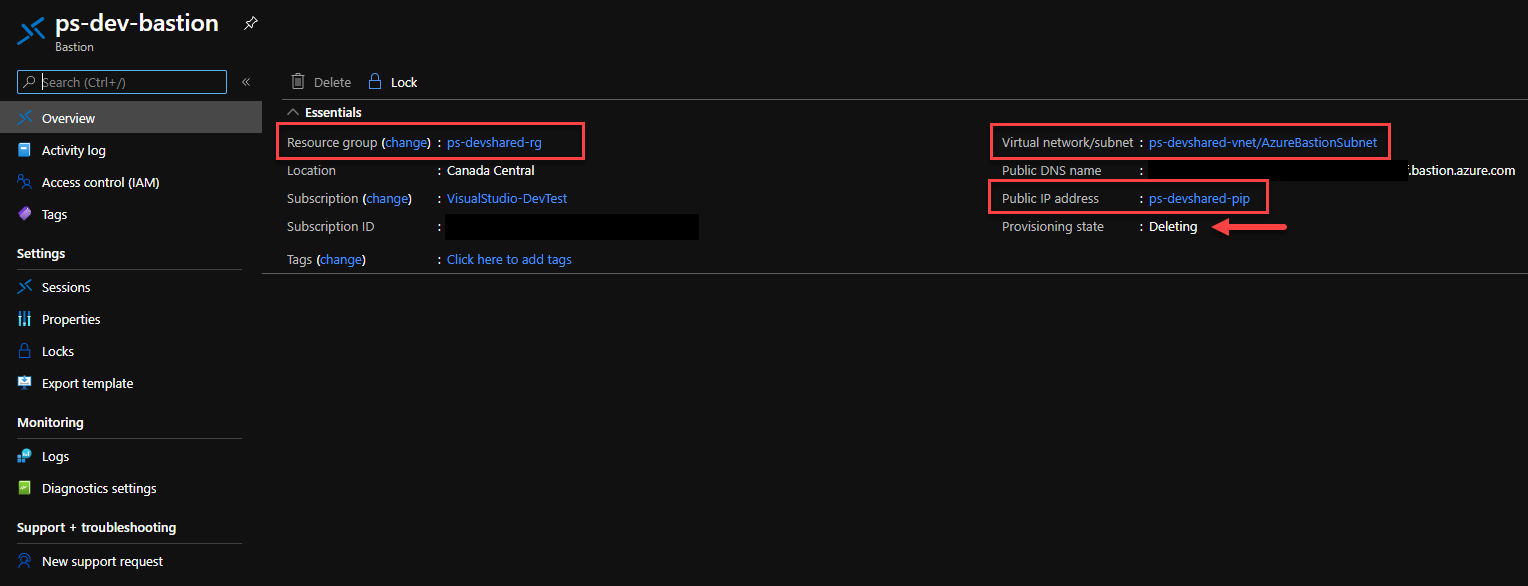
Bastion Host Status
Pricing Difference
I've pulled the monthly cost of Azure Bastion price using Azure Calculator. I've used 2 scenarios where you'd deploy Bastion and leave it running 24 hours and 7 days a week versus deploying bastion only during business hours.
| Resource Name | Price ( Running 24x7) | Price (Running (9-5)*5 Days) |
|---|---|---|
| Azure Bastion | CA$177.54 | CA$38.91 |
| Public IP | CA$4.67 | CA$4.67 |
| TOTAL | CA$182.21 | CA$43.58 |
As you can see that the price difference is nearly 4 times the amount you'd be paying otherwise by leaving the resource running 24 x 7.
Conclusion
Despite the fact that you have to work in browser session to access your VMs, I still think it's secure and easiest way to access your cloud resources just with single click without opening SSH and RDP Ports on individual VMs. You can drastically reduce the overhead of managing security groups for access policies or assigning public IPs to your VMs by using Bastion Service.
I hope you get some value out of this article. Please comment below for any queries.