PowerShell DSC in Azure: Zero to Hero
Configuration drift is one of the major problems that many organizations are struggling with and trying to ensure the systems stay compliant with the security policies all the time. After all, the more the count of users, the higher the likelihood of the configuration changes.
It is extremely important that you have configuration management to proactively deal with ongoing changes and implement auto-remediation actions rather than reacting to incidents. As the count of endpoints increases, it also gets challenging to manage and monitor all those systems.
In this article, we'll see how you can use PowerShell Desired State Configuration (DSC) Template in your cloud environment provisioned in any Public or Private Cloud to manage your infrastructure. It'd be ideal to have a little bit of understanding of the DSC Concept and basic knowledge of Cloud resources. The article focuses heavily on using Azure resources; however, you can deploy the DSC configuration to virtually any machine in AWS, GCP, or On-Premises environment.
What is DSC?
PowerShell DSC, in other words, called PowerShell Desired State Configuration (DSC), is well known for Infrastructure as Code (IaC) technology. It takes the help of PowerShell to configure and create MOF server files. WMI utilized it to provide config to any machine. In other words, PowerShell DSC uses PowerShell to configure your Windows-based computers programmatically. Furthermore, Desired State Configuration (DSC) can control the current state of resources that are applied to config to check the machine consistency. Along with monitoring, DSC can also automatically correct your system's configuration, so it's always in the state of desire.
Desired State Configuration (DSC) is an essential element of server, support, and administration Windows-based setup. It allows a PowerShell script to provide an explanatory model to effectively handle and manage device set up in a standard, direct way.
What is the Main Usage of PowerShell DSC
Desired State Configuration (DSC) enables you to use a configuration file and PowerShell to customize Windows and programs. As in most configuration management systems (e.g., Puppet or Ansible), the administrator may describe the appropriate configuration (target state) in the configuration file using the Intended State Configuration and then use PowerShell to add it to one or more computers/servers. You will significantly simplify the deployment and setup of servers and workstations with PowerShell Preferred State Configuration by configuring the OS as code.
How Does PowerShell DSC Works
DSC uses a specially crafted file format, "MOF," which contains all the information about the machine's configuration and any metadata associated with the configuration. PowerShell DSC converts PowerShell components into WMI MOF files to tailor a computer. There are two main strategies DSC could use to apply the config to a computer: push and pull.
DSC Push and Pull Techniques
Perhaps the most straightforward strategy, to begin with, is the Push approach. Such a method helps users invoke a cmdlet Start-DscConfiguration to push the configured server's desired config state. It has the bonus of beginning to implement the setup immediately. The downside of this strategy in automation is that the current ideal condition would not be applicable if the push server is down. That's where a safer solution would be to use the pull form.
The Pull approach goes out to the server and pulls down the required state structure, and adds it, as the name suggests. It requires that you have a Pull server that holds your server settings. The downside to this technique is the need for a different server to house the setup. To decide if there is a new MOF file available, the installed servers must then be configured to poll the pull server. Luckily, you'd not need to worry about building any Pull Server for this scenario, as we'll be using Azure Automation Account as the pull server.
The model suggests that we need to write the script how we might execute the stuff because the DSC is the declarative model indicates that it only explains what we need to do rather than how. E.g., the server's configuration to be joined to a particular domain, build a single local user and install the IIS features on the server.
What is Local Configuration Manager (LCM)
To manage the state of the different servers, the DSC uses an LCM generator. Thus, it is a bridge between the declared configuration and the remote computers (Automation Account in this case). Suppose the Pull mechanism is used, LCM periodically surveys the remote servers to verify if they are in the desired state unless the setup is called to render them in the desired state.
General DSC Command to Know
While working with Azure Automation Account as a pull server, you might not need to know all the associated DSC commands you would typically otherwise use. Here's a subset of commands you need to be familiar with while working with the Automation Account Pull Server.
Get-DSCResource
The Get-DSCResource shows you the available DSC resources and provides details about the providers around the usage along with sample syntax to help you write the DSC config file for the first time. You can run Get-DscResource to check the available DSC resources on the computer or follow the script below to find a sample syntax block to build the DSC template.
PS> Get-DscResource -Name `<Option Here>` -Syntax

#Example Output for "File"
File [String] #ResourceName
{
    DestinationPath = [string]
    [Attributes = [string[]]{ Archive | Hidden | ReadOnly | System }]
    [Checksum = [string]{ CreatedDate | ModifiedDate | SHA-1 | SHA-256 | SHA-512 }]
    [Contents = [string]]
    [Credential = [PSCredential]]
    [DependsOn = [string[]]]
    [Ensure = [string]{ Absent | Present }]
    [Force = [bool]]
    [MatchSource = [bool]]
    [PsDscRunAsCredential = [PSCredential]]
    [Recurse = [bool]]
    [SourcePath = [string]]
    [Type = [string]{ Directory | File }]
}
Get-DSCConfiguration
The Get-DscConfiguration command gets the configuration of a given node along with the details. Be sure to use an elevated PowerShell session when running the command. Below is a sample query along with the output showing some of the DSC-defined configurations.
PS> Get-DscConfiguration
#OUTPUT
ConfigurationName    : ISVBoxConfig
DependsOn            :
ModuleName           : cChoco
ModuleVersion        : 2.4.1.0
PsDscRunAsCredential :
ResourceId           : [cChocoPackageInstaller]7zip.install
SourceInfo           :
AutoUpgrade          :
chocoParams          :
Ensure               :
Name                 : 7zip.install
Params               :
Source               : <https://chocolatey.org/api/v2>
Version              : 19.0
PSComputerName       :
CimClassName         : cChocoPackageInstall
Get-DSCConfigurationStatus
The Get-DscConfigurationStatus queries the local configuration status of the machine. You can refer to this command to check the Pull Mode of the DSC and Status to confirm if the node is registered successfully along with the Date and Time of node registration.
PS> Get-DscConfigurationStatus

Status     StartDate                 Type            Mode  RebootRequested      NumberOfResources
------ --------- ---- ---- --------------- -----------------
Success    1/20/2021 11:15:11 PM     Consistency     Pull  False                4
Get-DSCLocalConfigurationManager
The Get-DscLocalConfigurationManager gets the local configuration, meta-data, and state of the node. You can also use this command to validate the endpoint or pull server details.
PS> Get-DscLocalConfigurationManager

ActionAfterReboot              : ContinueConfiguration
AgentId                        : 78C9D815xxxxxxD819385
AllowModuleOverWrite           : True
CertificateID                  :
ConfigurationDownloadManagers  : {[ConfigurationRepositoryWeb]AzureAutomationStateConfiguration}
ConfigurationID                :
ConfigurationMode              : ApplyAndAutoCorrect
ConfigurationModeFrequencyMins : 15
Credential                     :
DebugMode                      : {NONE}
DownloadManagerCustomData      :
DownloadManagerName            :
LCMCompatibleVersions          : {1.0, 2.0}
LCMState                       : Idle
LCMStateDetail                 :
LCMVersion                     : 2.0
StatusRetentionTimeInDays      : 10
SignatureValidationPolicy      : NONE
SignatureValidations           : {}
MaximumDownloadSizeMB          : 500
PartialConfigurations          :
RebootNodeIfNeeded             : False
RefreshFrequencyMins           : 30
RefreshMode                    : Pull
ReportManagers                 : {[ReportServerWeb]AzureAutomationStateConfiguration}
ResourceModuleManagers         : {[ResourceRepositoryWeb]AzureAutomationStateConfiguration}
PSComputerName                 :
Update-DSCConfiguration
You'll use this command to initiate a connection to the remote server. In this case, Automation Account, to pull the state configuration file and apply changes, if any. Below is a sample output of the results you see when a node is registered already.
PS> Update-DscConfiguration

Id     Name    PSJobTypeName   State   HasMoreData  Location       Command
-- ---- ------------- ----- ----------- -------- -------
8      Job8     Configuratio... Running   True      localhost  Update-DscConfiguration
PowerShell DSC High-Level View
So, you might be wondering how does the DSC code look like. As you discussed that, we need to define the steps in the declarative formation; we'll refer to the code snippet below as an example for now. Also, refer to the diagram below to get a visual representation of the DSC application workflow.
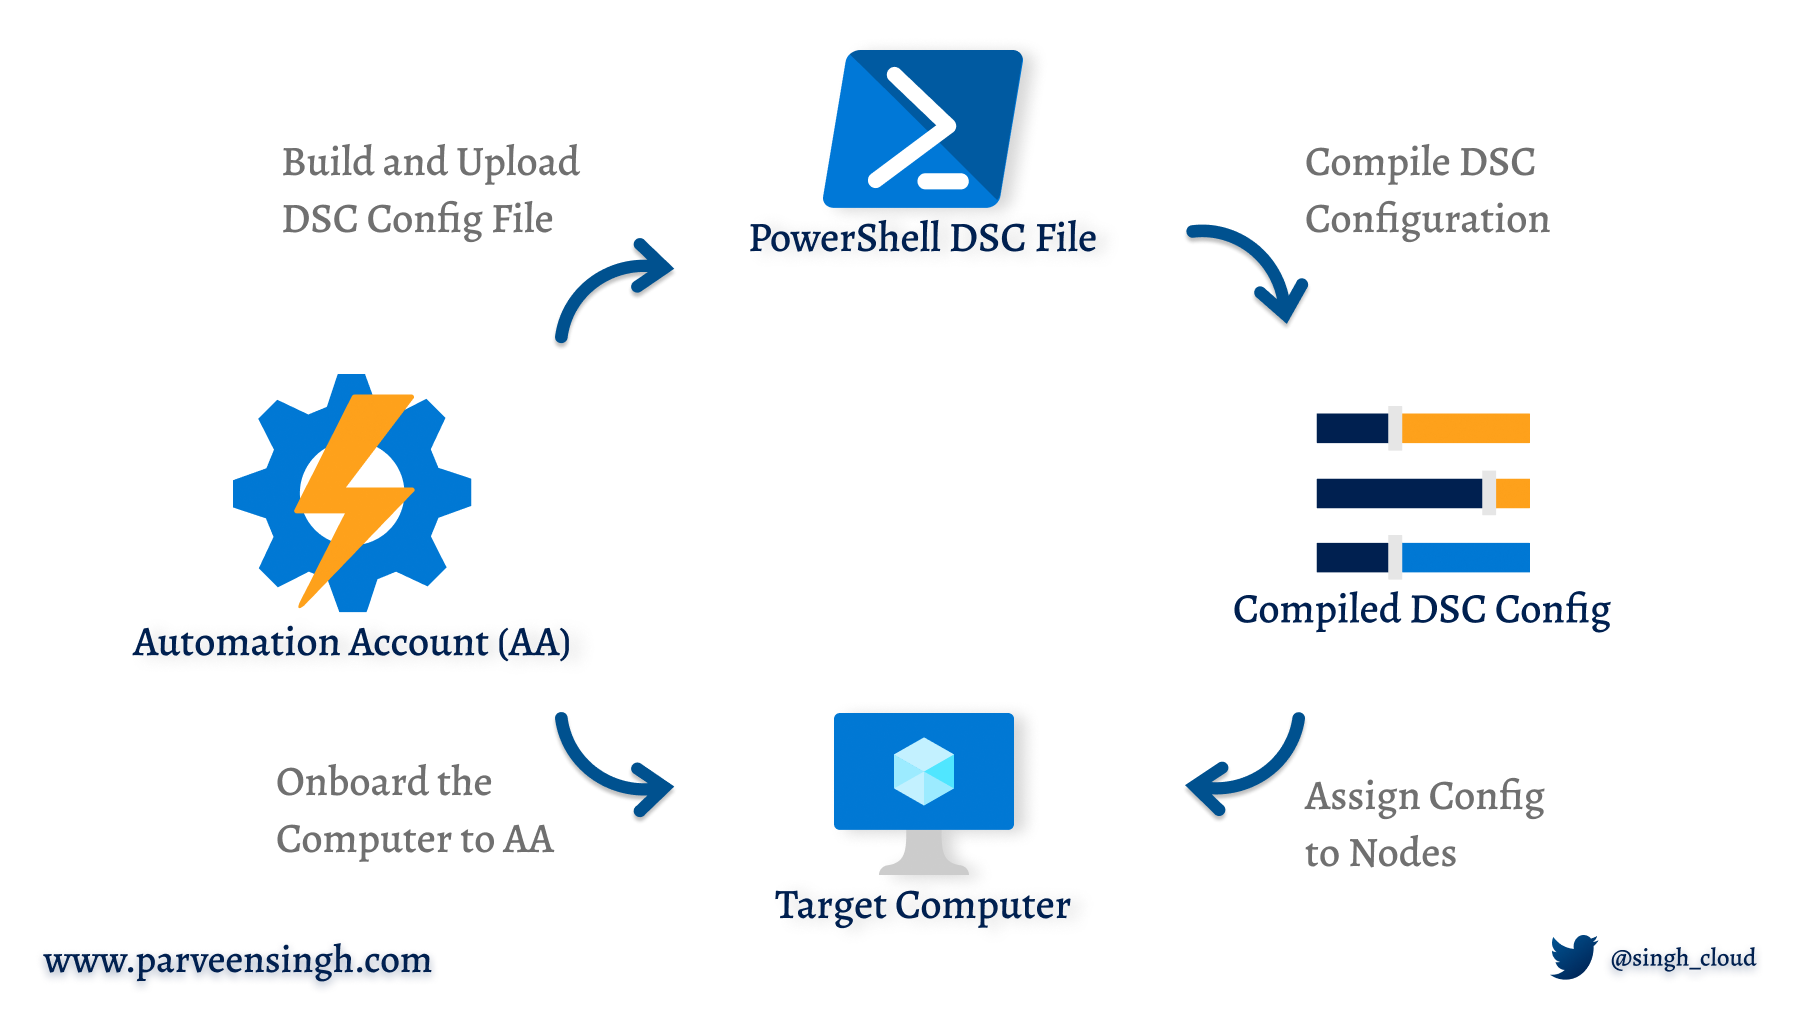
DSC Workflow High-Level Overview
The snippet starts with a Configuration block, which is one of the desired state definition blocks. You can have multiple configuration sections in one script based on your environment needs for server and workstations.
As you go to the second line, you define the target nodes for the configuration. Node is referred to the VM Name or Computer name that you wish to target. You can either specify the exact hostname or use [localhost] to trigger deployment across multiple systems.
The third component inside the Node defines all the desired state configuration items. In this case, we validate the WinRM Service on the machine and set its StartupType to Automation, and also create a file called Config.html inside the folder C:\\IIS. If you look at the source, we fetch the file from a local network path; making sure the network path is accessible to the machine to access and pull the files.
Configuration MyDSCConfig{
	Node ("Test1-Win2k12","Test1-Win2k16"){
		Service WinRMStatus{
			Name = 'WINRM'
			State = 'Running'
			StartupType = 'Automatic'
		}

	File IISFile{
		Type = 'File'
		DestinationPath = 'C:\\IIS\\Config.html'
		SourcePath = '\\\\addc\\shared\\Config.html'
		Ensure = 'Present'
		Force = $true
		}
	}
}
Local Environment Setup for DSC Configuration Build
This post is intended for those who are new to DSC, so we will use a simpler pull process to get started. In our case, you need to ensure that you have a testing machine to validate and build out the DSC script files. Since the code is written in PowerShell, the configuration file will be a .ps1 extension.
For the sake of demonstration, we'll use Chocolatey as the DSC resource and install two applications using the DSC script on the nodes. Chocolatey is one of the popular Windows Package Manager which is relatively easy to pick up and get started with. You can find the resources to install and test Chocolatey here.
If you are not familiar with Chocolatey, check out the article below:
Getting Started with Chocolatey Package Manager
Script Configuration
For DSC, to describe the configuration, we use the Configuration keyword. In this case, the component we are setting up is ChocoPackage using the DSC Resource called cChoco. Reference URLs are HERE and HERE. You will see that two instances of the cChocoPackageInstaller component are described separately, one for each application we want to configure. Each configured instance requires its unique name, as when translating to a MOF file, the name is used as a key. Each component that you configure has an Ensure property that can be set to either Present or Absent. If you want the configuration to stay on the machine as it is, enter Current. If you do not want the computer to have a role, you state Absent.
Configuration ServerSetup
{
    Import-DscResource -ModuleName cChoco

    Node 'localhost' {
        cChocoInstaller installChoco
        {
            InstallDir = 'C:\\choco'
        }

        cChocoPackageInstaller 7zip.install
        {
        Name     = '7zip.install'
        Ensure   = 'Present'
        Version  = '19.0'
        Source   = '<https://chocolatey.org/api/v2>'
        }

        cChocoPackageInstaller notepadplusplus.install
        {
        Name     = 'notepadplusplus.install'
        Ensure   = 'Present'
        Version  = '7.9.2'
        Source   = '<https://chocolatey.org/api/v2>'
        }
    }
}
Once you build the Configuration block, call the Configuration by the name and pass on the OutputPath so that DSC knows where to store the MOF file. We call the Start-DscConfiguration cmdlet after the DSC File compiles. Configuration file expects the path of the mof file to publish the configuration on the local node.
DSC Build Local
If you are looking for a reference specific to the cChoco installer, use this URL to see the choco package offerings. Navigate to the desired package and select "Organization" from the top menu, followed by the deployment method of "PS DSC".
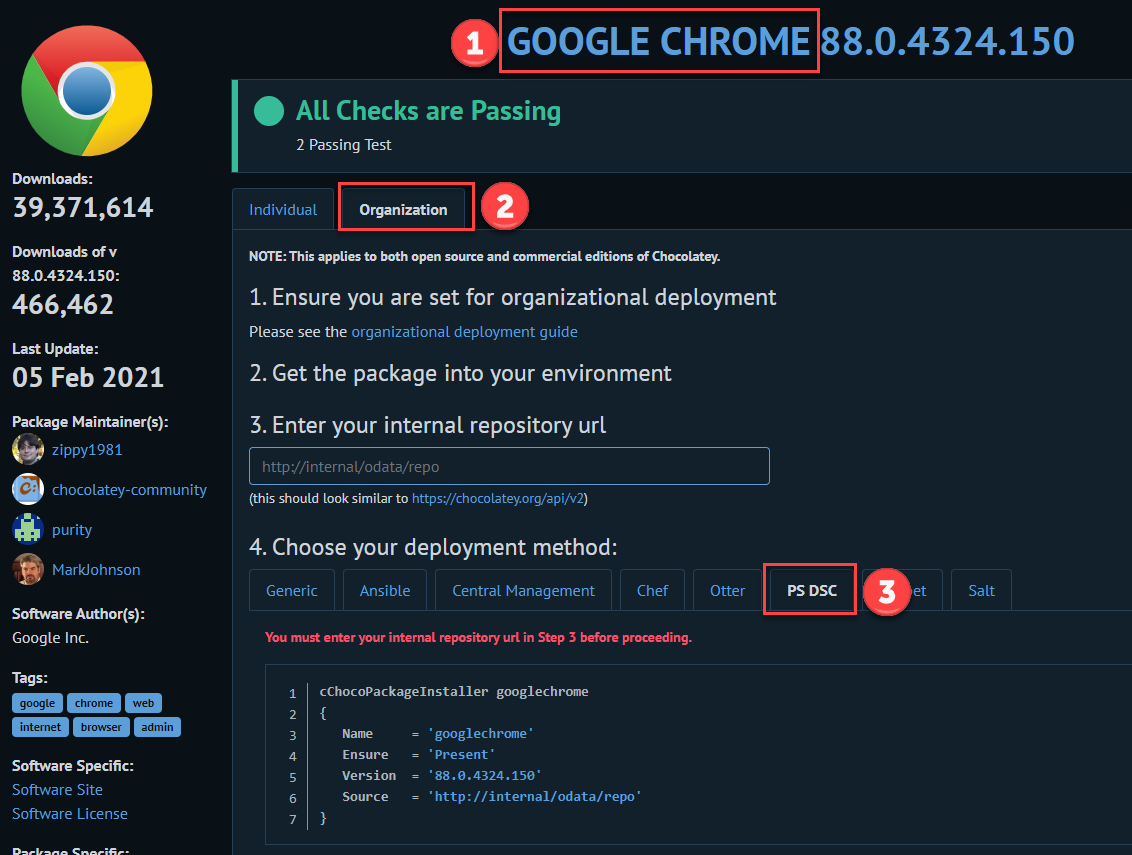
Chrome Chocolatey Install Steps
If you face any issue related to "CimMethod" or "WinRM," be sure to enable the WinRM Services for your computer by running
Start-Service WimRM. If the configuration complaints about consistency check, use-Forcealong with your Start-DscConfiguration command to force the configuration while testing. This is expected as ideally the machines would be set toPullinstead ofPushrefresh mode.
You can see the screenshot below showing the system pulling the chocolatey package and performing the installation. This completes our DSC Template build. You can upgrade and add more components after testing it locally before pushing the template to Automation Account for deployment.

Chocolatey Configuration Screenshot
Provision an Azure Automation Account
Since we are using Azure Automation Account as the pull server, you'd need to deploy an automation account to onboard the nodes and process the configuration files. Use the following steps to create a new automation account using Azure Portal or PowerShell.
Using PowerShell to Provision Automation Account
Use the PowerShell command below while logged into your Azure PowerShell session or using the Cloud Shell in Azure. Be sure to change the variable names for the Account name, Resource Group name, and deployment location.
$ResourceGroupName = "RG01"
$Location = "East US"
$AutomationAccName = "DemoAA"

# Create a Resource Group
New-AzResourceGroup -Name $ResourceGroupName -Location $Location

# Create Automation Account
New-AzAutomationAccount -Name $AutomationAccName -Location $Location -ResourceGroupName $ResourceGroupName
Using Azure Portal to Provision Automation Account
If you prefer using Azure Portal instead, follow the steps below to create a new Automation Account.
- Navigate to Azure Portal and login to your account.
- Search for the Automation Account using top search bar.
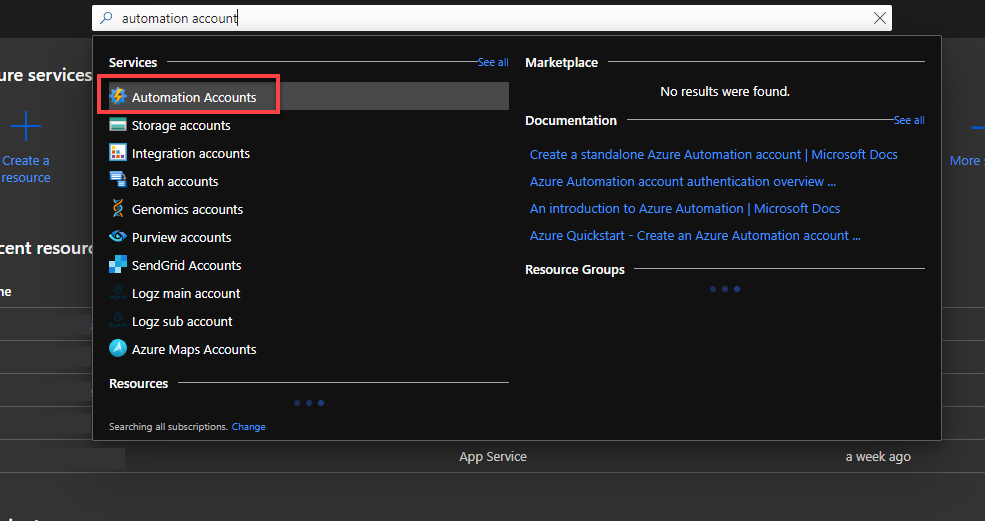
Search Automation Account
- Click New to provision a new Automation Account resource.
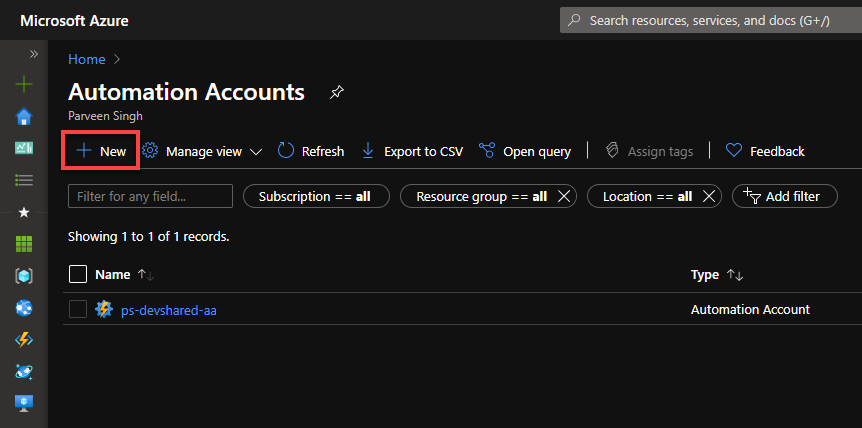
New Automation Account Resource
- Fill out the information about your resource name and location. Select Yes on the Run as Account options and finish the resource creation.
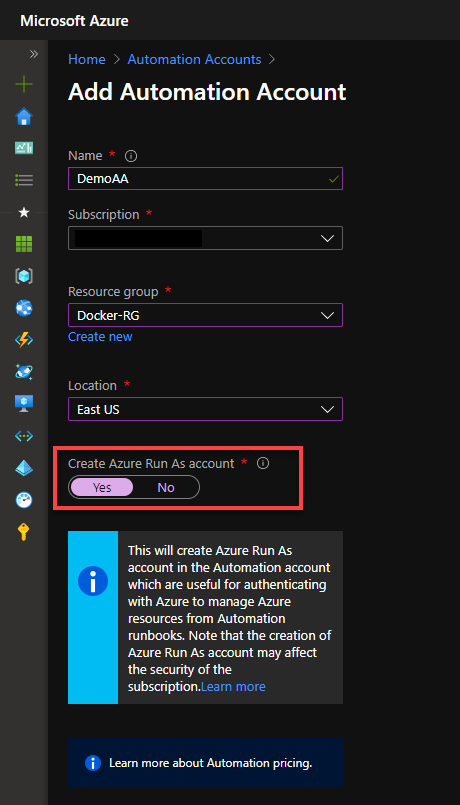
Creating Automation Account
DSC Module Registration in Automation Account
This step is subjective to the modules that you use in your script. Since the Automation account is working as a pull server, the server needs to register the modules on its own environment before it's usable for the nodes. The way Automation Account keeps the inventory of the installed modules is using its Modules Library under the Shared Resource option in the portal.
Press Browse Gallery to search from available resources that you used in your script to use during runtime for your DSC template. In this case, install cChoco modules.
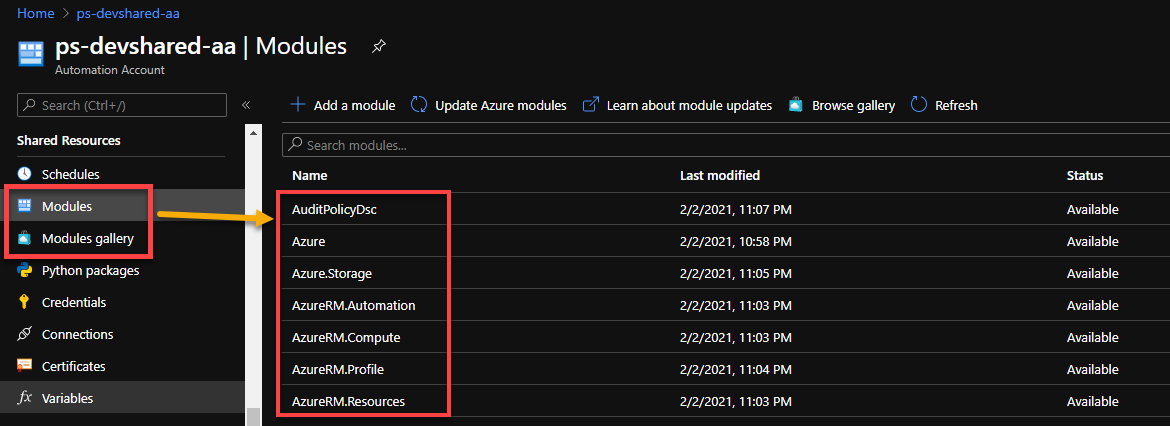
Automation Account Modules Import
Join Azure VM as Nodes to Azure Automation DSC
Joining Azure VMs to Automation Account is relatively simple and painless. If you are provisioning the new VMs, you can choose to use Custom ARM Templates with VM Extension that onboards the VM. If you are looking to onboard existing VMs, you can achieve the same results using the Azure Portal. Follow the steps below to onboard the Azure VMs:
- Navigate to Azure Portal and your Automation Account that was created earlier.
- Click on the State Configuration (DSC) option from the left menu and select +Add
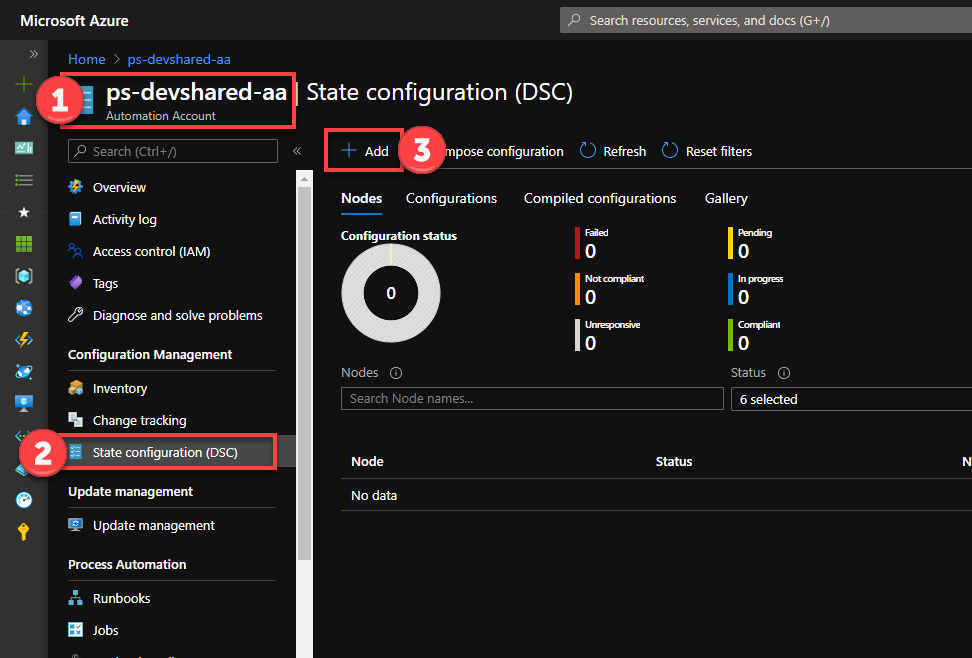
Azure VM Onboarding Steps
- Click on the VMs you wish to onboard and press Connect to join.
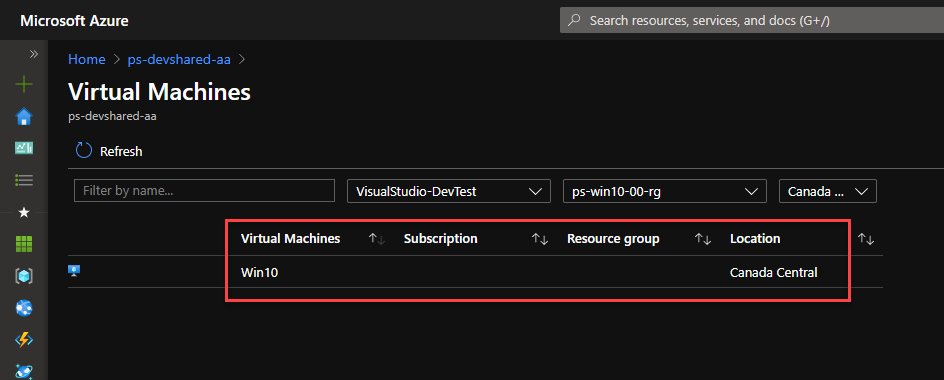
Azure VM Onboarding Steps
Register Non-Azure VM as a Node in Automation Account
Now that you've tested the DSC configuration on the local computer, you can now register your VMs to Azure Automation Account. There are two ways to achieve this: (a) Using Az Module to pull the automation account MetaConfig file or (b) using Automation Account registration URL and Registration Key to build the MetaConfig yourself without interacting with Az PowerShell. we'll work on the first option of onboarding using two methods for now.
Run the following commands in an elevated PowerShell session to install Azure Module in this case.
Installing Azure PowerShell Module
Register a Node using Azure PowerShell Module
Before you run the script, download the Az PowerShell module using the following commands that ensure you can log in to Azure using PowerShell and pull the configuration from the automation account.
Before running the script, be sure to change the Resource Group Name and the Automation Account Name associated with your account.
$ResourceGroup = "NameYouRGHere"
$AutomationAccount = "NameYourAAHere"
$OutputFolderString = $PWD

$Params = @{
    ResourceGroupName = $ResourceGroup;
    AutomationAccountName = $AutomationAccount;
    ComputerName = @('localhost');
    OutputFolder = $OutputFolderString;
}
Connect-AzAccount
Get-AzAutomationDscOnboardingMetaconfig @Params -Force

#Optionally Turn on the WinRM if you face any issue while onboarding
#Start-Service WinRM
Set-DscLocalConfigurationManager -Path "$OutputFolderString\\DSCMetaConfigs"
#Stop-Service WinRM
As you can see that this works fine for few computers but get's out of control when you are looking to onboard 100s of nodes to the same automation account. The next section will show you a better way to use a custom template and build the template to publish via GPO.
Register Multiple Nodes using AD Group Policy
If you opted to do the onboarding without using Az module and dealing with the login process to pull the MetaConfig information, you can use a custom script to register the node over the internet without having to log in to the Azure portal.
Use the same file as above but this time you'll need to add a line at the end that converts the mof file to base64 encoded string.
$ResourceGroup = "NameYouRGHere"
$AutomationAccount = "NameYourAAHere"
$OutputFolderString = $PWD

$Params = @{
    ResourceGroupName = $ResourceGroup;
    AutomationAccountName = $AutomationAccount;
    ComputerName = @('localhost');
    OutputFolder = $OutputFolderString;
}
Connect-AzAccount
Get-AzAutomationDscOnboardingMetaconfig @Params -Force

$ByteArray =
[System.IO.File]::ReadAllBytes(".\\DscMetaConfigs\\localhost.meta.mof")
[System.Convert]::ToBase64String($ByteArray) | Out-File "$OutputFolderString\\DscMetaConfigs\\localhost.meta.mof.base64";
The idea of using Base64 code is so that you can use the base64 encoded value in the GPO startup script when pulling in the server automatically inside your AD environment.
In order to register the node, you can either set up a Startup Script for the computers that will run the script to onboard the machines or follow any method that you prefer for one-time onboarding. While onboarding multiple computers, you can use the same Base64 value in the script below to onboard the devices as a node in Automation Account.
$Base64 = 'COPY-THE-BASE64-FROM-PREVIOUS-SCRIPT'
$OutputPath = "$env:Temp\\DscMetaConfigs"

New-Item -Path $OutputPath -ItemType Directory -Force

$ByteArray = [System.Convert]::FromBase64String($Base64)
Set-Content -Path "$OutputPath\\localhost.meta.mof" -Value $ByteArray -Encoding Byte -Force

Set-DscLocalConfigurationManager -Path $OutputPath -Verbose
Here's an example screenshot of what you will see after a successful onboarding.
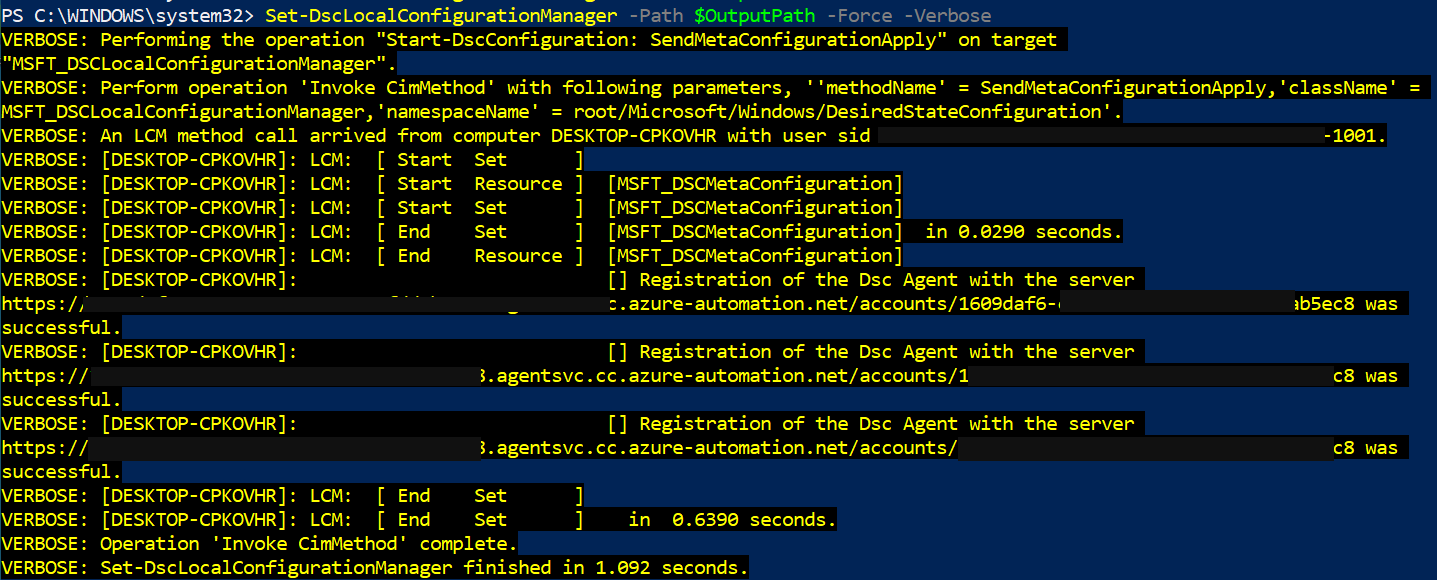
GPO Onboarding Sample Output
Validating Node Enrollment under Automation Account
Once you go through the enrollment process, you also want to make sure the computer is registered properly. You can either look up the VM under your Azure Automation Account or run the following script on the host machine to verify the DSC Status. The following output confirms that the node's local configuration is in place for the automation account.
PS> Get-DscLocalConfigurationManager

#OUTPUT
ActionAfterReboot              : ContinueConfiguration
AgentId                        : 9D1xxxxxx19385
AllowModuleOverWrite           : False
CertificateID                  :
***ConfigurationDownloadManagers  : {[ConfigurationRepositoryWeb]AzureAutomationDSC}***
ConfigurationID                :
ConfigurationMode              : ApplyAndMonitor
ConfigurationModeFrequencyMins : 15
Credential                     :
DebugMode                      : {NONE}
DownloadManagerCustomData      :
DownloadManagerName            :
LCMCompatibleVersions          : {1.0, 2.0}
LCMState                       : Idle
LCMStateDetail                 :
LCMVersion                     : 2.0
StatusRetentionTimeInDays      : 10
SignatureValidationPolicy      : NONE
SignatureValidations           : {}
MaximumDownloadSizeMB          : 500
PartialConfigurations          :
RebootNodeIfNeeded             : False
RefreshFrequencyMins           : 30
RefreshMode                    : Pull
ReportManagers                 : {[ReportServerWeb]AzureAutomationDSC}
ResourceModuleManagers         : {[ResourceRepositoryWeb]AzureAutomationDSC}
PSComputerName                 :
You should be able to confirm the same setting on the Azure side under the Automation Account Resource.
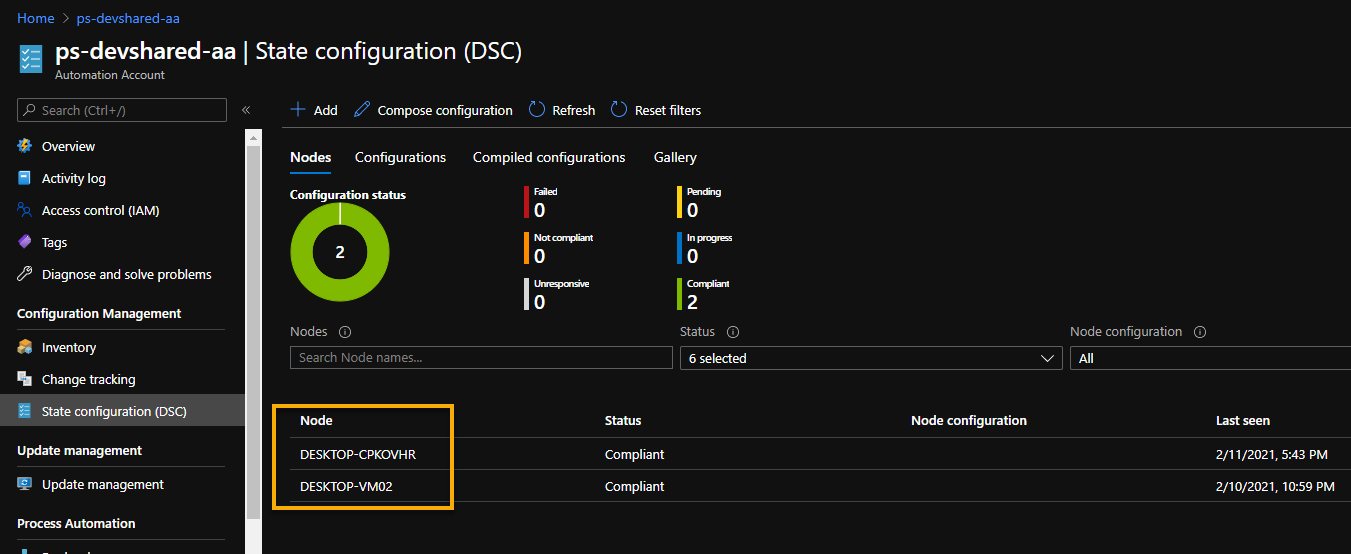
Validation Node Onboarding from Azure Portal
Importing DSC Configuration File
As you have come this far, your nodes should be registered at this point. The last step is to upload your configuration and apply it to the nodes for state management.
- Follow the steps below to complete the DSC Configuration:
- Navigate to your Azure Portal and then Automation Account resources that you are using.
- Under the State Configuration option, navigate to Configuration submenu.
- Click +Add to add a new configuration.
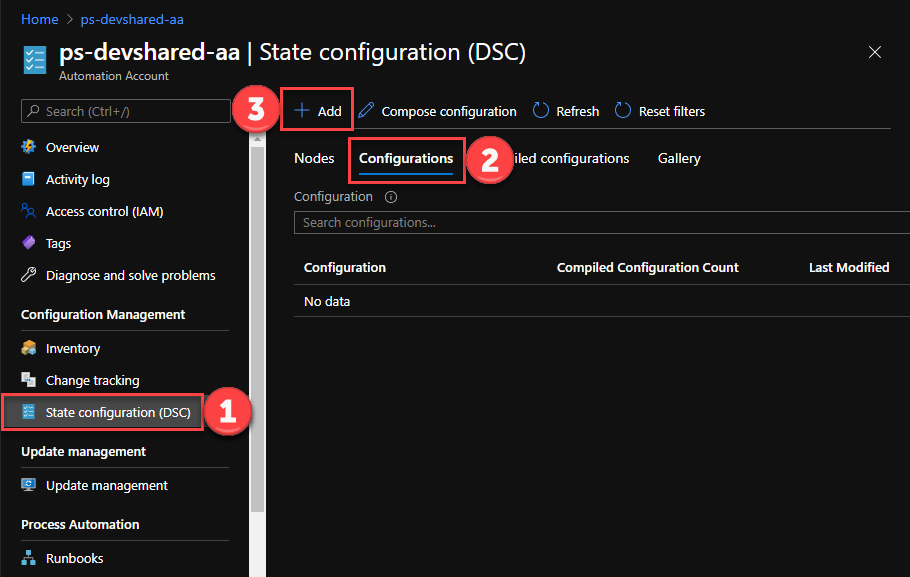
DSC Configuration Upload
- Upload the configuration file that you prepared earlier for DSC resources.
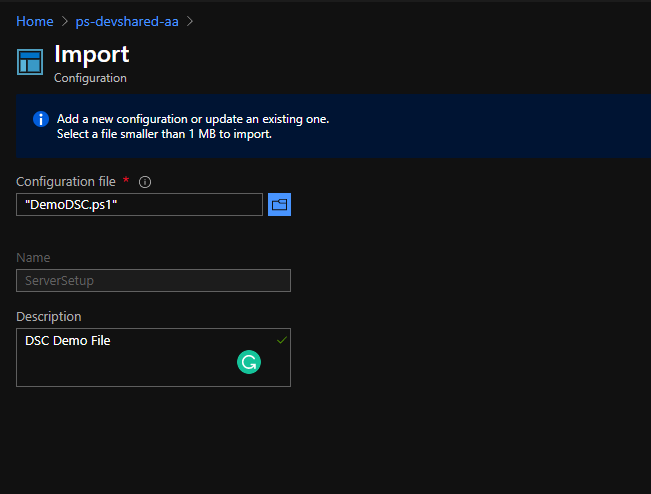
DSC Configuration Import
Compiling and Assigning DSC Configuration File
Once the import process is complete, select the configuration name from the list of configurations.
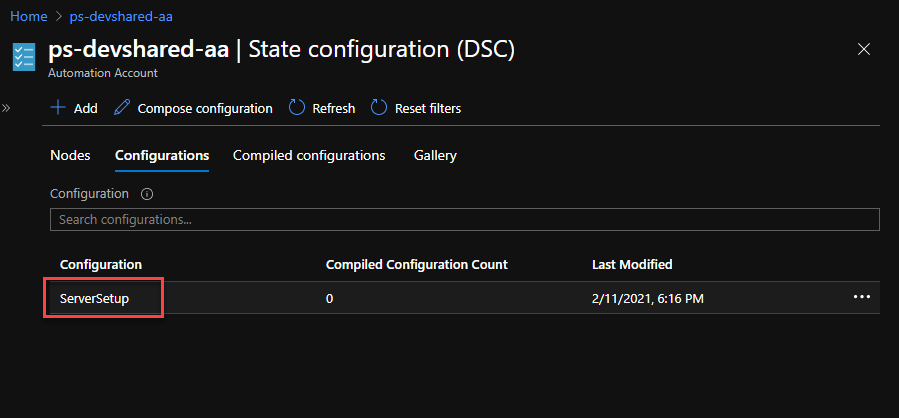
DSC Configuration Compilation Process
- Click Compile and wait for the process to trigger the compilation. The status of compilation should change to Queued and eventually to Completed once it is complete.
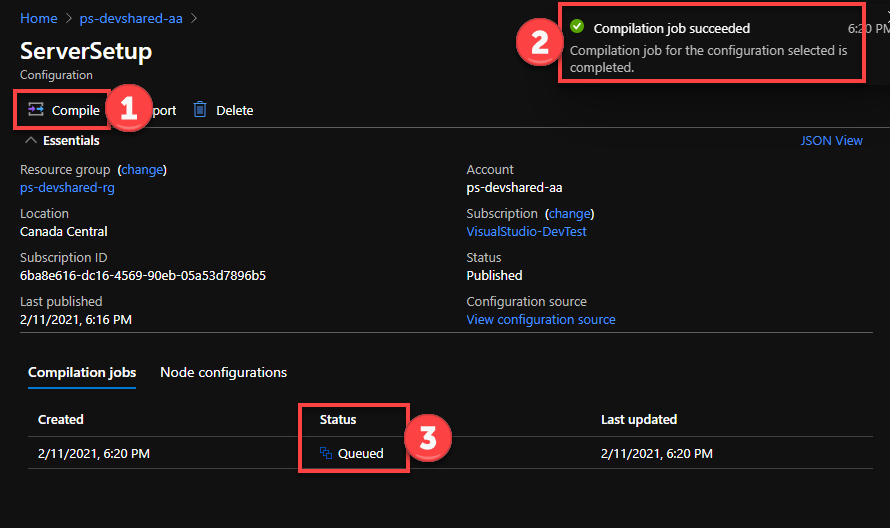
DSC Compile Check
- Once the compilation job is complete, navigate back to the VM View under the Configuration Management option. Click through the VMs and select "Assign Node configuration" to assign the policy to the nodes.
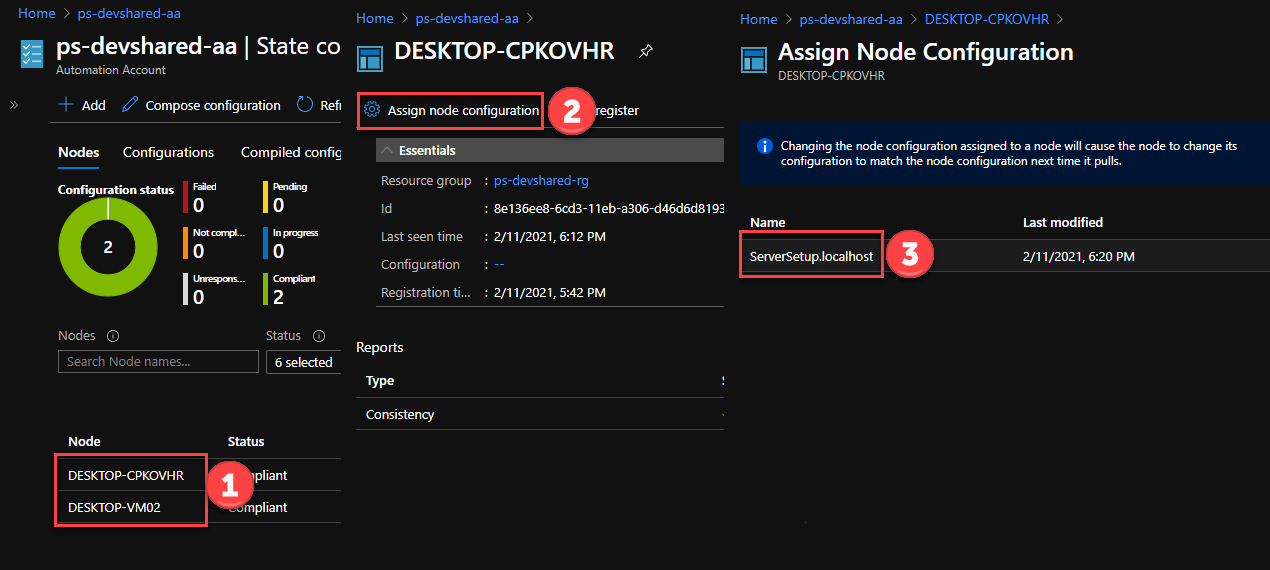
DSC Node Assignment
At this point, wait and watch for the application to install automatically on the machines that you have registered as nodes.
Automation Account Cost Analysis
The cost of using an Automation Account for Configuration Management varies based on the workloads you onboard.
- If you are using Azure VM, you can use the DSC management service for FREE. There's no cost associated with it.
- If you are onboarding non-azure VMs, you get up to 5 Free nodes/month and pay $6/node/month as per Microsoft's Official Pricing structure.
Certificate Expiration and Re-Registration
Whenever a node onboards to the Automation Account, it gets its own certificate, which is valid only for one year. Currently, Azure Automation doesn't support automatic certification renewal. You'd need to re-register the nodes to Automation Account before expiry so that they are not unresponsive if the certificate expires. The process to re-register is by doing the enrollment again for the nodes.
Conclusion
I hope that helps you get on board with Azure Automation Account and PowerShell DSC. The combination is compelling due to very little maintenance and management of the pull server and all the nuances that come with it.