
How to Install Azure CLI: A Complete Guide

Azure CLI provided by Microsoft is a cross-platform command-line tool for managing Azure resources and automating cloud resource deployment. The tool enables you to query, create and manage the cloud resources using the terminal.
Azure CLI is supported across multiple operating systems, including Windows, macOS, Linux, and most recently, on a web browser. In this article, you'll see how you can install the CLI tool and get started, and automate the management of your cloud environment.
Prerequisites
There are no prerequisites for this article; however, it's good to have an active Azure Subscription to deploy resources to use Cloud Shell.
Using Azure Cloud Shell in Azure Portal
If you need to use the Azure CLI commands for temporary or interim access, you can use Azure Cloud Shell, which comes pre-installed with fully functional Azure CLI commands and other relevant tools necessary to run the queries.
To access the Cloud Shell for your account, follow the steps below:
- Log in to your Azure Account with a valid subscription. (https://portal.azure.com)
- Navigate to shell.azure.com that opens the browser session for the Azure Cloud Shell in a separate tab. This gives you an entire webpage dedicated to Cloud Shell instead of opening a partial window with Azure Portal GUI view.
- If it's your first time logging on to Cloud Shell, select Bash as your default shell:
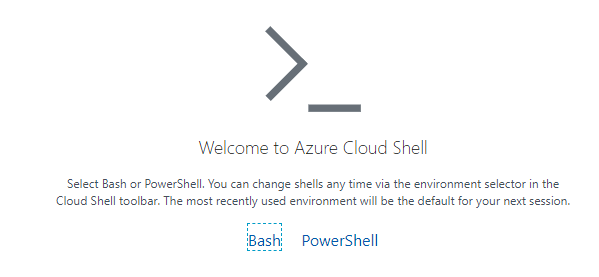
Cloud Shell Terminal Selection
- Choose the subscription you want to use to store the cloud shell session profile. If you already have a storage account that you would like to use instead, choose Show advanced settings to point to the current storage account resource.

Cloud Shell Storage
- Fill out the dropdown by selecting the location of your current storage account and the resource group. Enter cloudshell as the new File Share name to create a file share container at your designated location.

Cloud Shell File Share
- Click Create storage to finish the storage mount process.
- Once the storage is ready, cloud shell will spawn and prompt a bash terminal for usage as shown below:

Cloud Shell Azure CLI Version
- Run
az --versionto validate the module's installation from the terminal.
Installing Azure CLI on Windows
The Azure CLI for Windows offers multiple different ways of installation. Regardless of which option you prefer to choose, you get the ability to query and run CLI commands using PowerShell and Command Prompt(CMD) for resource management.
Installing Python for Windows
Since Azure CLI is written in Python, it needs a python interpreter to execute the commands.
Use the link below to download the latest Python executable and install it on your windows machine. Be sure to Add Python to PATH while installing the application:
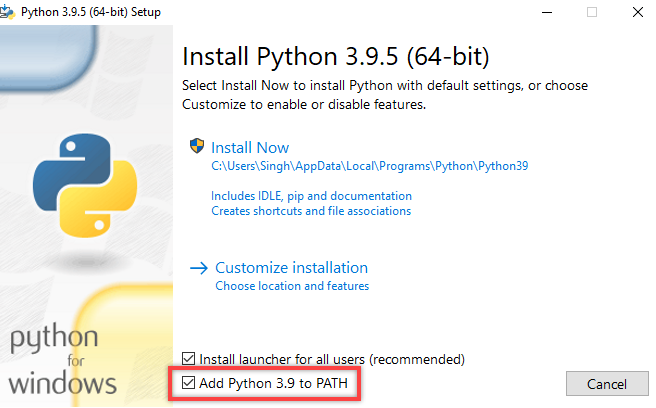
Python Installation Path
Installing Azure CLI using MSI GUI Installer
If you are comfortable with the traditional way of installing the software using an executable package, you can use the MSI installer for Azure CLI to install the modules.
- Use the following URL to download the latest CLI installer: Download Azure CLI
- Run the installer, accept the terms in the License Agreement using the checkbox, and click Install:
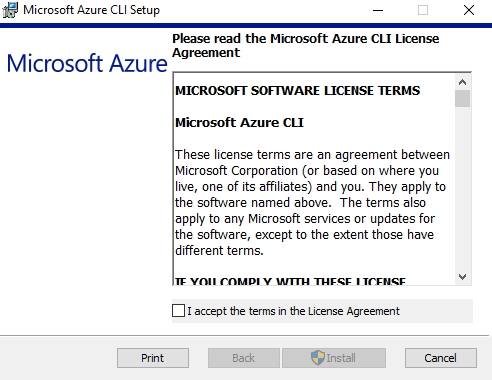
Azure CLI MSI Installation
- Once the installation is complete, go to the Start Menu and search for powershell and click Open:

PowerShell Start Menu
- Type
az --versionand press Enter. The version number and the relevant information confirms that the Azure CLI is installed:

PowerShell Azure CLI Results
Installing Azure CLI using MSI Installer with PowerShell
If you chose to use PowerShell command instead, follow the steps below to install the Azure CLI using PowerShell command:
- Go to the Windows Search bar and enter powershell.
- This time, click on Run as administrator when opening the PowerShell:

PowerShell Admin Mode Launch
-
Paste the following command in the PowerShell terminal:
Invoke-WebRequest -Uri <https://aka.ms/installazurecliwindows> -OutFile .\\AzureCLI.msi; Start-Process msiexec.exe -Wait -ArgumentList '/I AzureCLI.msi /quiet'; rm .\\AzureCLI.msi -
The command above will download and install the latest version of the Azure CLI. If you already have a version installed, the installer will update the existing version.
-
After the installation is complete, reopen the PowerShell and run the
az --versioncommand to validate the Azure CLI installation.
PowerShell Azure CLI Output
Installing Azure CLI using Chocolatey
The popular Windows Package Manager, Chocolatey, also supports the installation of the Azure CLI module. So whether you are trying to incorporate the installation into your image baseline code or distributing the package to multiple endpoints, you can do so using the choco commands.
Follow the steps below to install Azure CLI using Chocolatey:
- If you don't have chocolatey installed already, run the following script in an elevated (Administrator) PowerShell session to install the tool on your Windows machine:
Set-ExecutionPolicy Bypass -Scope Process -Force; [System.Net.ServicePointManager]::SecurityProtocol = [System.Net.ServicePointManager]::SecurityProtocol -bor 3072; iex ((New-Object System.Net.WebClient).DownloadString('<https://chocolatey.org/install.ps1>'))
Chocolatey Install
- Once installed, reopen the PowerShell in Admin mode and run the following command to install the Azure CLI package:
choco install azure-cli - Confirm the installation by typing Y:
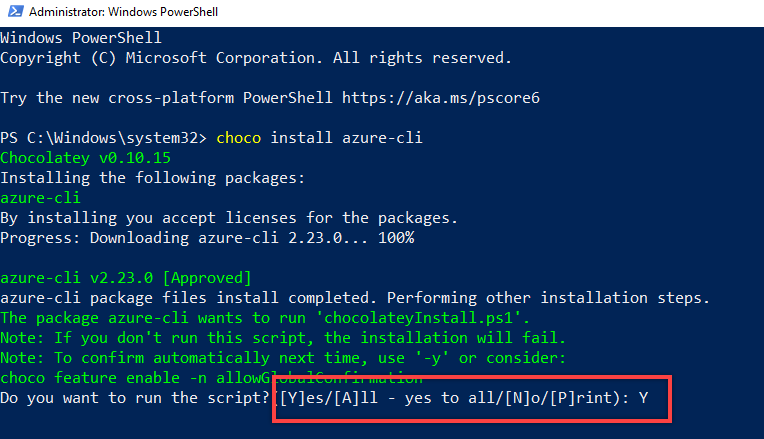
Chocolatey CLI Package Install
- Once the installation is complete, the output confirms the installation of the CLI module. At this point, you need to reopen the PowerShell instance to start using the Azure CLI commands.

Choco Result Output
Installing Azure CLI on Linux
The versatility of Azure CLI enables the usage across multiple operating systems. In addition, it supports the majority of the Linux flavors for install and use. In the following section, you'll discover how you can install the CLI tool on Ubuntu and other major Linux OS.
Installing Azure CLI on Debian and Ubuntu Server
Ubuntu and Debian Linux has their package distribution management system that assists in delivering the application to the operating system. The process to install the tools involves adding Microsoft's package source as a trusted repo and finally using the apt package manager to pull the package on the system.
- If you prefer to use one-liner for the install, run the following command in the terminal:
CLI Install using Single Script
Ensure that you have sudo permission before running the command.
Follow the steps below to install Azure CLI on Ubuntu and Debian OS using the apt package manager:
- Launch the Terminal on your ubuntu system and run the following command to perform the package updates:
apt Package Update
- Azure CLI requires some packages as a prerequisite, including curl, lsb-release, ca-certificates, apt-transport-https, and gnupg. Run the following command to pull the necessary packages on the system to prepare for install using the following commands:
Dependencies Install
- The next step involves adding the Microsoft package manager signing keys to the system trusted root:
Adding Microsoft Singing Keys
- You need to add the CLI repo as a source in the /etc/apt/source.list.d folder using the following commands:
Adding Microsoft Package Repo
- Finally, run the following command to update the apt package sources and install the CLI tool:
Installing CLI on Ubuntu
- Validate the installation by running the
az --versionin the terminal:

CLI Version on Ubuntu
- Python package is installed on most of the Linux distribution. However, if you get any python package error, run the following command to install Python:
Installing Python on Ubuntu
Installing Azure CLI on RedHat, CentOS, or Fedora
Fortunately, if you are used to the RedHat or CentOS version of Linux, Microsoft provides the CLI package on both the dnf and yum package manager library.
Regardless of which operating system you have, follow the steps below to add the Microsoft package repository:
- Run the following command in the terminal to import Microsoft repository keys:
Adding Microsoft Package Repo
- Run the following command to add Microsoft package repo as source:
Adding Package Manager Keys
- On CentOS, since you have
yumpackage manager, run the following command to install Azure CLI tools:
Installing CLI using YUM Package Manager
The installation will pull other necessary packages for CLI to work as well.
- Alternatively, use the following command if you have
dnfpackage manager on your system:
Installing CLI using DNF
Installing Azure CLI using Install Script
Although using the package manager is always the recommended method, there might be a case when you don't have access to the package manager directly for any reason and would like to use a URL directly to install the CLI tools. It is worth mentioning that you need to install the following packages before running the script since these modules are required for the script to execute successfully and complete the installation.
Once the modules mentioned above are installed, run the following script in your terminal to complete the installation:
Installing CLI using Bash Script
Installing Azure CLI on macOS
MacOS comes with Homebrew preinstalled, which is the best method to install the Azure CLI tool on Mac devices. Homebrew is a package managed for macOS, which is similar to apt in Linux OS. If you don't have Homebrew installed, follow the instructions below to set up the Homebrew and install the CLI tool:
- Open your Apple Terminal by pressing Command + spacebar on your device and type Terminal:

macOS Search Terminal
- Paste the following command in the terminal and press Enter:
Installing Homebrew on macOS
- Once the installation is complete, run the following command to perform a package update on brew:
Updating Homebrew
- Finally, run the last command to install the Azure CLI tool:
Installing CLI using Homebrew
Python and other necessary packages will be installed automatically while installing the CLI tool.
Running Azure CLI as a Docker Container
If building custom images using Docker is your only option, luckily, there's a managed Azure CLI Docker image provided by Microsoft on their open container registry that you can pull down. You can use the image directly with Docker to run an isolated container or use it as the base for your custom image.
Follow the instructions below to run Azure CLI as a Docker Container.
- If you don't already have Docker installed, follow the instruction to install Docker on Windows or Linux operating system.
- Run the following command in your terminal to verify the Docker installation:
Checking Docker Version
- Run the following command to install the CLI using
docker run:
Running CLI in Docker Container
This will place you directly inside the container to start using right away to connect to Azure and manage your cloud environment.
Conclusion
Now that you have installed the Azure CLI, you will start interacting with your cloud resources using the command line.
Keep an eye on the upcoming article in the series on using Azure CLI!