Using Packer to create Custom Azure VM Image with Azure DevOps Pipeline

If you also have been struggling and looking for a process to create master images for your Azure Environment that you can reuse for either Dev or Production workloads and remove the manual overhead of customizing the VM on each deployment, this article will guide you on creating a master image with all sorts of customization and securely storing the image for future builds of the infrastructure.
Building out a gold/master image has been a time-intensive process with a lot of traditional software and additional management involved. After going through the article, you'll realize the extensibility and capability of Azure DevOps (ADO) to work and interact with your Azure Resources.
Before I being with technical details, I'll assume that you are familiar with Microsoft Azure and resources like Key Vault, Storage Account, Virtual Network, and Service Principal objects.
Create new Azure DevOps Organization and Project
If you haven't used Azure DevOps (ADO) before, you'll need to create a new organization to store build code and use the code to run the pipeline.
- Navigate to
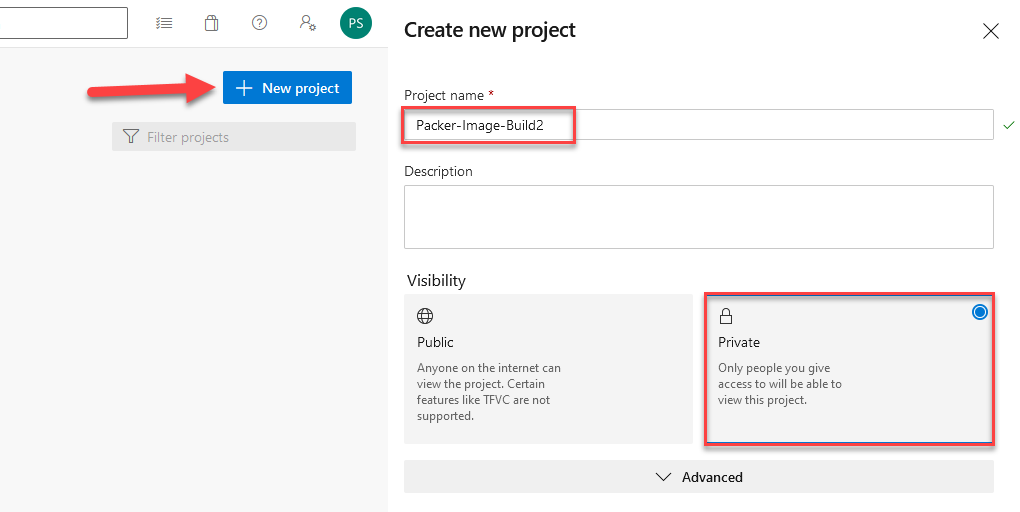
dev.azure.comand login with your Office 365 Personal or Work email. Agree to DevOps agreement and continue. - Click "New Project" on the right side of the windows and give a meaningful name to your project.
- Validate the project visibility to be "Private" if you don't want to share it publicly.
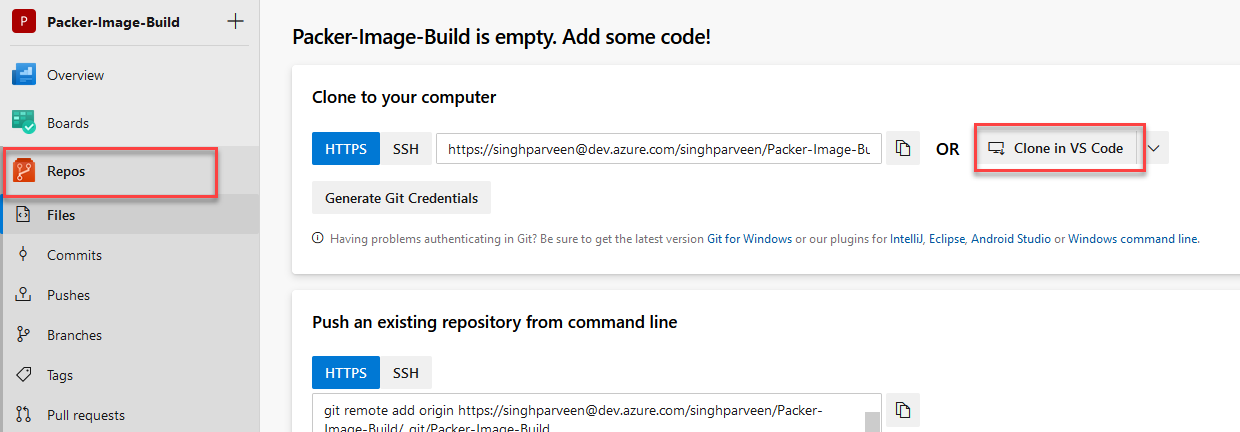
- Navigate to "Repo" inside the project and "Clone to VS Code". Feel free to use any editor. You can follow the steps mentioned on this page to see how you can push code back to this repo from VS Code or any other editor.
 Let's configure the Azure Subscription first to get the resource ready and we'll come back to ADO after configuring our Azure side of the configuration.
Prepare Azure Environment for ADO Access
To set up the Azure side of access to deploy an image, we'll need the following resources to use during our pipeline deployment.
Make sure all the resources are in the same Azure region.
- Resource Group that will withhold all the resource below.
- KeyVault access to Service Principal for secret retrieval.
- Storage Account for storing installers for our custom software.
- We'll also configure one Service Principal to connect ADO to our destination subscription where all the resources reside.
We'll go over the steps one by one to deploy all the resources and provision access. While we create some of the resources, I'd suggest using notepad to keep a note of some of the critical information that we'll need later.
Let's get started with the following.
Go to your Azure Portal at https://portal.azure.com
Resource Group and VNet
- Deploy a "Resource Group" for packer resources. (call it packer-resources)
- Deploy a "Virtual Network" to use for image build with a subnet in any IP range of choice.
Make a note of your Resource Group name, Virtual Network name, and Subnet name within the VNet for later use.
Storage Account
- Deploy a General PurposeV2 "Storage Account" for storing installers.

- Once deployed, navigate to the deployed resource.
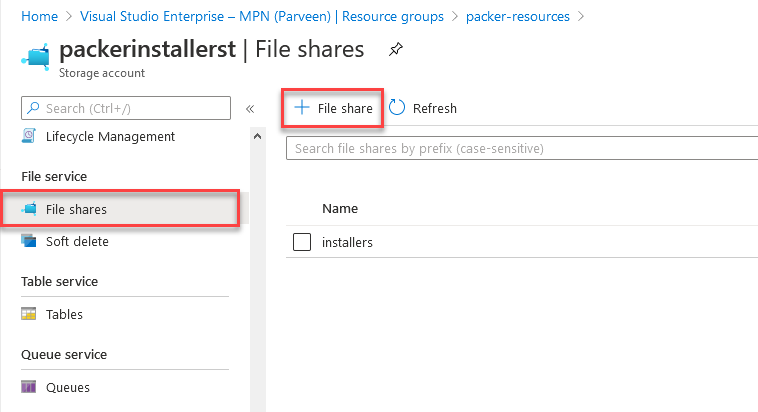
- Go to "File shares" from left blade options.
- Create a file share inside Storage account by clicking "+ File Share" and name it "installers". We'll use this container to fetch executable to image during deployment.
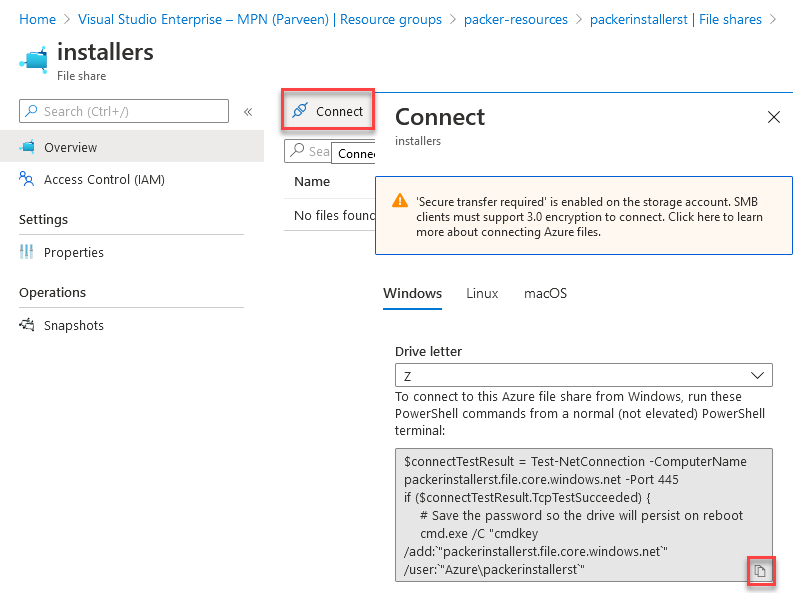
- Click on the newly created share and click "Connect" to open the connection script.
- Copy the script to notepad and extract out the Drive Path address. In my case, it was
\\packerinstallerst.file.core.windows.net\installers
- Navigate back to Storage Account and click "Access Keys"
- Extract out the "Storage Account Name" and "Key" from Key1.

Create Service Principal (SP)
There are 2 ways to create a Service Principal: 1. Via the Azure portal 2. PowerShell
Using Azure Portal,
- Navigate to Azure Portal -> Azure Active Directory
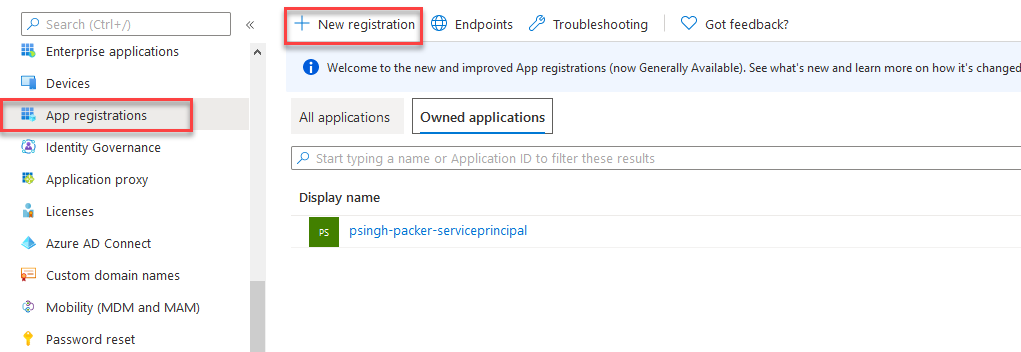
- Select "App Registrations"
- Click "New Registration" and give your service principal a meaningful name.
- On the Application Dashboard, note down the "Application ID". We'll need that for later use.

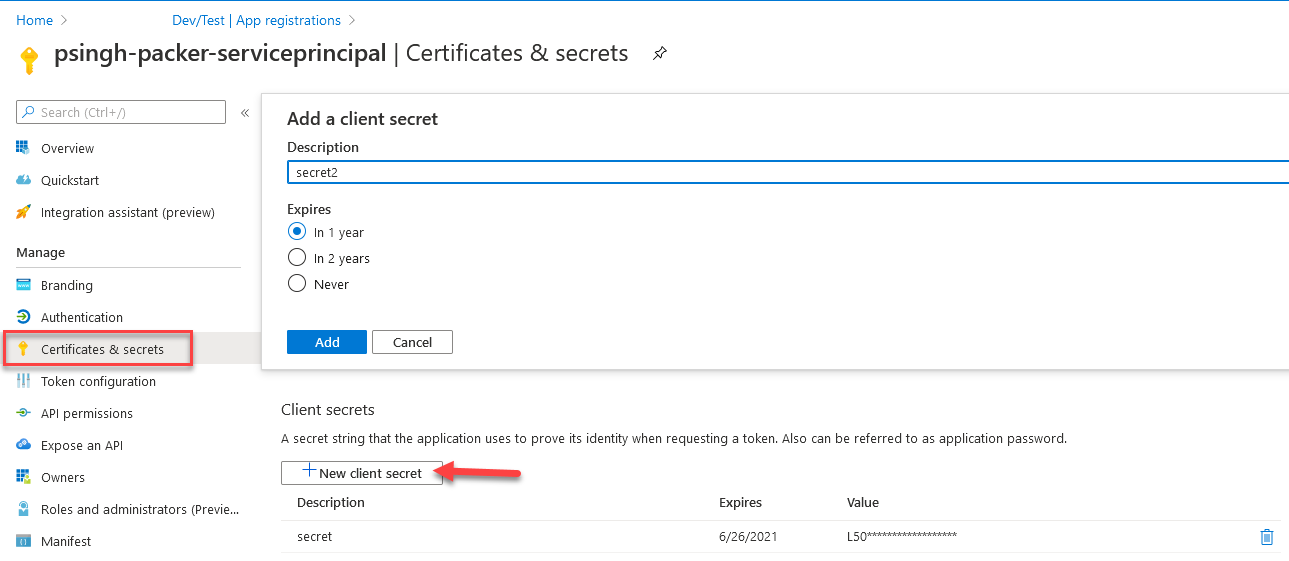
- Generate a new Client Secret from the "Certificates and secrets" option from the left side blade.
- Click "New Client Secret" and add a description for the secret.
- Once added, the secret will be visible only once. Copy the secret for later use as well.
 Alternatively, use the PowerShell snippet below to create a service principal.
$ADContext = Connect-AzureAD
$SP = New-AzureADApplication -AvailableToOtherTenants $true -DisplayName "Packer-ServicePrincipal"
$SPCreds = New-AzureADApplicationPasswordCredential -ObjectId $SP.ObjectId

#Get Password (secret)
$SPCreds.Value

#Get App id:
$SP.AppId
Allow RBAC Permission to SP
To allow this Service Principal the permission to deploy to subscription, we'll need to assign at least the Contributor RBAC role to this service principal. To do that, follow the steps below.
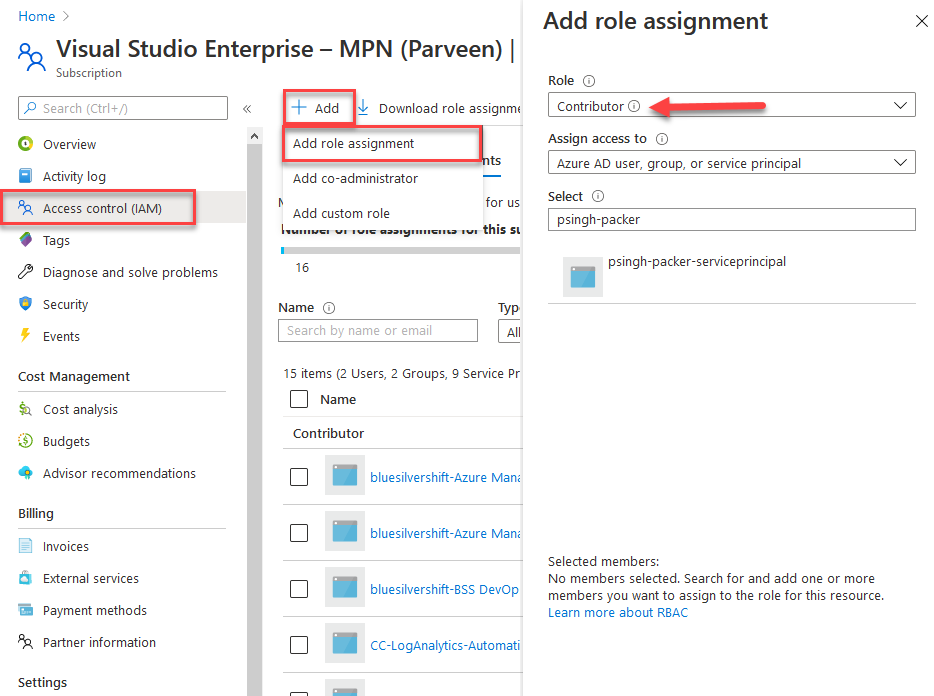
- Navigate to your subscription that you'll be using to Deploy the Image to.
- Click on "Access Control (IAM)" followed by "Role Assignment"
- Click "+ Add" to add a new RBAC role assignment.
- Choose "Contributor" under Role and search the Service Principal by name.
- Click on the service principal itself to add permission and save the assignment.
KeyVault Resource
- Go to the resource group created for Packer resource and deploy a KeyVault resource with default configurations.
- Once deployed, navigate to "Secrets" in KeyVault blade and add the following secrets collected previously to the KeyVault
| Name | Value |
|---|---|
| ADOAppID | App ID of Service Principal |
| ADOAppSecret | Secret of Service Principal |
| StorageAccountName | StorageAccount name from Step 2 |
| StorageAccountKey | Key from Step 2 |
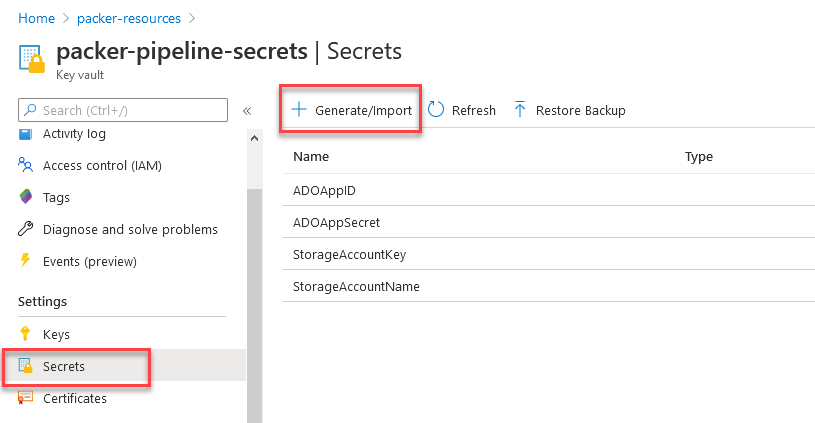
- Once you generate and store the secrets in the vault, click on "Access Policies" and "Add Access Policy"
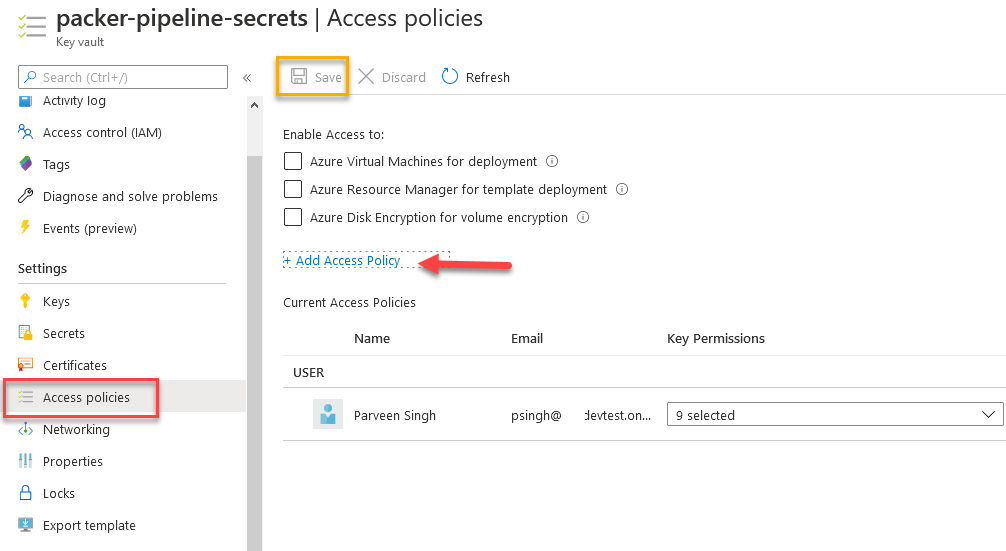
- Configure the access with "Key, Secret and Certificate Management" and add principal by selecting "None Selected" next to Select principal.
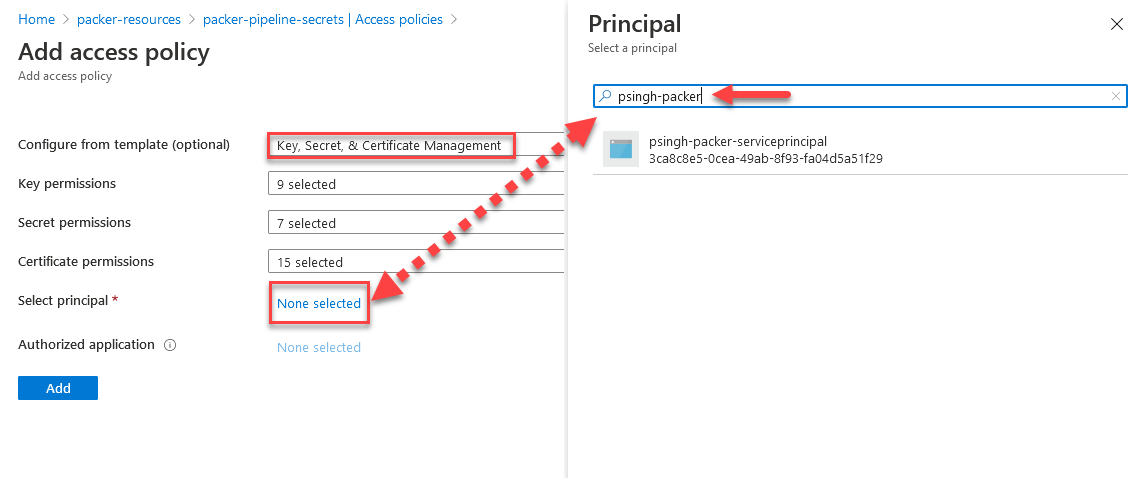
- Hit "Add" and once redirected to the previous screen, be sure to hit "Save" on top to save the permission policy assignment.
At this point, we have our Azure Subscription side of resources ready for access. Let's go back to ADO and start building out the scripts.
Connect Service Connection with Azure Subscription
In order to deploy the resource to Azure subscription from our ADO, we'll need to create a connection that authenticates the project with Azure subscription and allow resource deployment.
- Navigate to your project and click the gear icon on the bottom left and choose "Service Connection"

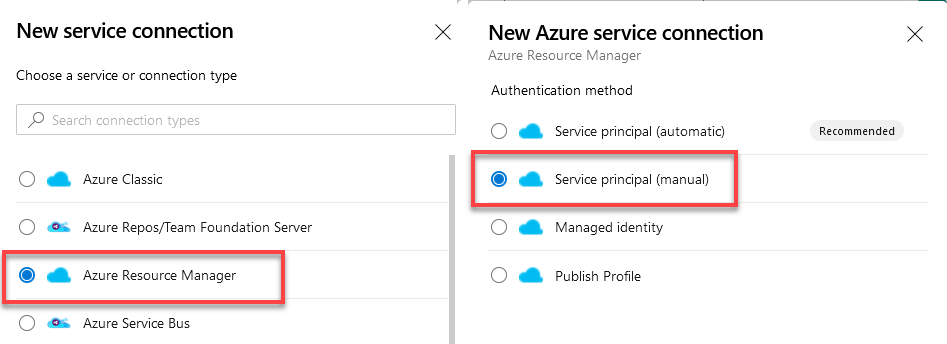
- Click "Create Service Connection" to create a connection.
- Choose "Azure Resource Manager" and "Service Principal (manual)"
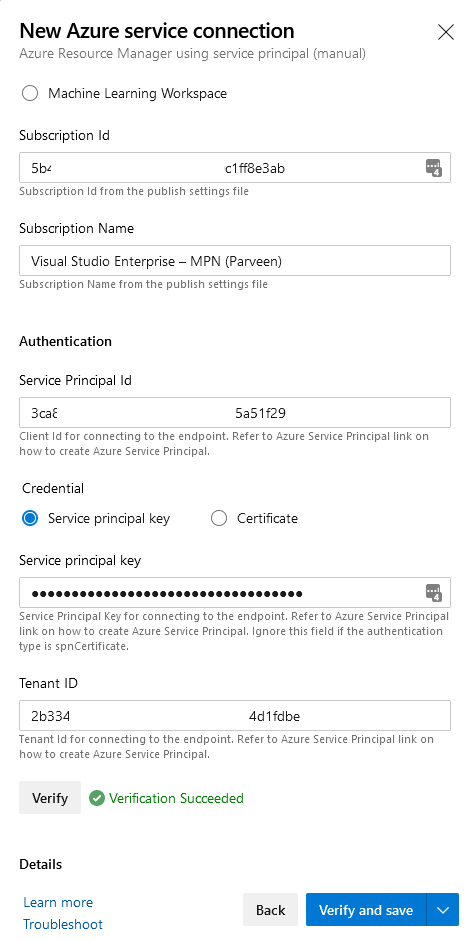
- Keep the Scope level to "Subscription",
- Enter your Subscription ID and Subscription Name that have RBAC Permissions for SP.
- Also, collect the Tenant ID from your Azure portal from "Azure Active Directory -> Overview section -> under "Tenant Information" "
- Under the Authentication section, enter SP ID (
ADOAppID) and SP Secret (ADOAppSecret) stored in KeyVault earlier. - Click verify to check connection and permission to specified subscription and save with a meaningful name for this connection.
Create Pipeline Variables
Now we'll start with defining some of the variables that we'll be using in the script to enable automatic deployment with very little input required.
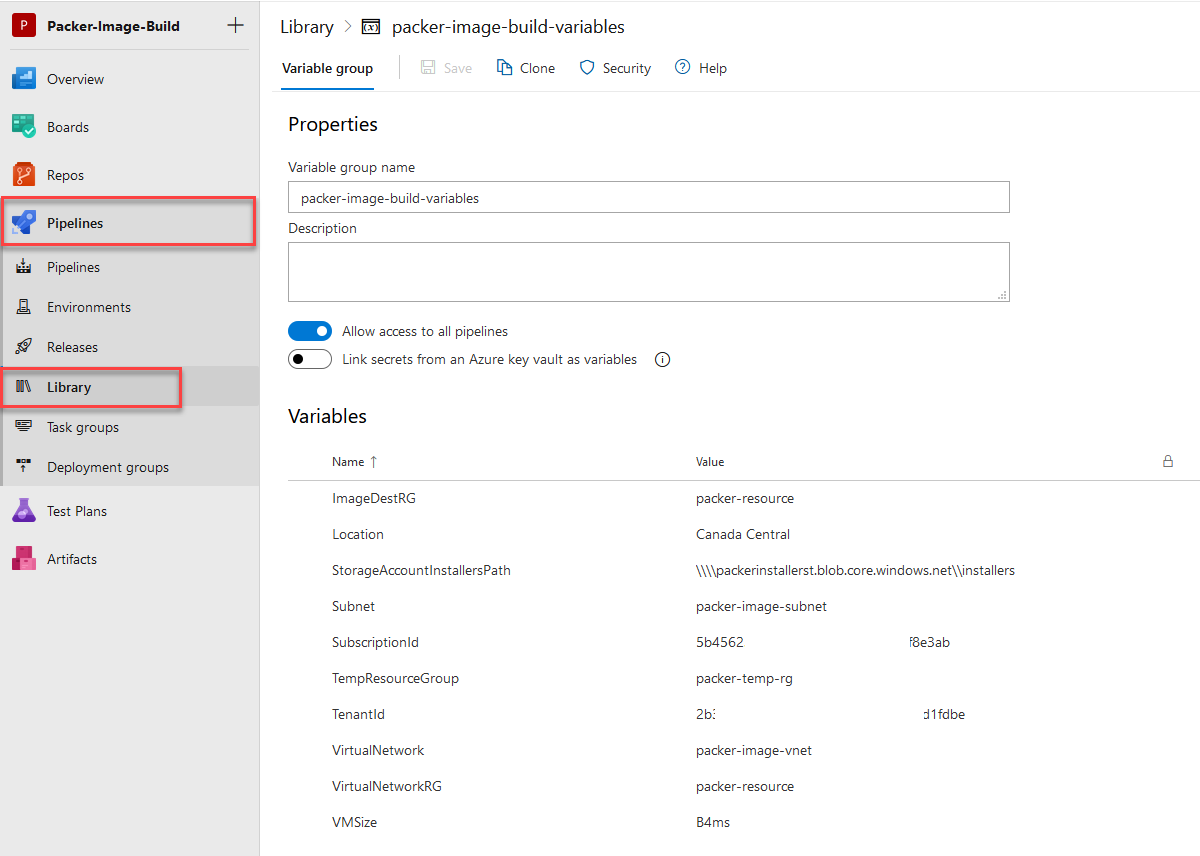
- Under "Pipelines", navigate to "Library" where we'll be storing pipeline variables to use with the deployment script.
- Create a new "Variable group" and give the Variable group name - "packer-image-build-variables". The pipeline will call this variable group to fetch its associated values.
- Add the following variables.
| Name | Value |
|---|---|
| ImageDestRG | RG where you want to store the final image |
| Location | Azure Region to use for resource residency |
| StorageAccountInstallerPath | Storage path collected from Step2 of file share creation |
| VirtualNetworkRG | RG Name where Virtual Network is deployed |
| VirtualNetwork | Name of Vnet resource |
| Subnet | subnet name to use in vnet for build process |
| VMSize | Size of VM to deploy while processing the image(Standard_B4ms) |
| SubscriptionID | Target SubscriptionID |
| TenantID | Tenant ID |
| TempResourceGroup | Any arbitrary name for temporary resource processing |
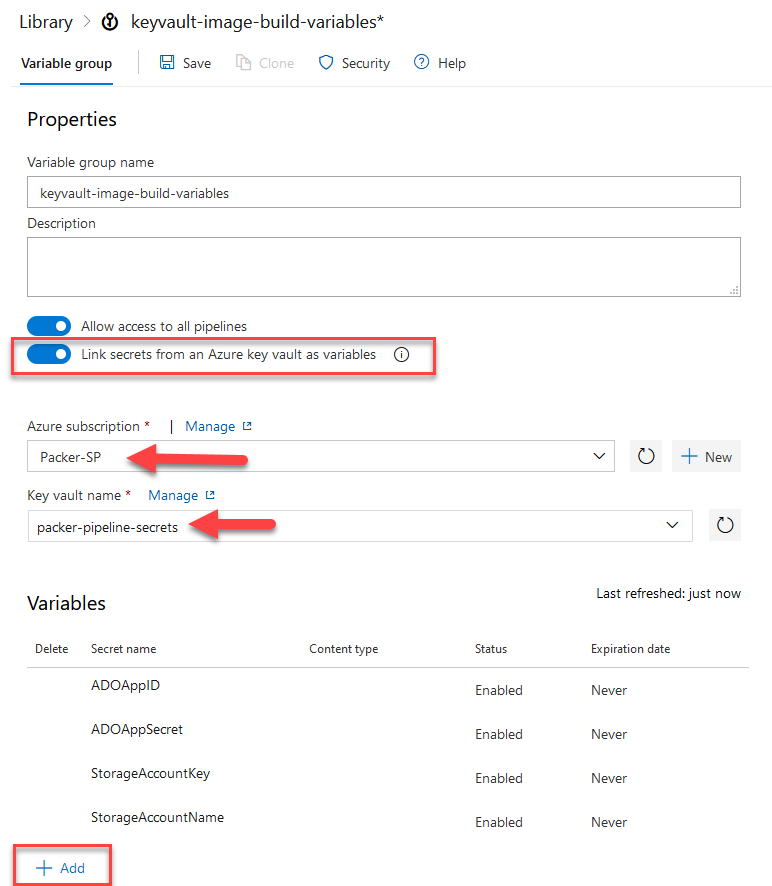
- Create another Variable Group with name "keyvault-image-build-variables" and this time, toggle "Link Secret from an Azure KeyVault as variables" This will connect to Azure KeyVault resource and pull the variables without specifically allowing ADO users to see the secret value within the variable.
- Choose the Subscription which will display the Connection Name configured earlier. If you get any error at this point, check the service connection setting done in the last step.
- Select the keyvault from the packer-resource resource group.
- Click "Add" and import all the secrets using checkboxes.
Create Packer files for Image Build
I've uploaded the necessary files at my GitHub repo here.
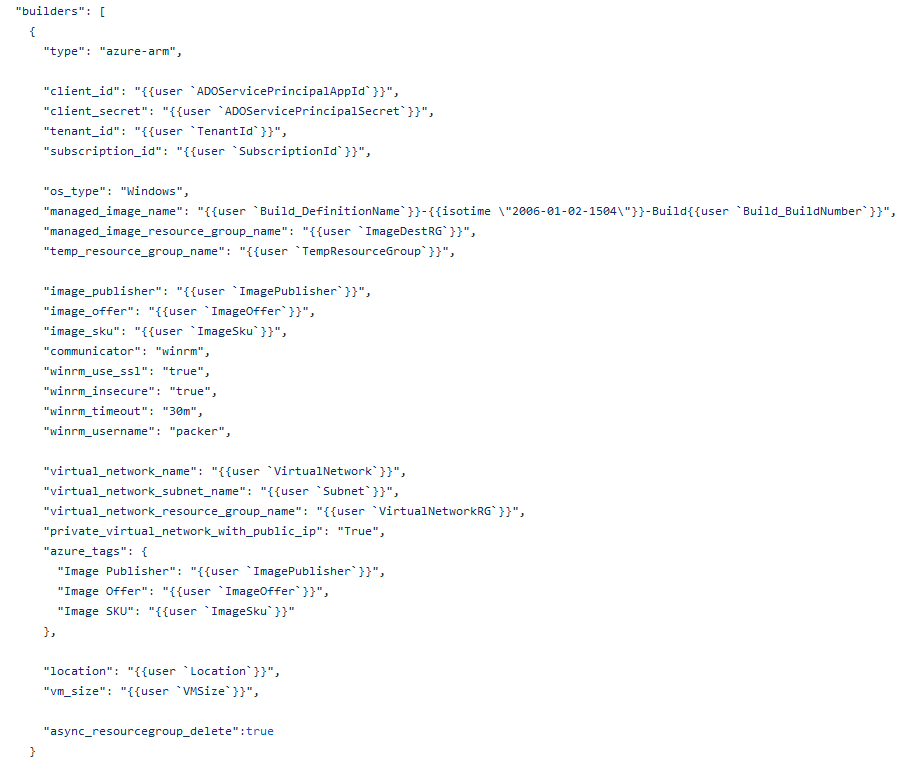
Let's start with the first file packer.json. The first variable snippet initialize the variables that we'll use to define some of the necessary information required to target the resource group where network and keyvault resides.
I'm using Windows 10 1909 version with Multi-session and Office 365 ProPlus installation.
You can search up the lastest image and associates SKU using the following PowerShell snippet.
Get-AzVMImageOffer -Location CanadaCentral -PublisherName  "MicrosoftWindowsDesktop"

#get sku of the image
Get-AzVMImageSku -Location CanadaCentral -PublisherName  "MicrosoftWindowsDesktop" -Offer "office-365"
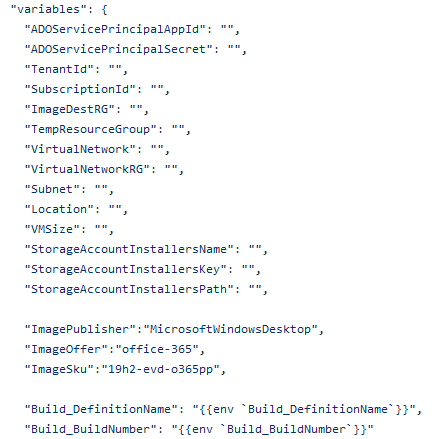 The second variable snippet leverage the initially defined variables as a reference along with some build-time variables which will be populated based on the build number and pipeline name.
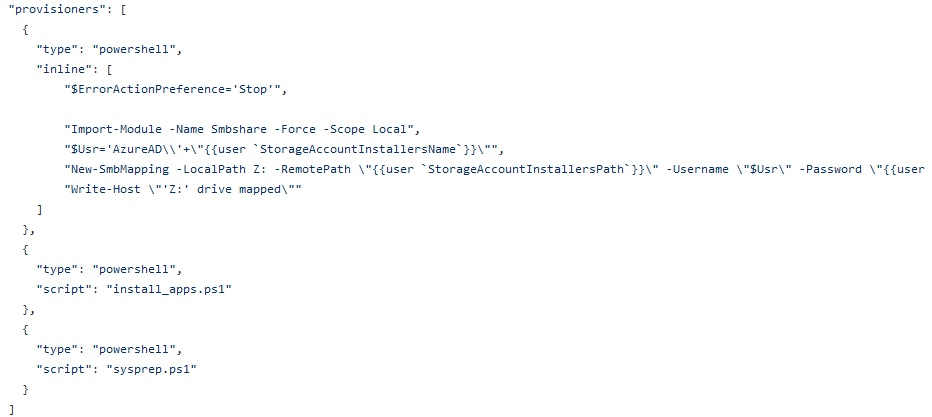
 This last section defines some PowerShell scripts that runs after the initial deployment of the image. I've used 2 reference scripts, one for installing custom application stored in the storage account with some installation parameters and the second script prepares the temporary VM using Sysprep and locks the image into final image resource.
 Moving forward to
 azure-pipeline.yml file, modify the "customTemplateParameters" with variable names used in ADO Variable Library. These parameters are referenced from the JSON file prepared earlier.
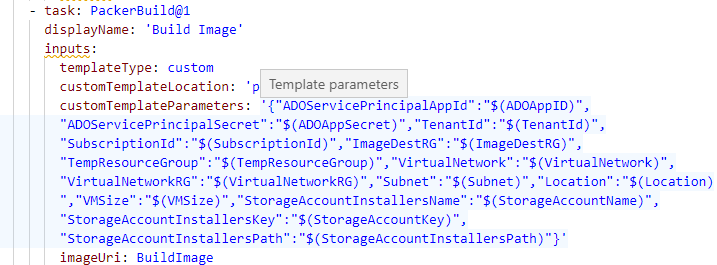
- Also, be sure to update the variable group name if you opted to use a different naming convention.

Create a script for Customization
I've added 2 other scripts that is used in the packer.json file. Use the install_apps.ps1 to add installation parameters. Since the Z: drive is mapped by the first script section, installation scripts can refer to installer location using Z: drive and installation parameters.
This script file allows you to define PowerShell scripts that you might want to run during the preparation to either remove any unnecessary in-built software.
Configure and Run Pipeline
Once you have the script ready and modified, upload them to ADO Repos. The next steps will help you build your first CI/CD pipeline using the yaml file in the repo.
Before we build the pipeline, we'll need to install the packer extension for our ADO organization. Make sure you have enough permissions to install an extension for your ADO Organization.
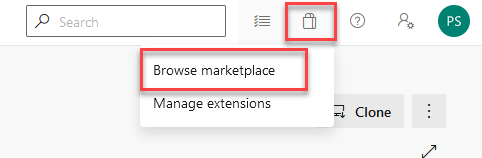
- Navigate to the top right of the page and click on the Extension icon and click "Browse marketplace"
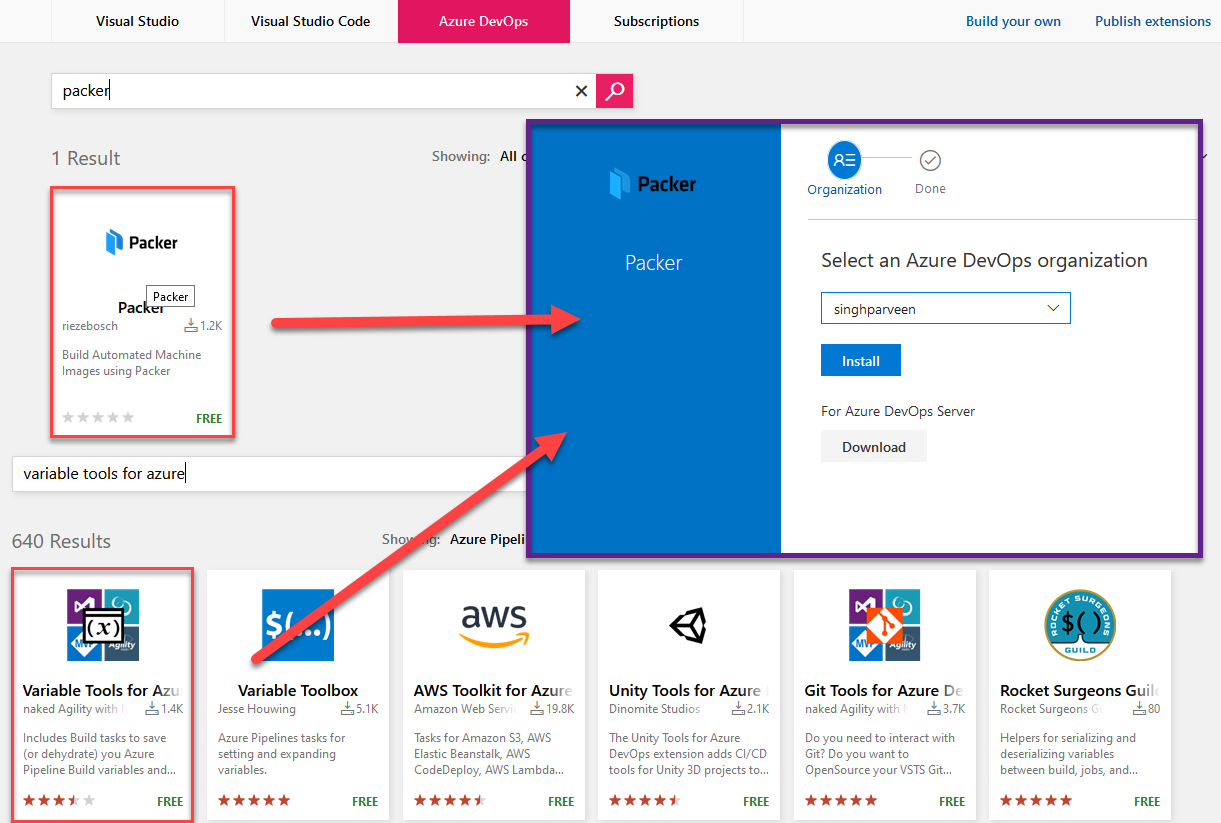
- Search and install 2 extensions. "Packer" and "Variable Tools for Azure" to use pipeline build for our purpose.
 With the extensions installed, we'll build our pipeline now.
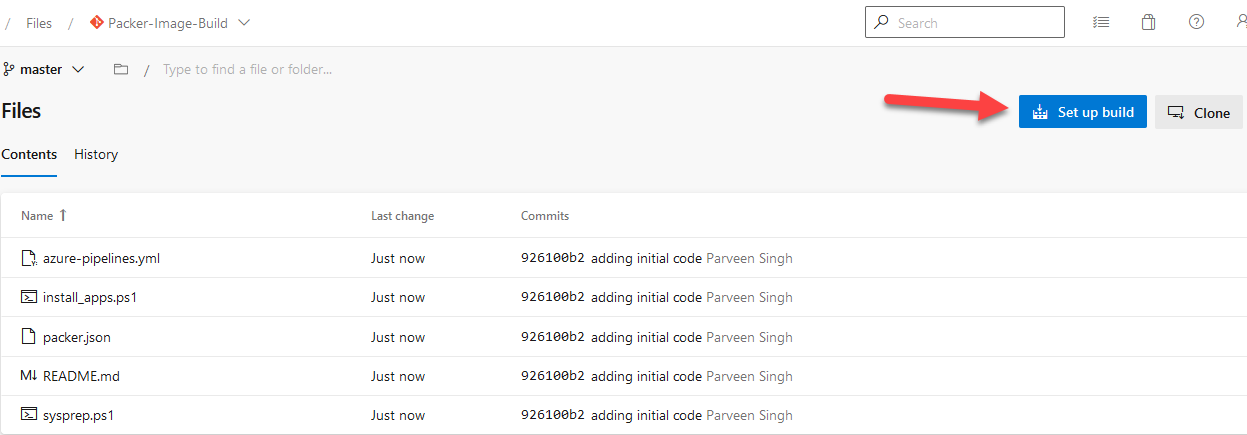
- Navigate to ADO Project and "Repos"
- Click "Set up build". Alternatively, you can also navigate to "Pipelines" directly and target the yml file to run it for the build.
- Click "Save" or "Save and Run".
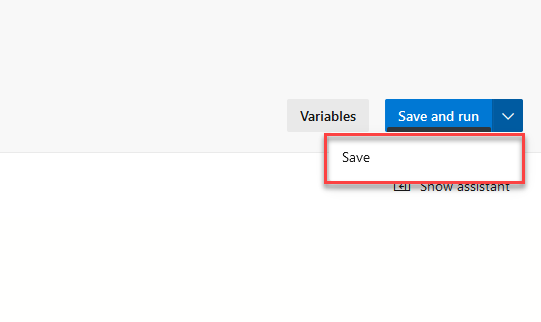
- If you click "Save", you'll need to navigate to Pipelines and trigger the pipeline manually.
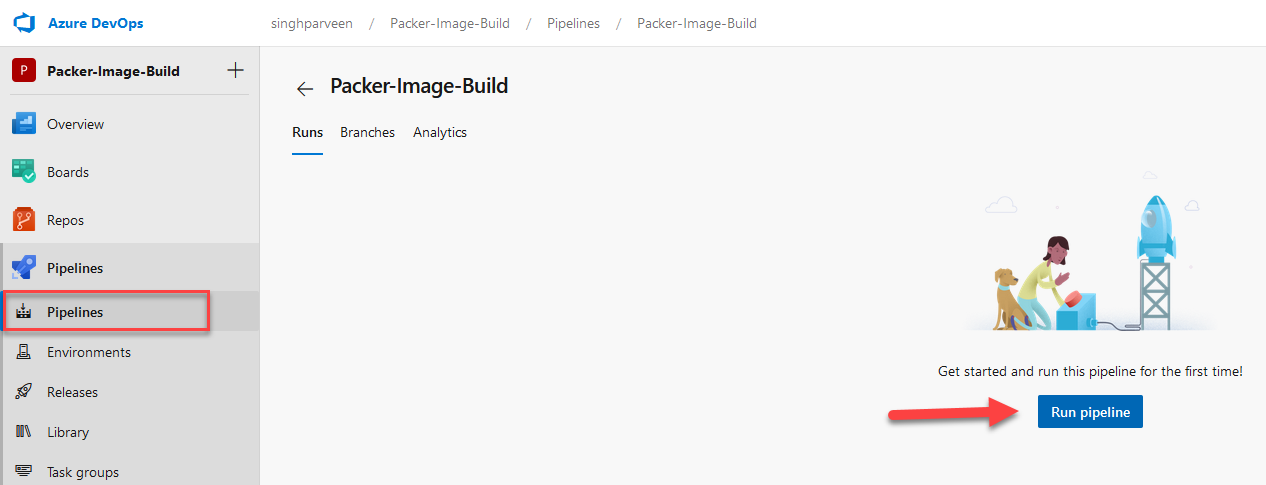
- This will trigger the build launch and you can click on the build number to see the progress.
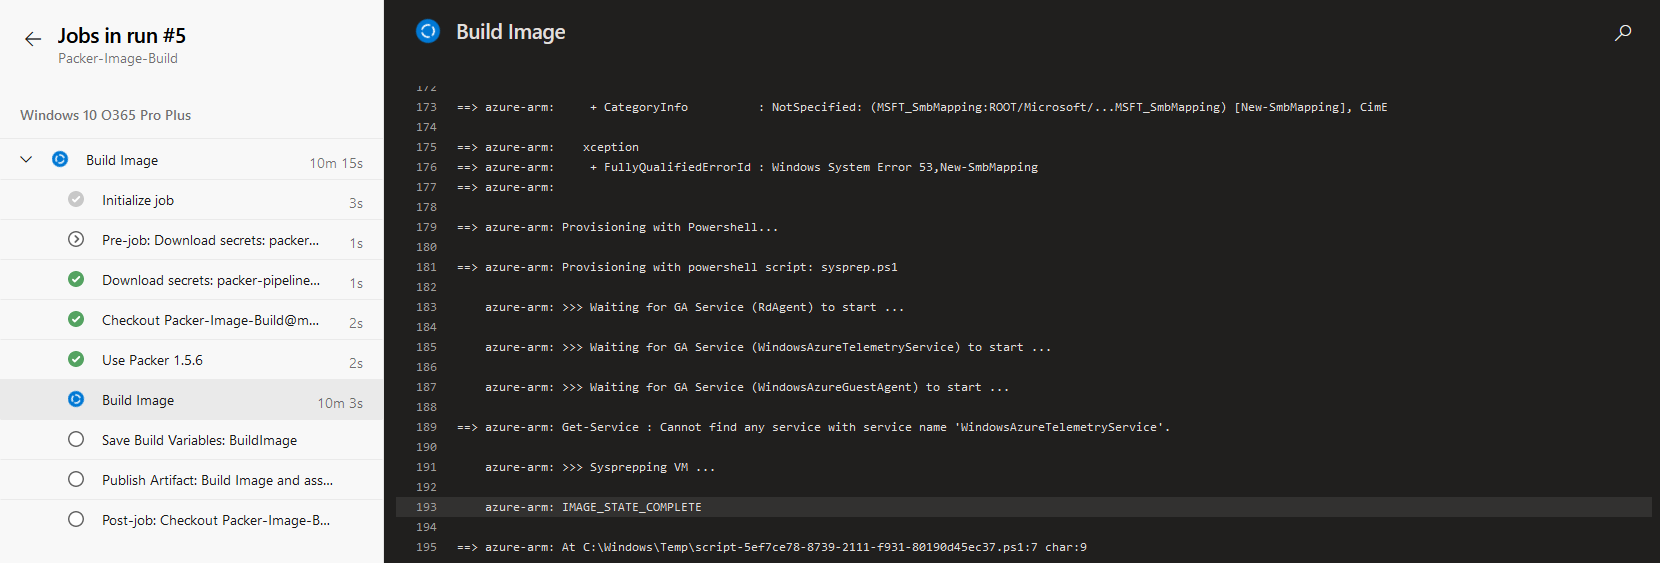
- While build process runs, you can verify the deployment by looking at resources in the temporary resource group.
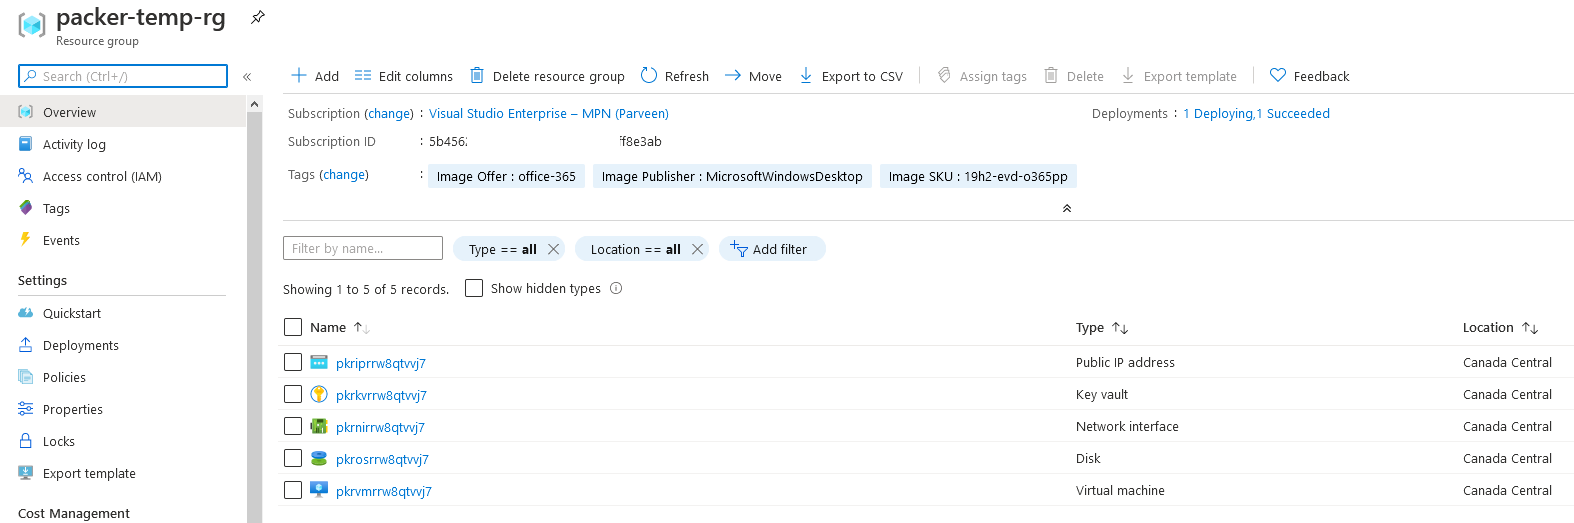
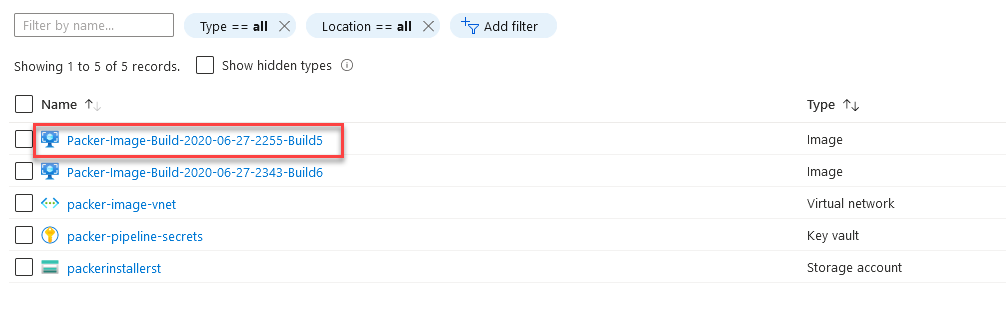
- After the build finished successfully, check the Packer resource group deployed initially with keyvault resources to validate the process and creation of Image resource.
Conclusions
With our master image built with customization, you can leverage this image to deploy VMs in your Azure environment or use this image in your ARM Templates or Terraform build to scale out the development.
The pipeline is configured with CI enabled when configured initially. Any change made to code, resulting in a commit will trigger the pipeline to run an additional image deployment process. However, this can be disabled by editing pipeline settings.
Since the Pipeline saves the results as an artifact, you can also leverage those to trigger VM creation using Release Pipeline as well.
 I hope you find this information useful to deploy customized VM images at scale using ADOSP and Pipeline.