

Relaxing on weekends and planning a personal project can work out in two different ways. It can either be a very good reason to challenge yourself or you can end up stressing over a stupid error. And that’s exactly what happened to me. I’ll let you figure out which one out of both. 😉
So, as part of my plan, I decided to set up a Remote Desktop Service (RDS/RD) on a local server to the Internet using Azure App Proxy. Pretty crazy right? Publishing an RD application to the internet without exposing any IPs directly and using Azure AD as an authentication on top of that.
The documentation here by Microsoft looked too good to be true! I spent hours trying to figure out what went wrong with the setup and also ended up redeploying the whole infrastructure twice. Brutal, I know!
My main motive to write this article is to help save your time. I’m compiling all the information that I collected from different sources. This article will act as an ultimate setup guide so you don’t need any other sources to figure out your next steps.
Prerequisites
Installing an RDS on Windows Server appears to take many steps, but in reality is quite easy. I’d assume that you have a Domain Controller and RDS Services up and running on one or more servers. Make sure you fulfill the following requirements before publishing your RDS application to Azure.
- Your RDS is configured and running the RD roles. Follow this article if you wish to set up RDS Environment from scratch. Don’t forget to set up an SSL certificate for your RD Gateway as it’s not configured in the linked article.
- Your On-Prem Active Directory (AD) is connected to Azure AD using AD-Connect.
- All servers are domain-joined.
- There are at least two available servers. One acting as published remote desktop and other server hosting RD roles.
- Your RDS is published with RD collection locally and functional on the local network.
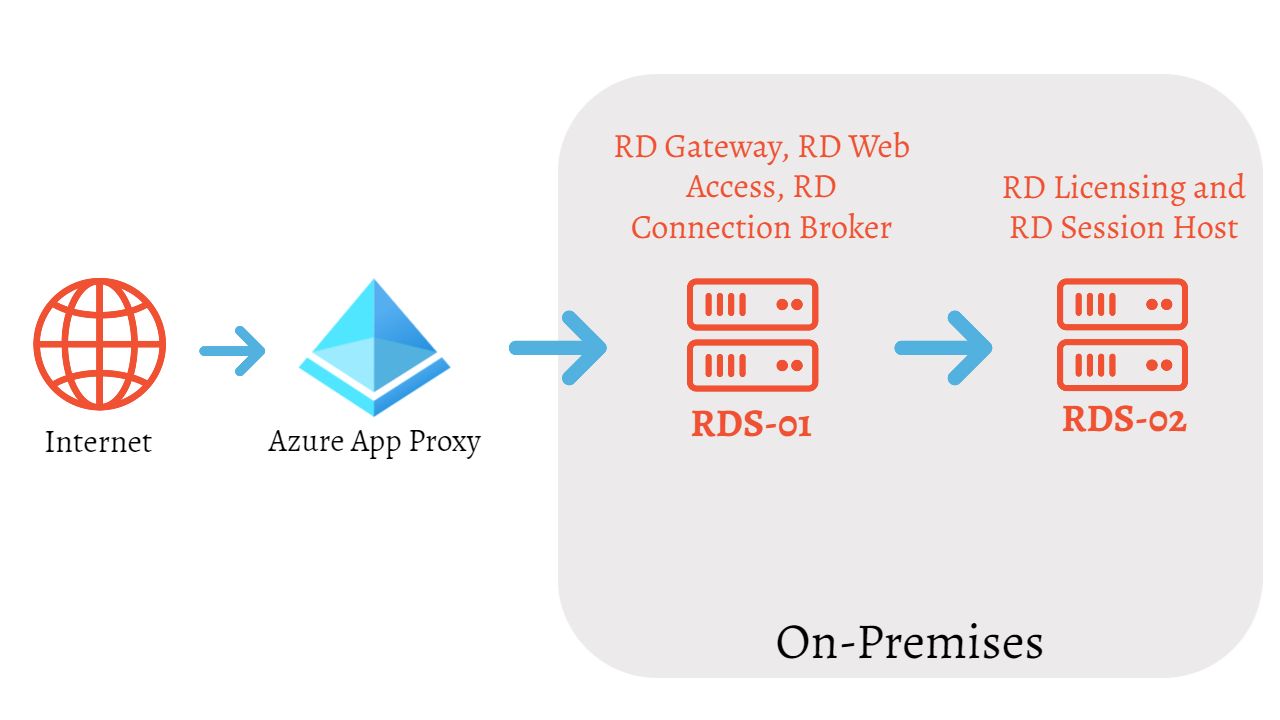
I’m using a pretty simple RDS setup where I have RDS-01 as RD Gateway, RD Web Access, and RD Connection Broker. RDS-02 is the remote server that I’m hosting with RD Licensing and RD Session Host services. This is the server that I want to publish as a remote desktop for users to log in to.
Why do you need Azure App Proxy?
I want to focus on the reason that you might want to opt in to use the Azure App Proxy. App Proxy gives you the ability to publish your RDS Environment with no public endpoints on any host servers. The communication between server roles will take place on the local network only. All the RDS traffic will be routed through App Proxy to local servers over HTTPS (443). I believe this reason itself is convincing enough to use App Proxy instead of exposing your server IPs in the wild.
Preparing Azure AD Tenant for App Proxy
Before you create any app proxy, you’ll need to enable its service from your Azure AD Tenant. You won’t see the option to enable the app proxy if you don’t have at least Azure AD Premium P1 or P2 License in your tenant. If you have the appropriate licenses, follow the steps below to prepare your tenant for creating new apps.
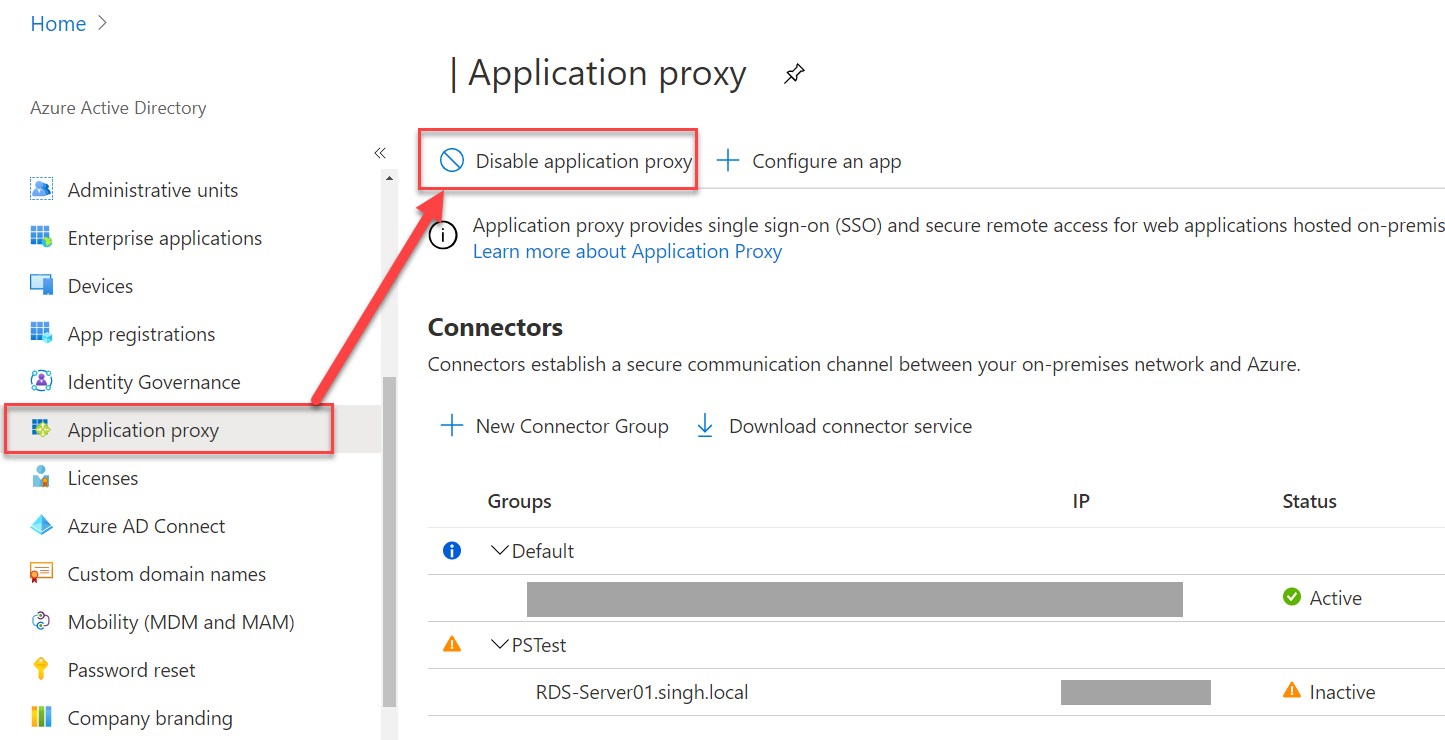
- Navigate to Azure Portal → Active Directory
- Click on “Application Proxy” and click “Enable Application Proxy“
- The same option should turn to “disable application proxy” once turned on. This confirms that your tenant can now register an application proxy.
Creating App Proxies for RPC and RDWeb
Before you successfully connect your on-prem application to Azure, you’ll need to create two applications in Azure. One Application will handle the RDWeb Access and other RPC Gateway Authentication. These were the steps that I missed initially and got stuck in rabbit holes for hours to figure out what the issue was.
To create a new App Registration, use the steps mentioned below:
- Navigate to Azure Portal → Active Directory
- Click “Application Proxy” and “+Configure an app“
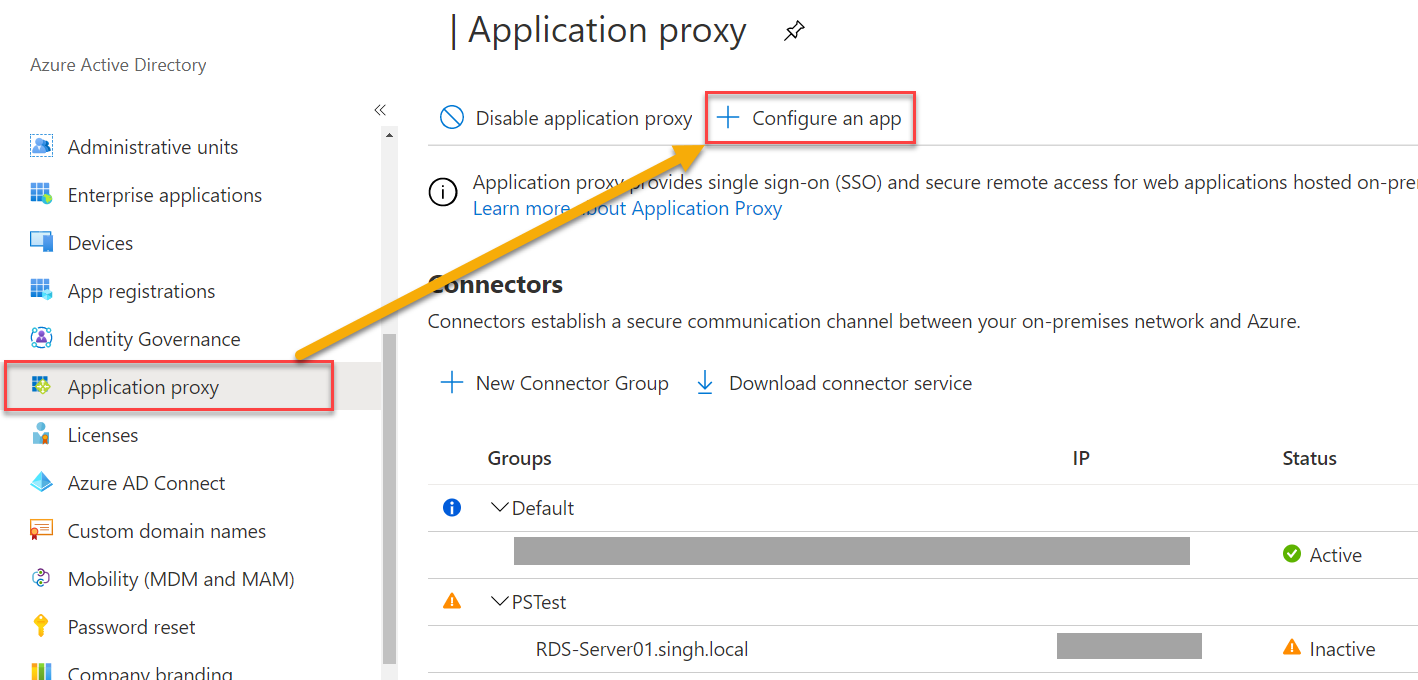
- This should take you to the next page where you’d need to fill out the application information. Use the information from the next two sections to register the application for both RDWeb and RPC applications.

Internal FQDN of the server should be something like “servername.domain.com” where domain.com is being synced to Azure AD using AD-Connect.
App Proxy for RDWeb (Front End)
Create an App Proxy for RDWeb from Azure AD Tenant using the following information.
- Internal URL: https://<Internal FQDN of RDS Server>/rdweb/ (the trailing slash is important)
- External URL: https://rds-<tenantname>.msappproxy.net/rdweb/ (This should be the default value)
- Pre-authentication method: Azure Active Directory
- Translate URL headers: No
- Application Body: No
App Proxy for RPC (Gateway)
Create an App Proxy for RPC from Azure AD Tenant using the following information. This application will act as your gateway that you’ll be using on-premises to redirect the traffic for Remote Desktop. Take note of the External URL once the application is ready.
- Internal URL: https://<Internal FQDN of RDS Server>/rpc/ (the trailing slash is important)
- External URL: https://rdsgw-<tenantname>.msappproxy.net/rpc/
- Pre-authentication method: Passthrough
- Translate URL headers: Yes
- Application Body: No
Configuring User Access for the Application
Since the Public IP of the servers is not exposed, you need to add users to the proxy access list for the FrontEnd proxy. Adding permission to fronted proxy adds the application under applications.microsoft.com portal for each user so they don’t have to remember any URL to join to a remote desktop.
To assign this permission, I’d recommend performing the following steps:
- Create a ‘Security Group” on-premises and add users as members that you want to allow RDS Application Access. e.g. “RDS_WebUsers”
- Sync the changes to Azure AD through AD-Connect or give it some time to perform the periodically scheduled sync.
- Navigate to Azure Portal → Enterprise Application and search for your Front End Proxy application.

- Click on the name of the application and choose “Users and Groups” on the left blade.
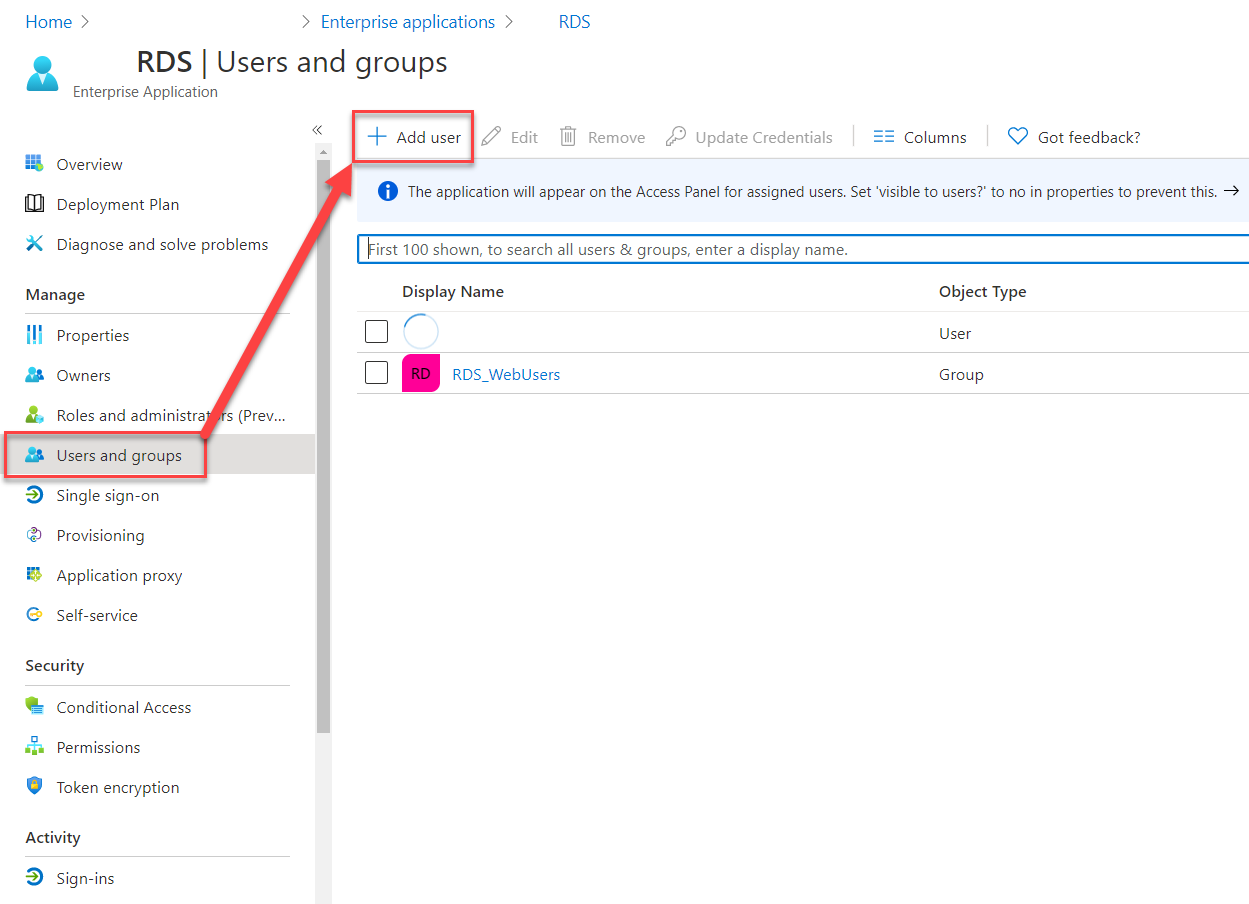
- Add the Group that you create on-prem so that it has the permission to allow Application access.
- Along with this, you also need to add permissions for the Remote Desktop Collection that’s publishing the Remote Desktop for users. Both permissions are necessary for users to get proper access. You’ll see how to add that permission in the coming sections under “Updating On-Prem RD Gateway Address“.
Once you perform this step, you simply add the users to that associated group next time. That will assign the permission for the RDS App Proxy automatically based on group membership.
There’s no need to assign any user permission for the gateway app proxy.
Installing App Proxy on Application Server
In this step, you’ll install the Application Proxy agent on your application server or RD Gateway server. You must make sure that internal URL of the RDS application is accessible from the server that gets the proxy agent.
App proxy agent installation involves some registry changes on your server. This is essential to make sure that the agent communicates with the Azure Tenant. Follow the two listed steps one by one to configure your server for app proxy.
Preparing Server for App Proxy
If you are using Windows Server 2019 to install the connector, you must disable HTTP2 protocol support in the WinHTTP component by making changes to the registry.
- Open registry editor on your Server. (Run regedit to open)
- Add or Update the following key on machine-wide registy.
Location: *HKEY_LOCAL_MACHINE\\SOFTWARE\\Microsoft\\Windows\\CurrentVersion\\Internet Settings\\WinHttpType: DWORD-32Name: EnableDefaultHttp2Value: 0*Regardless of the OS version being used, the next step is to Enable TLS 1.2 on your server before installing the connector. Create the new “key” and associated DWORD values if the keys don’t exist already.
- Create the Key for “TLS 1.2” [HKEY_LOCAL_MACHINE\SYSTEM\CurrentControlSet\Control\SecurityProviders\SCHANNEL\Protocols\TLS 1.2]
- Create “Client” key and add the following values [HKEY_LOCAL_MACHINE\SYSTEM\CurrentControlSet\Control\SecurityProviders\SCHANNEL\Protocols\TLS 1.2\Client]
“DisabledByDefault”=dword:00000000
“Enabled”=dword:00000001 - Create the “Server” key and add the associated values. [HKEY_LOCAL_MACHINE\SYSTEM\CurrentControlSet\Control\SecurityProviders\SCHANNEL\Protocols\TLS 1.2\Server]
“DisabledByDefault”=dword:00000000
“Enabled”=dword:00000001 - Create a new value for the following entry: [HKEY_LOCAL_MACHINE\SOFTWARE\Microsoft\.NETFramework\v4.0.30319]
“SchUseStrongCrypto”=dword:00000001
Restart the Server once you complete the registry changes.
Installing App Proxy Agent
For this step, you’ll need to go back to your Azure Portal once again to grab the proxy agent.
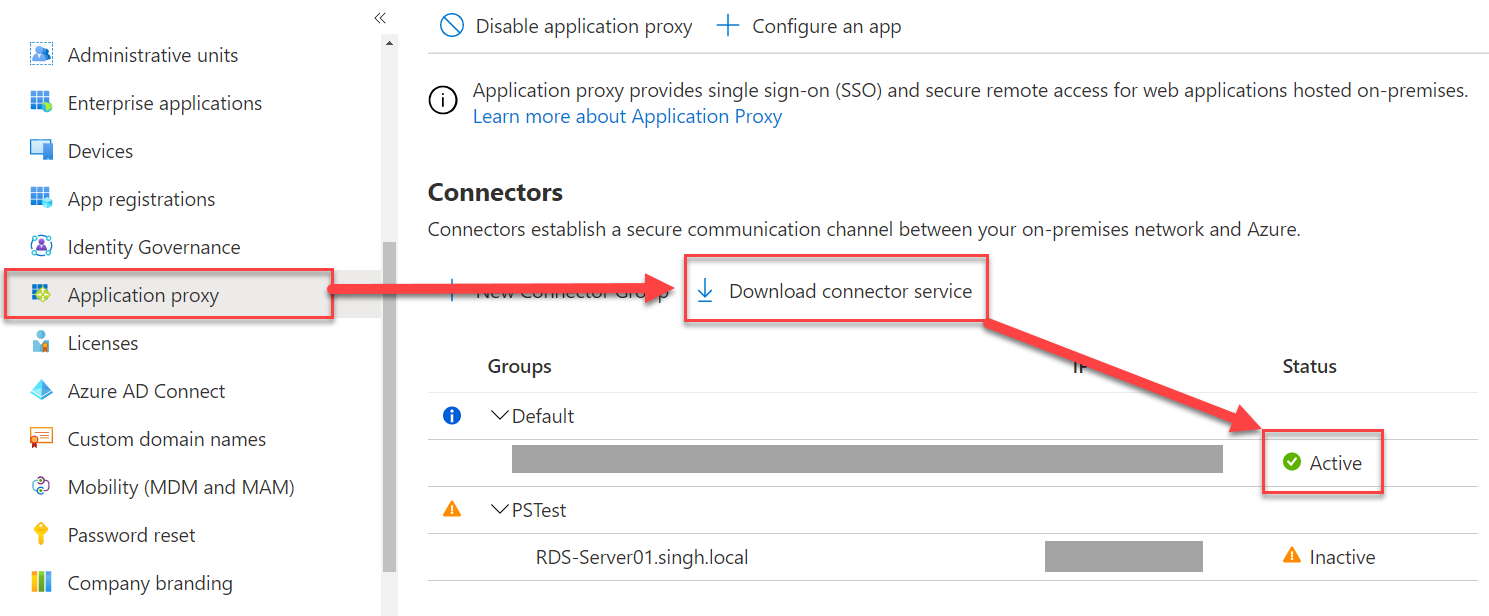
- Navigate back to Azure Portal → Active Directory
- Select “Application Proxy” and “Download Connector Service“
- Install the Agent on your server where RD Gateway is setup.
- During the installation process, you’ll be asked to log in to Azure to register the proxy with your O365 tenant. Make sure you have enough permissions (preferably Global Admin) to successfully register the agent.
- Once installation finishes, you should see your agent under Connectors as shown in the above image with its status.
- If you see any of the agents with an “Inactive” status, use the troubleshooting guide to fix the status. It usually can be fixed by restarting the “Microsoft App Proxy Connector” service on the local server.
Updating On-Prem RD Gateway Address
At this point, your server name should be visible in the Proxy Connector and status should be “Active” in the Azure portal. The next step involves making changes to the On-Prem RD Gateway Server to update the Gateway URL so that App Proxy can take over the gateway traffic for remote access.
Updating RD Collection Group Permission
As you might have added the users to the security group “RD_WebUsers” for Front End Proxy Application, I’ll show you how you can add the same group to Session collection so that the users can see their published application from the RD Server.
- Open your “Server Manager” and navigate to the “Remote Desktop Services” → Collection and click on the collection name from the left blade.
- Click “Tasks” → “Edit Properties” to open the Collection configuration wizard.
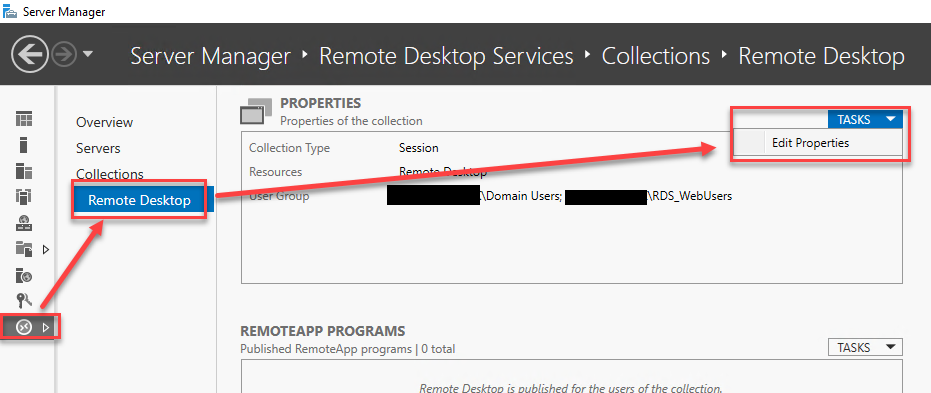
- Navigate to “User Groups” and add your security group here so that users inside the group can see the published app in this collection.

- Perform the same steps for any other collection if you have more than one.
Updating RD Gateway in Server Manager
You’ll need to navigate to your Server Manager on the server where the RD Gateway role is setup.
- Click on “Remote Desktop Service” from the left panel followed by “Overview”.
- Under the “Deployment Overview” tab, click Tasks → Edit Deployment
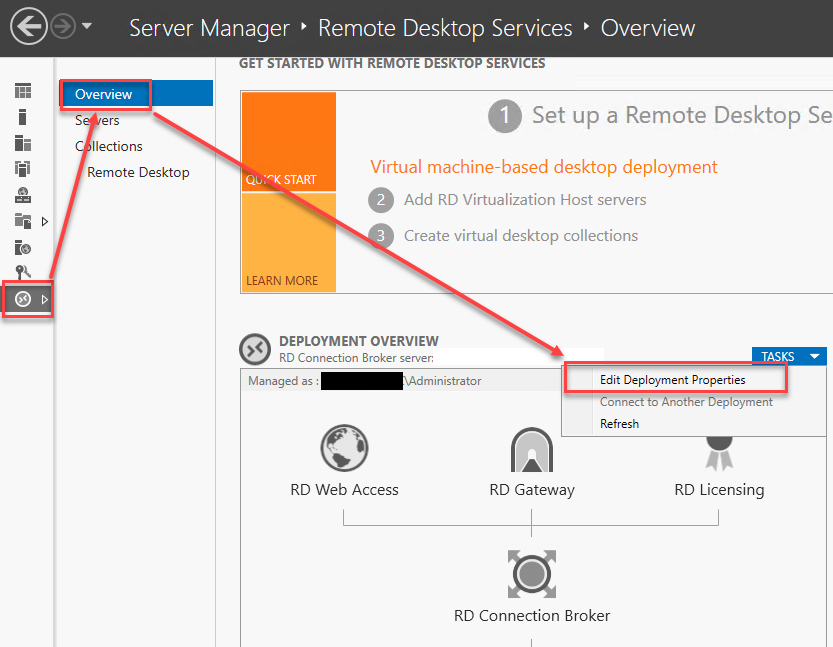
- Once on the Deployment properties page, change the “Server Name” field and update it with your Azure App Proxy Gateway External URL as configured in “App Proxy for RPC (Gateway)“. You should only be using the URL piece of the whole address without any protocol or directory. e.g. “rdsgtw-<tenantName>.msappproxy.net“
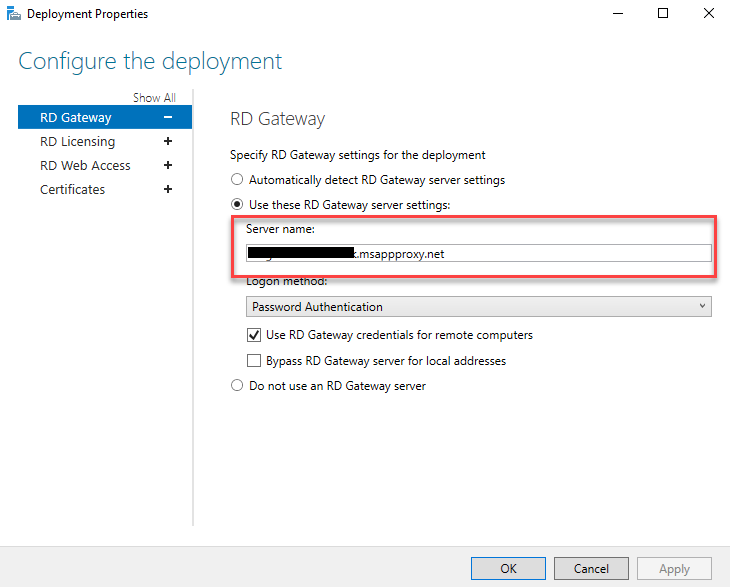
- Click Apply and OK to save the changes.
Updating IIS TSGateway
Moving forward to the next step, you need to update the IIS Settings to get the Gateway Address for your RDWeb Access. Follow the steps below to make the necessary changes.
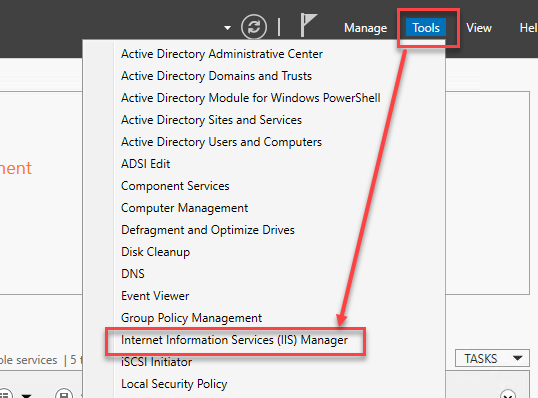
- From Server Manager, Navigate to “Tools” and select the IIS option.
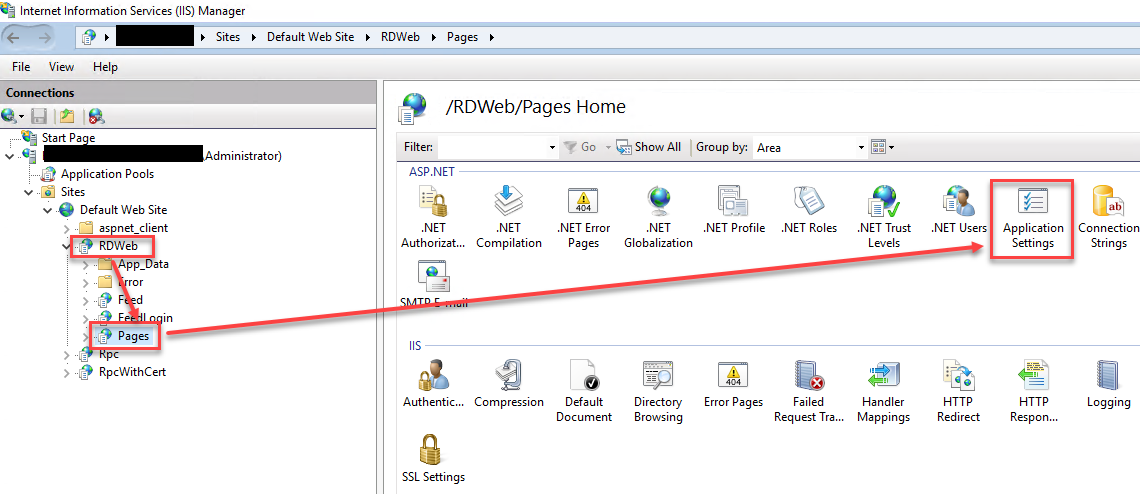
- Expand the connection on the left side and drill down to “RDWeb” → “Pages“
- While selecting the Pages, double click the “Application Settings” to open the configuration for the RDWeb.
- Update the “DefaultTSGateway” with your external URL of the App Proxy configured as Gateway. As mentioned in the last section, you only need to fill out the URL part of the whole Address without any protocol or directory.
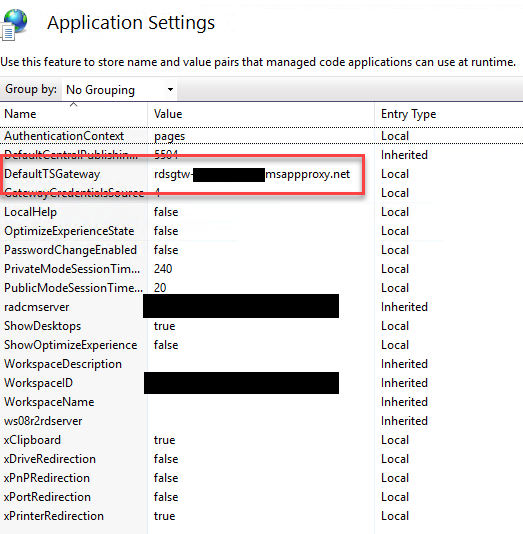
- Perform a quick IIS reboot by running
iisresetin PowerShell.
Wrap Up
That finishes your setup for App Proxy to enable On-Prem RDS Environment Access without exposing any IPs to the internet. At this point, use the External URL that you received from the “App Proxy for RDWeb (Front End)” to connect to your authorized resources.
You’ll be prompted for authorization via Azure Active Directory which will handle the authentication and authorization piece for you. Make sure your user account is added to the appropriate group as covered in “Configuring User Access for the Application”
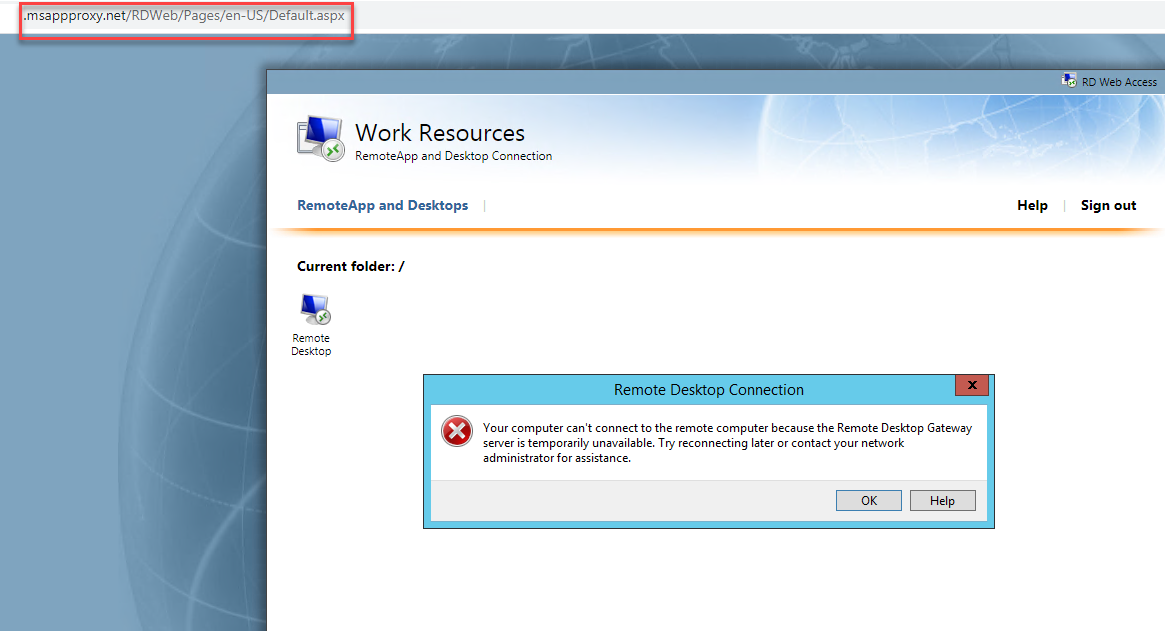
Still Getting Errors?
If you receive any error related to “RD Gateway Server is Unavailable” while accessing the application outside the network, make sure you’ve set the RPC (Gateway Proxy) URL properly on your on-prem RD Gateway. It’s most likely the issue with the gateway address entered incorrectly. I received the following error after performing the steps before and got stuck for hours, and finally realizing that I didn’t set up the gateway proxy correctly in Azure Portal. Double-check everything before making any changes so that it doesn’t end up breaking something else.
Are you still receiving an error after following the article step-by-step? Feel free to reach out to me on Twitter or leave a comment below!
Reference
Below are some of the articles that I used as a reference to fix the issues and complete the setup properly. Some of them were simply a repetition of the same thing but with little changes that I had to pay special attention to get the correct steps.
Microsoft Official Docs Article
Discover more from Parveen Singh
Subscribe to get the latest posts sent to your email.


