How to Remotely Lock a Windows Device with Intune
A laptop goes missing on a Friday afternoon. Until now, the honest Intune answer for a Windows device was a wipe, because the built-in Remote lock button in the device's action bar only covers iOS, macOS and Android. Wiping a laptop that will probably turn up in a taxi office on Monday is a big hammer, and the user loses everything that wasn't synced.
Windows now has its own remote lock, in preview. When a device receives it, Windows signs out every session, hides every sign-in option and shows a "Device locked" screen. Nothing is erased, the device stays enrolled, BitLocker stays on, and the lock holds through restarts and while the laptop is offline. Only an admin can lift it.
There's no button for it yet. In the preview you turn it on with a custom OMA-URI profile and a device group, so this post builds exactly that in a test tenant, screen by screen: the group, the profile with all three settings, the assignment, and the PowerShell you'll use on the day a device actually goes missing. If you want the condensed reference version to bookmark, it's in my Field Note on remote lock for Windows.
How the Pieces Fit
The lock lives in a configuration service provider on the device called RemoteDeviceLock. Intune doesn't send a one-off "lock now" command. It pushes a setting, LockState = 1, through a profile, and Windows enforces it at the next check-in. Unlocking is the same setting with the value 0.
That shapes the whole design:
| Piece | What it does |
|---|---|
Group Remote lock - ON | Empty most of the time. You add a lost device to it |
Profile Remote lock - ON | LockState 1, plus the text on the lock screen, assigned to that group |
Group and profile Remote lock - OFF | The same thing with LockState 0, for the day the laptop comes back |
You build it once, and on incident day the only action is a group membership change.
The device needs to be Microsoft Entra joined, hybrid joined or MDM enrolled, and running Windows Pro, Enterprise or Education.
Step 1: Create the Lock Group
This group stays empty most of the time. A device only lands in it when it's lost.
-
In the Intune admin center, click Groups in the left menu, then click New group.
-
Fill in the form with the following values:
Field Value Group type Security Group name Remote lock - ON Group description Windows devices in this group get the remote lock profile (LockState = 1). Add a lost or stolen device here to lock it. Membership type Assigned Owners and Members Leave empty 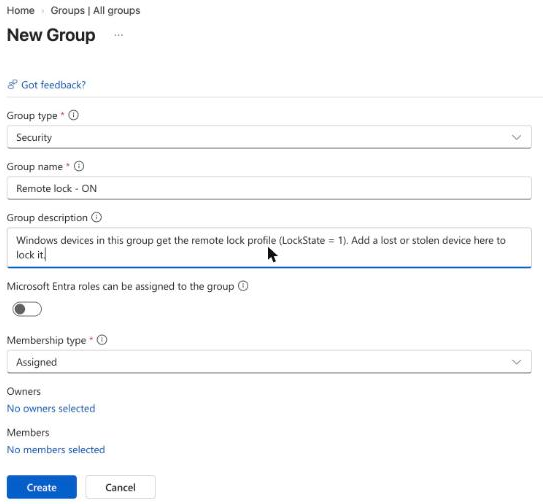
Gotcha: Use Assigned membership. A dynamic group fills itself from a rule, which is exactly what you don't want for a group that locks laptops.
-
Click Create.
-
Type Remote lock in the search box on the All groups page and confirm the new group shows up as a Security group with Assigned membership:
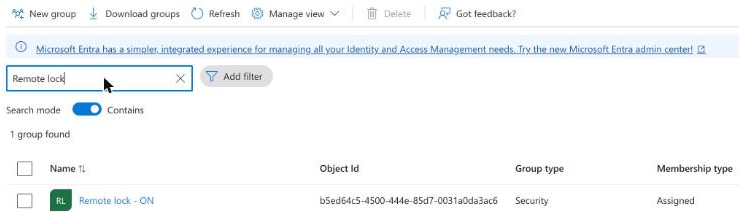
Checking the name now means it resolves when you need it under pressure.
If you'd rather script it, this creates the same group with the Microsoft Graph PowerShell module:
Connect-MgGraph -Scopes "Group.ReadWrite.All"

New-MgGroup -DisplayName "Remote lock - ON" `
  -Description "Windows devices in this group get the remote lock profile (LockState = 1)." `
  -MailEnabled:$false -MailNickname "remote-lock-on" `
  -SecurityEnabled:$true
Step 2: Create the Custom Profile
-
In the Intune admin center, click Devices in the left menu, then Windows, then Configuration.
-
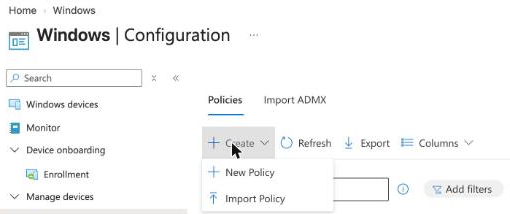
Click Create, then click New Policy:
-
In the Create a profile panel, select the following, then click Create:
Field Value Platform Windows 10 and later Profile type Templates Template name Custom 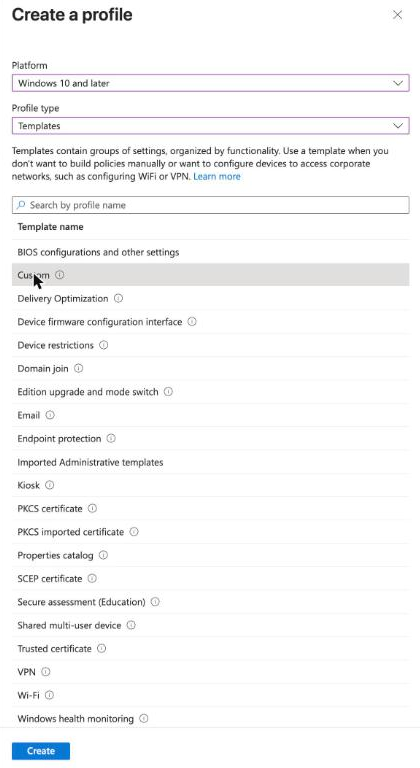
-
On the Basics tab, enter the following details, then click Next:
Field Value Name Remote lock - ON Description Locks Windows devices remotely (RemoteDeviceLock CSP, preview). Assigned to the Remote lock - ON group. Add a lost or stolen device to that group to lock it. 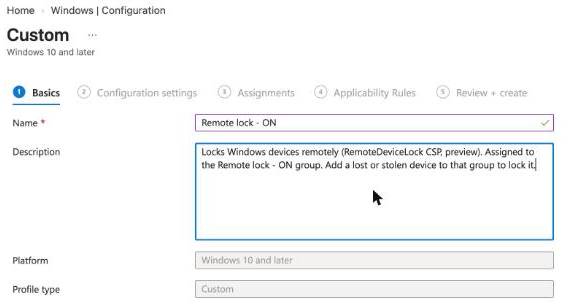
Say in the description which group drives the profile. The next admin who opens it should understand it without asking you.
Step 3: Add the Three OMA-URI Settings
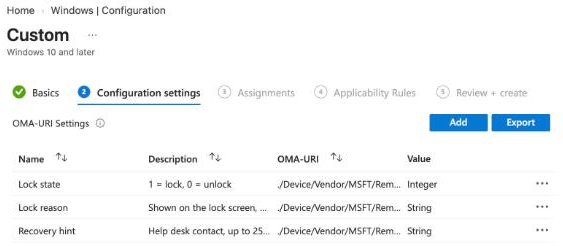
You add one row for each setting. Lock state is the only required one; the other two are the text the person holding the laptop reads.
-
On the Configuration settings tab, click Add.
-
In the Add Row panel, enter the following values, then click Save:
Field Value Name Lock state Description 1 = lock, 0 = unlock OMA-URI ./Device/Vendor/MSFT/RemoteDeviceLock/LockState Data type Integer Value 1 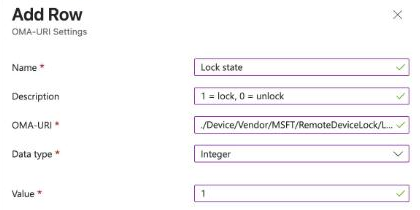
-
Click Add again and enter the lock reason, then click Save:
Field Value Name Lock reason Description Shown on the lock screen, up to 1,024 characters OMA-URI ./Device/Vendor/MSFT/RemoteDeviceLock/LockReason Data type String Value This device was reported lost and has been locked by IT. -
Click Add a third time and enter the recovery hint, then click Save:
Field Value Name Recovery hint Description Help desk contact, up to 256 characters OMA-URI ./Device/Vendor/MSFT/RemoteDeviceLock/RecoveryHint Data type String Value Found this laptop? Call the IT help desk at 604-555-0100. 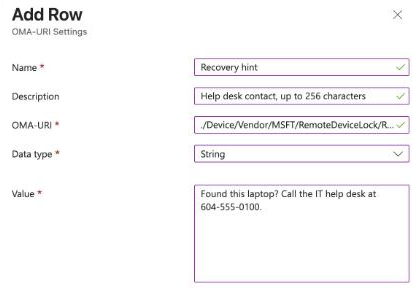
Pro tip: Write the recovery hint for an honest stranger, not for your employee. A phone number gets a laptop returned. A ticketing portal URL that only works inside the company doesn't.
-
Confirm the list shows all three rows, then click Next:
Gotcha: The paths start with
./Device/, so these are device-scoped settings. A typo doesn't fail when you save. The profile saves fine and then reports an error on every device, so paste the paths rather than typing them.
The three paths, ready to copy:
./Device/Vendor/MSFT/RemoteDeviceLock/LockState
./Device/Vendor/MSFT/RemoteDeviceLock/LockReason
./Device/Vendor/MSFT/RemoteDeviceLock/RecoveryHint
Step 4: Assign the Profile and Create It
-
On the Assignments tab, click Add groups under Included groups.
-
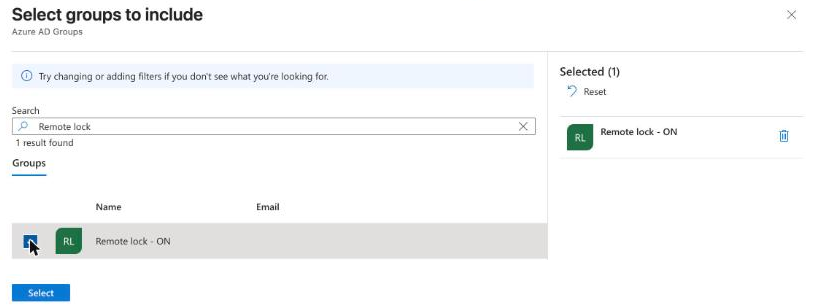
Search for the group you want this profile to lock and select it. This is where your own group goes: pick the device group you created for locked devices. In my test tenant that's Remote lock - ON from step 1. Click Select:
-
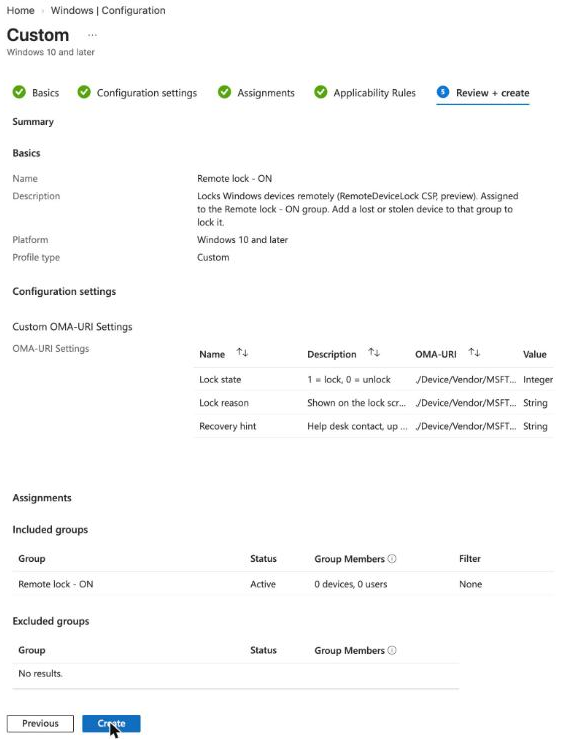
Confirm the group shows under Included groups with 0 devices, 0 users, then click Next:
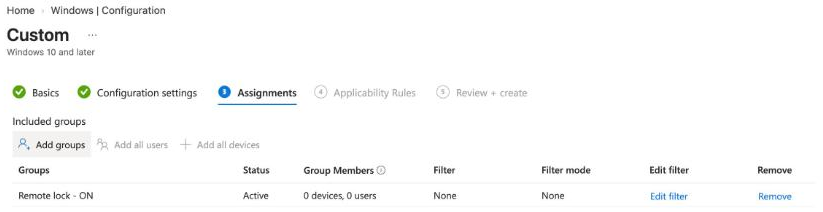
Zero devices is correct, and it's the whole point: the profile is live and assigned, and it does nothing until a device joins the group.
Warning: Never assign this profile to All devices or to a broad device group while you test. Every device in that group locks at its next check-in, and there is no local way back in. Test with a dedicated group and one spare laptop.
-
On the Applicability Rules tab, leave everything empty and click Next.
-
On Review + create, check the name, the three settings and the group, then click Create:
-
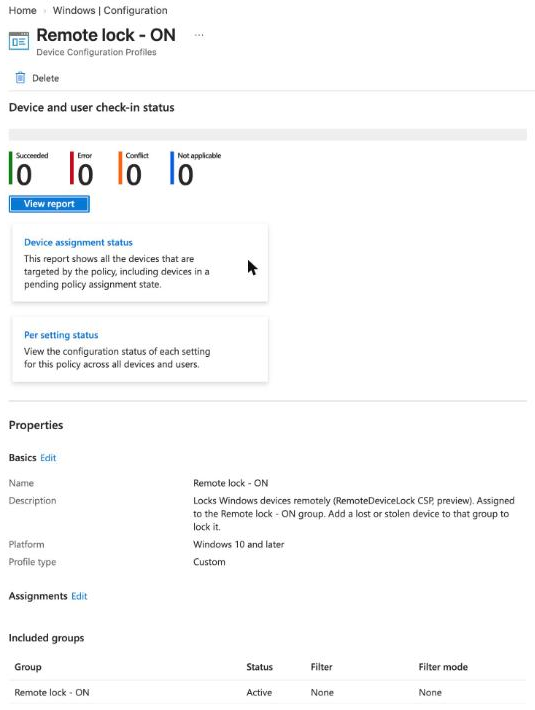
Click Refresh on the Configuration page, then click Remote lock - ON to open the profile. The overview shows the check-in status you'll watch during an incident:
Step 5: Build the Unlock Side Now, Not Later
There is no PIN, recovery code, local admin account or web sign-in that gets past a locked device. The unlock profile is the only way back, so build it the same day as the lock.
-
Repeat step 1 to create a second group named Remote lock - OFF.
-
Repeat steps 2 to 4 to create a second custom profile named Remote lock - OFF, with these differences:
Setting Lock profile Unlock profile Lock state value 1 0 Lock reason and Recovery hint rows Added Not needed Included group Remote lock - ON Remote lock - OFF
Locking a Device on the Day
-
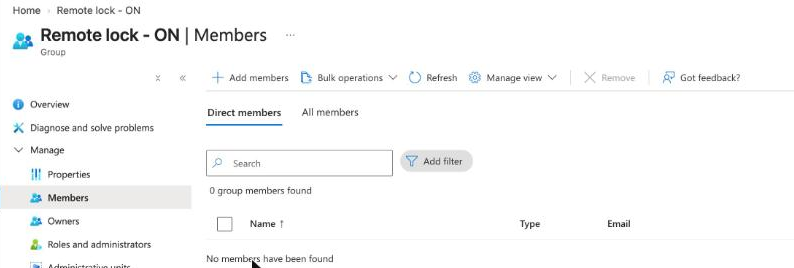
In the Intune admin center, click Groups, open Remote lock - ON, and click Members.
-
Click Add members, select the lost device (not the user), and click Select:
-
Click Devices, then Windows, then Windows devices, open the device, and click Sync, so it doesn't wait for its next scheduled check-in.
-
Revoke the user's sessions in Microsoft Entra ID. Remote lock locks the device, not the account, so the password and refresh tokens still work on every other device until you revoke them.
If the laptop is powered off, it only locks when it next reaches Intune, but the session revoke protects email, Teams and SharePoint right away. Steps 1, 2 and 4 in one go with Graph PowerShell, which is what I'd hand to a help desk:
Connect-MgGraph -Scopes "GroupMember.ReadWrite.All","Device.Read.All","User.RevokeSessions.All"

$device = Get-MgDevice -Filter "displayName eq 'LAPTOP-0142'"
$lock   = Get-MgGroup  -Filter "displayName eq 'Remote lock - ON'"

# Lock: add the device object to the lock group
New-MgGroupMember -GroupId $lock.Id -DirectoryObjectId $device.Id

# Kill the user's sessions everywhere, because the lock doesn't touch the account
Revoke-MgUserSignInSession -UserId "alex@contoso.com"
Unlocking When It Comes Back
-
Remove the device from the Remote lock - ON group.
-
Add the device to the Remote lock - OFF group.
Gotcha: Do step 1 before step 2. Two profiles writing different values to the same LockState setting is a conflict, and Intune reports the conflict instead of applying either value.
-
Sync the device and wait for the Remote lock - OFF profile to show Succeeded. The user signs in to the same desktop they left.
-
Remove the device from the Remote lock - OFF group.
Steps 1 and 2 with Graph PowerShell:
$unlock = Get-MgGroup -Filter "displayName eq 'Remote lock - OFF'"

Remove-MgGroupMemberDirectoryObjectByRef -GroupId $lock.Id -DirectoryObjectId $device.Id
New-MgGroupMember -GroupId $unlock.Id -DirectoryObjectId $device.Id
Verify It Worked
On the profile overview, the device moves from pending to Succeeded under check-in status. On the device itself, the RemoteDeviceLock CSP also reports its own state through a read-only Status node:
| Status | Meaning |
|---|---|
0 | Unlocked |
1 | Locked |
2 | Lock pending |
3 | Error |
And the user sees the default "Device locked" screen with your lock reason and recovery hint under it.
What It Doesn't Cover
Remote lock blocks the Windows sign-in screen, not the boot path. Windows Recovery Environment, Safe Mode and booting from a USB stick all still work on a locked laptop. It also doesn't isolate the device from the network or erase anything.
So the lock is one piece of the lost-device process, alongside three others:
| Gap | Cover it with |
|---|---|
| Someone pulls the drive or reimages the laptop | BitLocker, enforced by an Intune disk encryption policy |
| The account is still signed in elsewhere | Revoke sessions, reset the password or disable the account in Entra ID |
| The laptop is never coming back | Intune Wipe |
If BitLocker isn't on every device today, fix that before you rely on this. Without it, the lock screen is a door with no wall around it.
This is the same pattern I use for anything I want to switch on per device without a portal button: a CSP setting, a profile, and an assigned group that stays empty until it's needed. If you're managing Windows devices for Azure Virtual Desktop, I covered enrolling cloud-only session hosts in Azure Virtual Desktop with Intune for cloud-only users, and the Graph cmdlets above read better with the output tips in PowerShell Format Output.
It's still a preview, so try it on one spare laptop before it goes into your runbook, and check the official remote lock documentation for changes before you roll it out wider.