


Provisioning resources manually in Azure Portal is fun, but what about the case when you need to provision more than 50 instances of one resource with the same configuration and settings? How about multiple VM deployment with custom script extensions and also configuring backup for each VM?
Manually working with resources in this amount gets tiring really soon, and takes forever to get a similar experience across your environment. What if I tell you there is a tool just to do that?
In this article, I’ll guide you through setting up your local computer to use terraform CLI along with Azure CLI for Azure Portal authentication and enabling remote deployment. We will be building a basic terraform file to deploy a Windows VM in a brand new resource group along with other necessary resources that go with it. I’ll also cover a lot of basics and important information that you should be aware of while working with Terraform locally or in a DevOps pipeline.
If you are here for the first time, check out the previous article where I explained the Terraform Basics to get you started.
Terraform with Azure for Beginners
Prerequisites
- A device with VS Code Installed.
- An Active Azure Subscription to deploy resources.
Set up Local Desktop for Terraform Development
To use terraform on your local desktop, you need to install Terraform CLI and Azure CLI. You can additionally install VS Code extensions to make it easier while working with the terraform files.
Installing Terraform on Local Desktop
The first thing you need to work with Terraform is to download its executable CLI package from the Official Hashicorp website. Use this link here and download the Zip file and extract the exe to a local directory.
Once you extract the file from the zip, follow the steps below to add the location of that executable to your Environment path.
- Navigate to Start Menu and search “Environment Variables” and it will show you the system variables option.
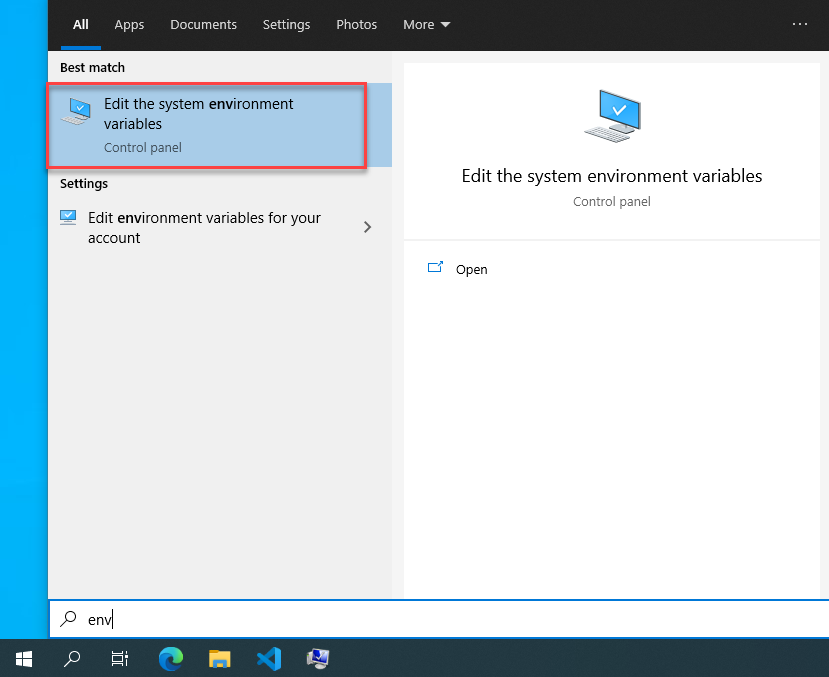
- Once opened, click “Environment Variables“.
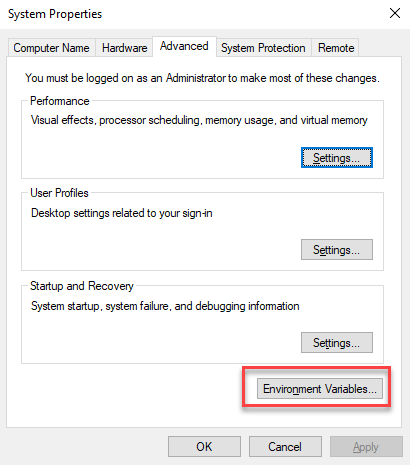
- Click “Edit” under the User variables section.
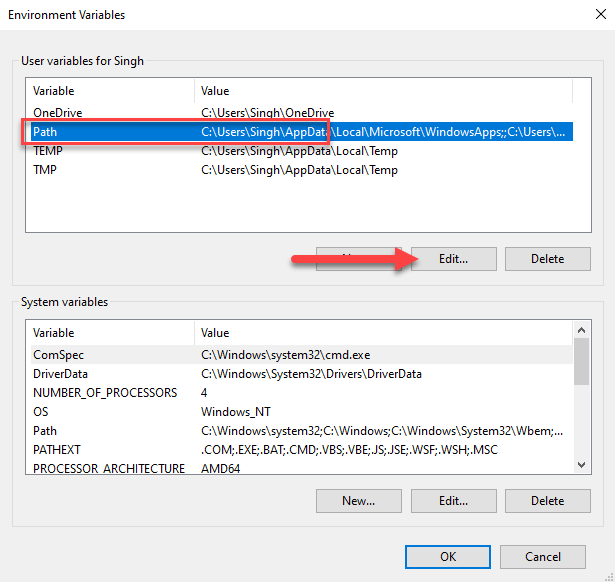
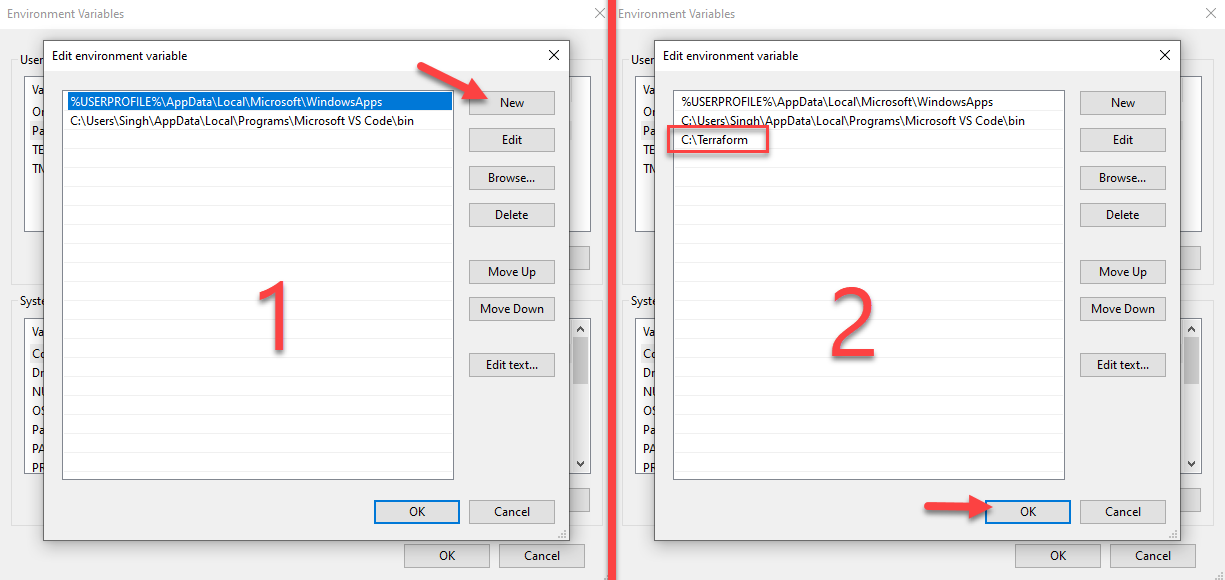
- Click “New” and add the path where your Terraform file lives. In my case, I’ve stored the Terraform CLI executable under
C:\\Terraformfolder. Click Ok at the end and save your settings.
Installing Azure CLI Module
The next step is to install the Azure CLI Module. You can simply open PowerShell in an Elevated Session with Administrator permission and run the following commands.
Invoke-WebRequest -Uri https://aka.ms/installazurecliwindows -OutFile .\AzureCLI.msi; Start-Process msiexec.exe -Wait -ArgumentList '/I AzureCLI.msi /quiet'; rm .\AzureCLI.msiYou should start seeing the progress as the command downloads the MSI file and initiate the quiet installation for you.
Installing Terraform Extension for VS Code
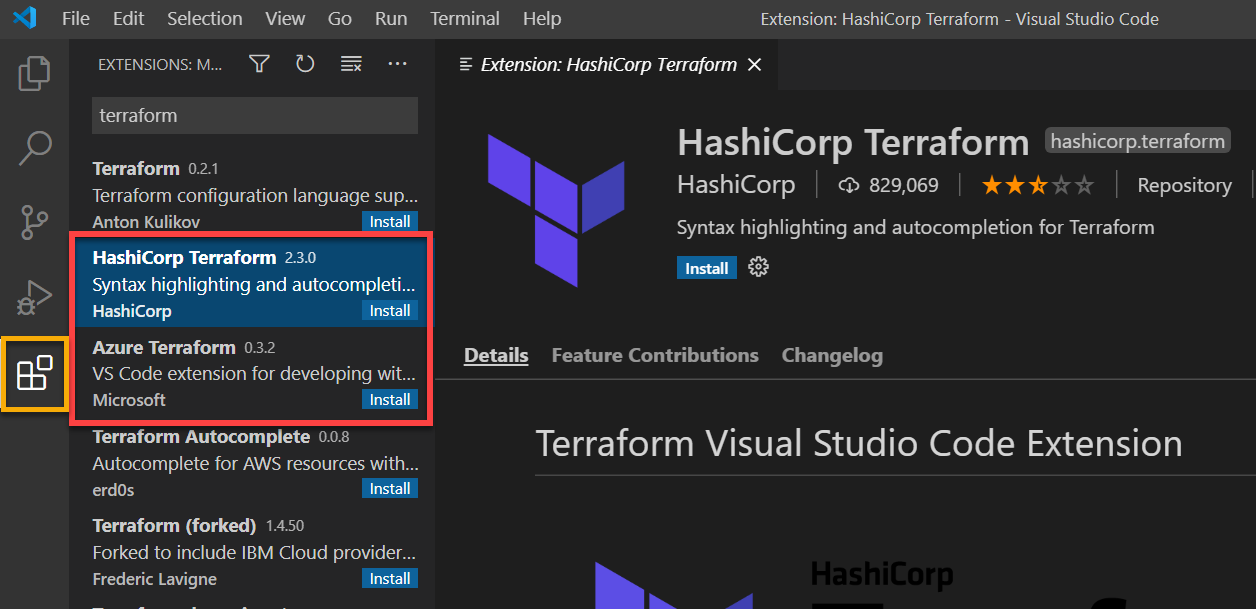
The next step is to download and install an extension in VS Code that would help you in writing terraform code much more easily and also provide guidance when your file isn’t correct. Use the following steps to install the Terraform Extension inside VS Code.
- Navigate to your VS Code application and click Extension on the left sidebar.
- Search for “Terraform“
- Install both “Azure Terraform” and “HashiCorp Terraform” for a better experience while writing the configuration files.
Validating Terraform and CLI Installation
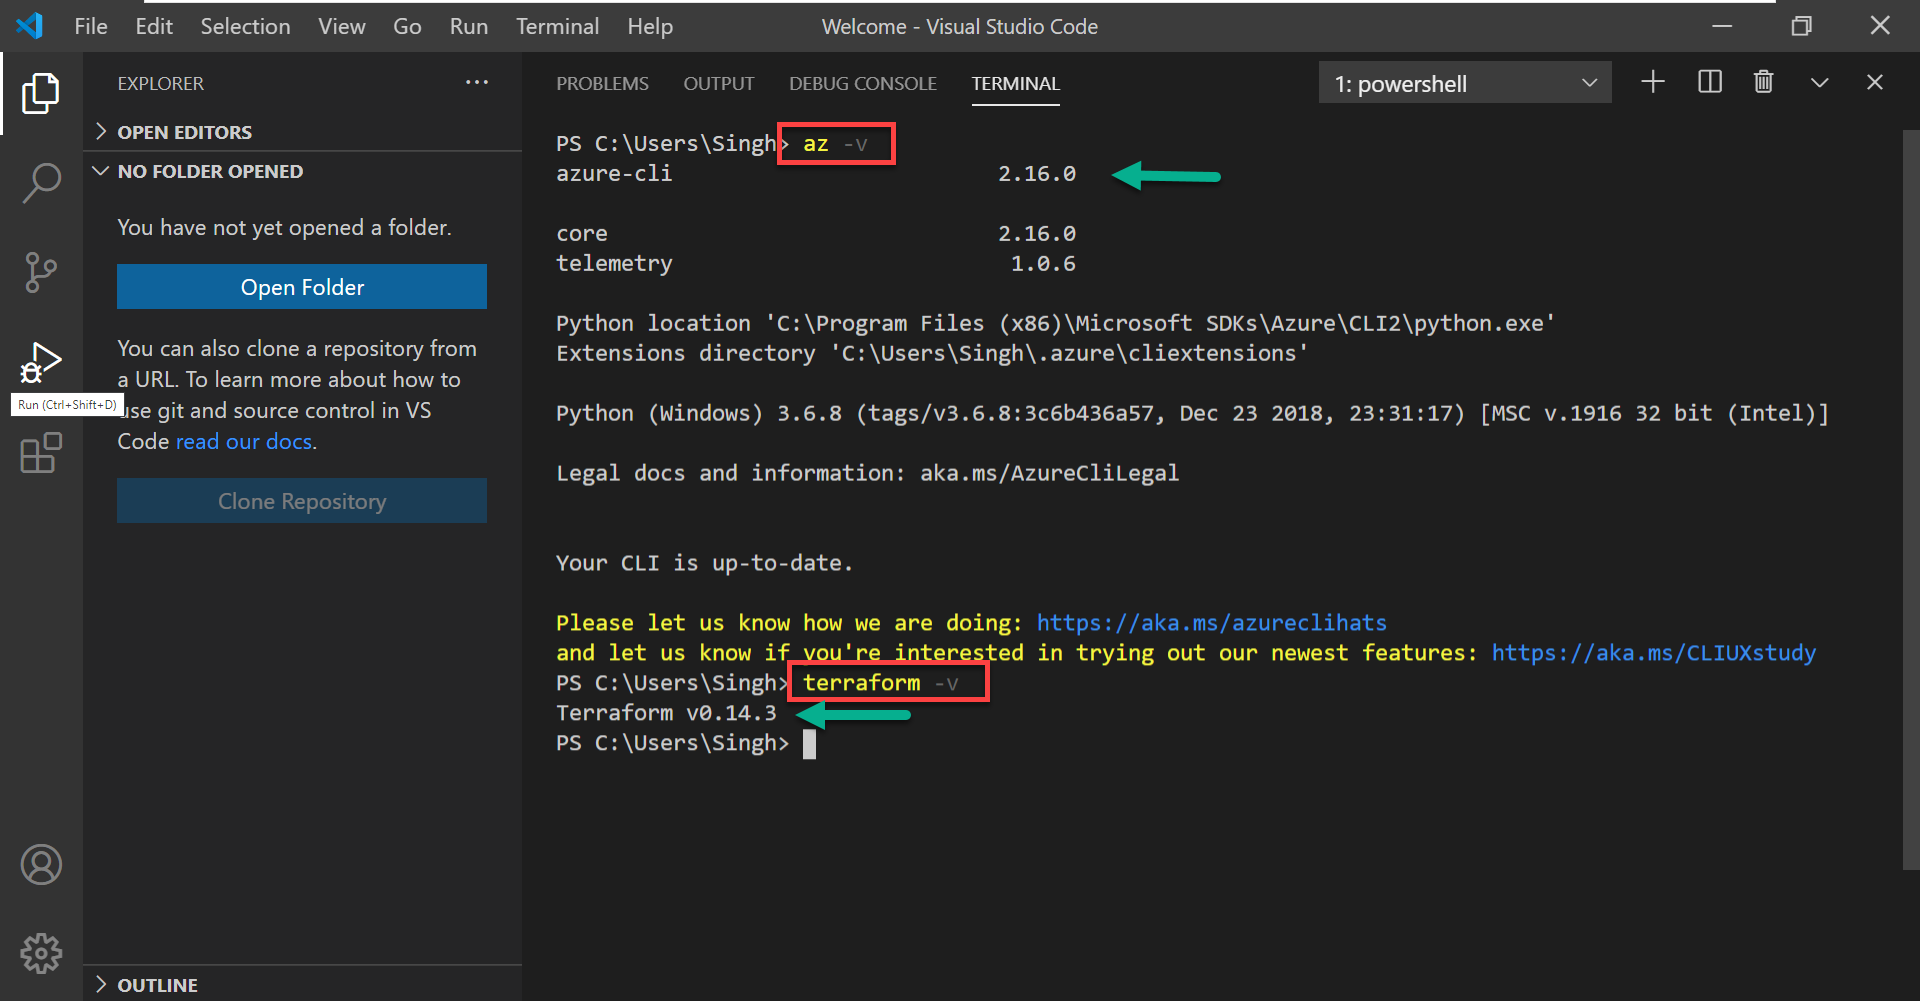
Now that you have done all the necessary installations, open a terminal to test the installation before moving forward with writing anything. You can either use PowerShell or use Terminal in VS Code session by clicking `Ctrl+“(backtick).
Run the following command to confirm the installation of terraform cli. This command simply verifies the version of terraform installed on the computer.
PS> terraform -vNext, run the following command to validate the installation of Azure CLI.
PS> az -vHere’s the expected result if you have installed everything properly.
Building Your First Terraform Project
This would be one step towards your DevOps journey to build, scale, and automate your tasks using Infrastructure as Code and other configuration management tools. Once you have installed and configured your terraform environment on a local computer, follow the steps below to build your first terraform code.
All the code used in this article is available at this GitHub repo:
Folder and File Structure in Terraform
Before going in to write any code, I’d like to address what the folder structure looks like when you are working with terraform code. You will be working with 3 primary files to deploy terraform code.
- The first file is called
main.tf, which terraform treats as an entry point for your build. This file contains all the resource information that you need in your Azure environment. - The second file is
variables.tfwhich stores the list of input variables that you will use in themain.tffile. The idea here is to not hardcode any values in the main file. - The third file, for now, would be
terraform.tfvars. This is optional, however, recommended if you are working with the terraform for the first time. Ideally, you should never check out this file to your source control as this file is used to define what values you want to pass on for all the input variables and it may contain sensitive information. - One last thing that I would not address here is the
terraform.tfstatefile. This file contains sensitive information about your environment built using terraform and ideally should be stored in secure storage, like Azure Storage Containers. However, we’ll cover the remote backend in the upcoming articles.
Creating the Terraform Main File
Enough of theory, let’s dive in and write our first lines of Terraform configuration to create a resource group and a simple VM with Windows 10 image.
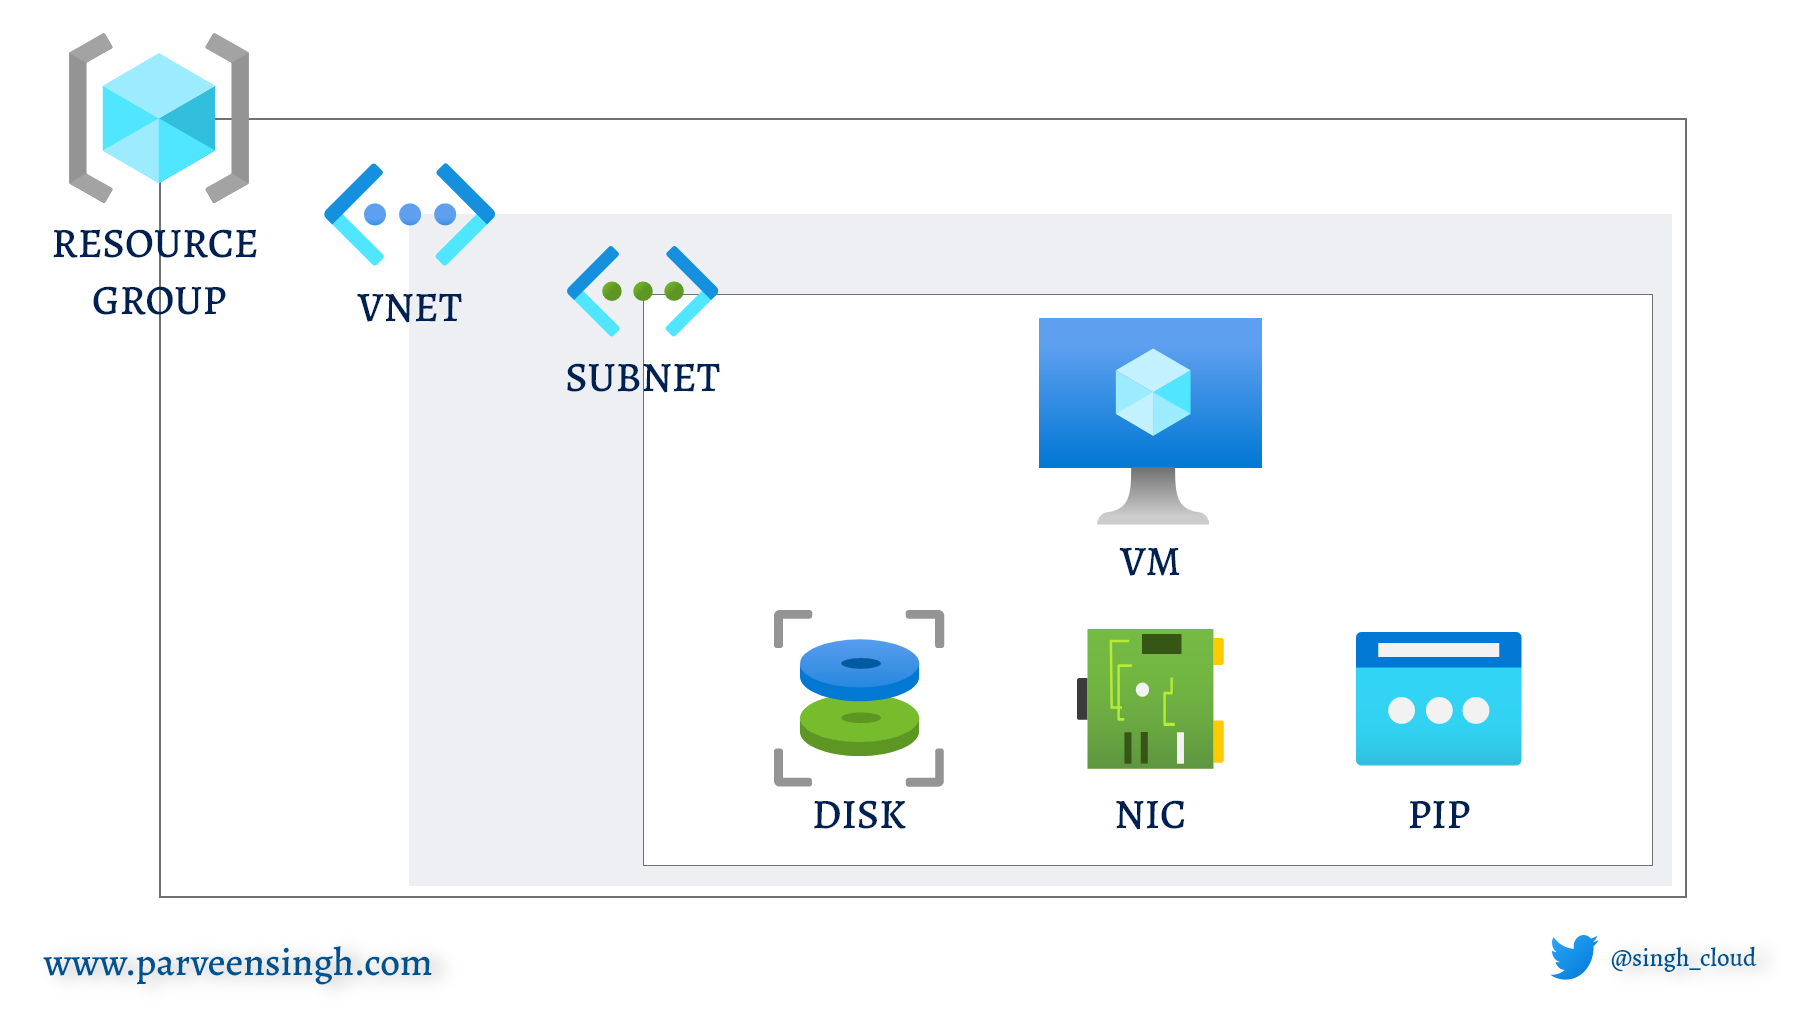
If you recall from the previous article, you need to plan out your deployment and resource prior to writing anything in terraform configuration. This is the best time to think of what resource you might need in Azure and then draw a high-level diagram to add any necessary dependencies. Since we are going to deploy a VM, I have the following diagram that I’ll add to terraform config one resource at a time to create the overall architecture. Let’s begin:
- The first thing you need to do is pick a folder where you’d want to store your code. Create a new folder at your location of choice and open that folder inside the VS Code using the “Open Folder” option in the File menu.
- Next, create a file called
main.tfon the root of the folder and paste the following code inside the file. - I’m using a name for the resources by calling
var.{variablename}which you will define in the next section after the main file.
terraform {
  required_providers {
    azurerm = {
      source  = "hashicorp/azurerm"
      version = "2.41.0"
    }
  }
}

provider "azurerm" {
  features {}
}

resource "azurerm_resource_group" "resourcegroup01" {
  name     = var.resource_group_name
  location = var.location
}

resource "azurerm_virtual_network" "azvnet" {
  name                = "${var.resource_group_name}-vnet"
  location            = var.location
  address_space       = ["10.0.0.0/16"]
  resource_group_name = azurerm_resource_group.resourcegroup01.name
}

resource "azurerm_subnet" "subnet" {
  name                 = "${var.resource_group_name}-snet"
  address_prefix       = "10.0.1.0/24"
  resource_group_name  = azurerm_resource_group.resourcegroup01.name
  virtual_network_name = azurerm_virtual_network.azvnet.name
}

resource "azurerm_public_ip" "static" {
  name                = "${var.resource_group_name}-vm-pip"
  location            = var.location
  resource_group_name = azurerm_resource_group.resourcegroup01.name
  allocation_method   = "Static"
}

resource "azurerm_network_interface" "vm_nic" {
  name                = "${var.resource_group_name}-vm-nic"
  location            = var.location
  resource_group_name = azurerm_resource_group.resourcegroup01.name
  ip_configuration {
    name                          = "primary"
    subnet_id                     = azurerm_subnet.subnet.id
    private_ip_address_allocation = "Dynamic"
    public_ip_address_id          = azurerm_public_ip.static.id
  }
}

resource "azurerm_windows_virtual_machine" "simple-vm" {
  name                = var.vm_name
  resource_group_name = azurerm_resource_group.resourcegroup01.name
  location            = var.location
  size                = "Standard_B4ms"
  admin_username      = var.admin_username
  admin_password      = var.admin_password

  network_interface_ids = [
    azurerm_network_interface.vm_nic.id,
  ]
  os_disk {
    name                 = join("_", [var.vm_name, "OsDisk"])
    caching              = "ReadWrite"
    storage_account_type = "Standard_LRS"
  }

  source_image_reference {
    publisher = "MicrosoftWindowsDesktop"
    offer     = "windows-10"
    sku       = "20h1-pro"
    version   = "19041.685.2012032305"
  }
}
Don’t be scared by looking at the file at the first glance. Let’s see what’s involved in the file above.
Terraform and Providers
The very first component of the file contains information about the provider you are going to use in the configuration. This can either be Azure, AWS, or any other available providers. Declare the providers with a specific version so that your configuration doesn’t break as a new version is rolled out for the provider that you are using.
You can get the list of resource in azure provider on this website.
https://registry.terraform.io/providers/hashicorp/azurerm/latest
terraform {
  required_providers {
    azurerm = {
      source  = "hashicorp/azurerm"
      version = "2.41.0"
    }
  }
}

provider "azurerm" {
  features {}
}
Resource Group
As per the diagram, the first thing you need in Azure to host any resource is the resource group. The terraform component for creating a resource group in Azure is below. You have to pass in two required variables for a name and location for your resource group. As a side note, You can have multiple resource groups in one terraform file and name them separately by changing the value of the resource, in this case, resourcegroup01.
Also, it’s worth mentioning that the var.resource_group_name and the value in the resource line resorucegroup01 are not linked at all. Think of the first one as what you get in Azure and the second one is simply used to reference the terraform resource inside the file. Whenever there is a dependency of resources on one another, you always reference the components using terraform resource name, not the variable name.
resource "azurerm_resource_group" "resourcegroup01" {
  name     = var.resource_group_name
  location = var.location
}
Virtual Network Components
Now you have a resource group, the next step is to build your networking components that build out the infrastructure networking requirements. The file below depicts three resources that you will need to secure and function your infrastructure.
The first one is virtual network. As you saw with resource group, there is a dedicated resource module available for virtual network that you need to use. The four required parameters are passed in along with the name of the resource azvnet which I have used in the next subnet component.
As you think about building the subnet and NSG, you should be able to visualize that you cannot have a subnet without a virtual network and both without a resource group. That poses a problem of adding a ‘dependency‘ of vNet and resource group for Subnet deployment.
The trick is simple, you need to call the vNet resource within the file so that terraform knows what to deploy first in order to fulfill the dependency requirements. As you can see on the last line below, I simply called the resource group followed by the virtual network resource referencing the name variable of both.
Note, you need to call the resource by its resource name instead of variable name as I mentioned earlier as well. The format would look something like this, resource.resourcename.parameter
resource "azurerm_virtual_network" "azvnet" {
  name                = "${var.resource_group_name}-vnet"
  location            = var.location
  address_space       = ["10.0.0.0/16"]
  resource_group_name = azurerm_resource_group.resourcegroup01.name
}

resource "azurerm_subnet" "subnet" {
  name                 = "${var.resource_group_name}-snet"
  address_prefix       = "10.0.1.0/24"
  resource_group_name  = azurerm_resource_group.resourcegroup01.name
  virtual_network_name = azurerm_virtual_network.azvnet.name
}
Network Card and Public IP
Great! Now you have your virtual network configured, all you need at this point is a network card and a public IP for your VM. You can choose to skip the Public IP if you don’t need to log in.
The public IP resource is pretty self-explanatory if you understood the resource above. However, there is something interesting happening in the network interface resource under IP configuration. As you can tell, I’m referencing the subnet ID from the subnet that I created earlier so that the NIC can get a private IP address. Also, in order to assign a Public IP address, I’m referencing the Public IP resource right above, to get the ID of the static IP that is assigned automatically to the public IP resource.
resource "azurerm_public_ip" "static" {
  name                = "${var.resource_group_name}-vm-pip"
  location            = var.location
  resource_group_name = azurerm_resource_group.resourcegroup01.name
  allocation_method   = "Static"
}

resource "azurerm_network_interface" "vm_nic" {
  name                = "${var.resource_group_name}-vm-nic"
  location            = var.location
  resource_group_name = azurerm_resource_group.resourcegroup01.name
  ip_configuration {
    name                          = "primary"
    subnet_id                     = azurerm_subnet.subnet.id
    private_ip_address_allocation = "Dynamic"
    public_ip_address_id          = azurerm_public_ip.static.id
  }
}
Virtual Machine in Terraform
Finally, the last step towards this main file is the Virtual Machine itself. As you can tell, there is a dedicated terraform resource for creating both Windows and Linux machines separately. I’m using the Windows VM resource below.
Few things to note here:
- A VM can have more than one network interface, so the value of
network_interface_idsis passed as an array ofIDof the network card that we built earlier in the above sections. - You can skip the OS disk section as terraform will provision that automatically. However, if you need to customize the disk name, you can do so by providing your custom variables.
- Source image section must use a valid image name, SKU, and version. Use
az vm image listto search for the image that you need for this resource.
resource "azurerm_windows_virtual_machine" "simple-vm" {
  name                = var.vm_name
  resource_group_name = var.resource_group_name
  location            = var.location
  size                = "Standard_B4ms"
  admin_username      = var.admin_username
  admin_password      = var.admin_password

  network_interface_ids = [
    azurerm_network_interface.vm_nic.id,
  ]
  os_disk {
    name                 = join("_", [var.vm_name, "OsDisk"])
    caching              = "ReadWrite"
    storage_account_type = "Standard_LRS"
  }

  source_image_reference {
    publisher = "MicrosoftWindowsDesktop"
    offer     = "windows-10"
    sku       = "20h1-pro"
    version   = "19041.685.2012032305"
  }
}
Creating the Terraform Variables File
The next step is to create a file called variables.tf. This is the file where you will define what input variables you need for your build such as resource-groupname, location, vm-name, and so on to make sure we don’t hardcode anything inside the main terraform file. You have already seen where these variables are used in the main file above.
## File -> variables.tf
variable "resource_group_name" {}
variable "location" {}
variable "vm_name" {}
variable "admin_username" {}
variable "admin_password" {}
Creating Variable Input File (Local)
The one last thing to ensure you have a separate file to provide all the input values and not publish the information to your source control is the file terraform.tfvars. This file is treated as the input values for the variables we defined in the file above. It is highly recommended not to publish this file to your source control and add this to your gitignore so that you don’t check out this by any chance.
Keep the VM name below 15 characters.
## File -> terraform.tfvars
resource_group_name = "demo-rg"
location = "eastus"
vm_name = "terraform-vm"
admin_username = "demo"
admin_password = "SuperSecretP@ass"
Validating and Deploying the Build
You have done the heavy lifting for the code. Now it’s time to validate and deploy the resource.
The first step towards validating the code is to log in to Azure and initialize all the providers that you have used in the code. Use the terminal in the VS Code and type the following command and Login to your Azure Account.
PS> az login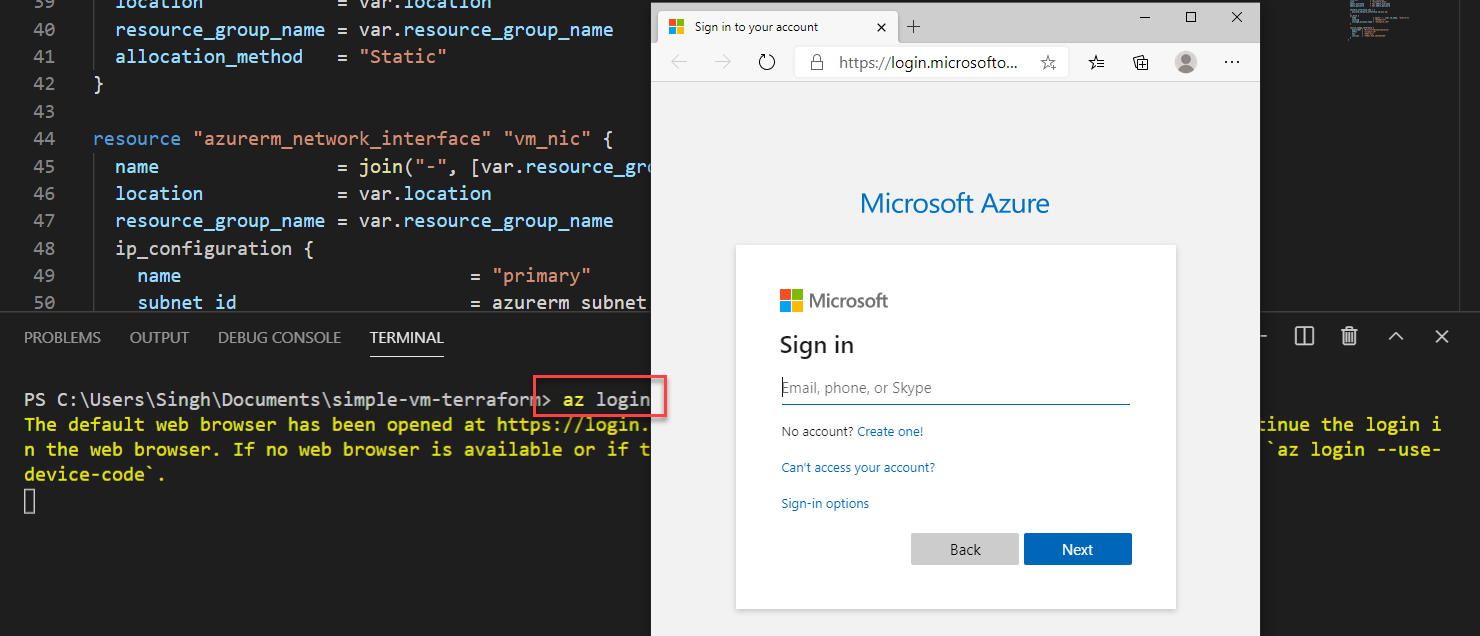
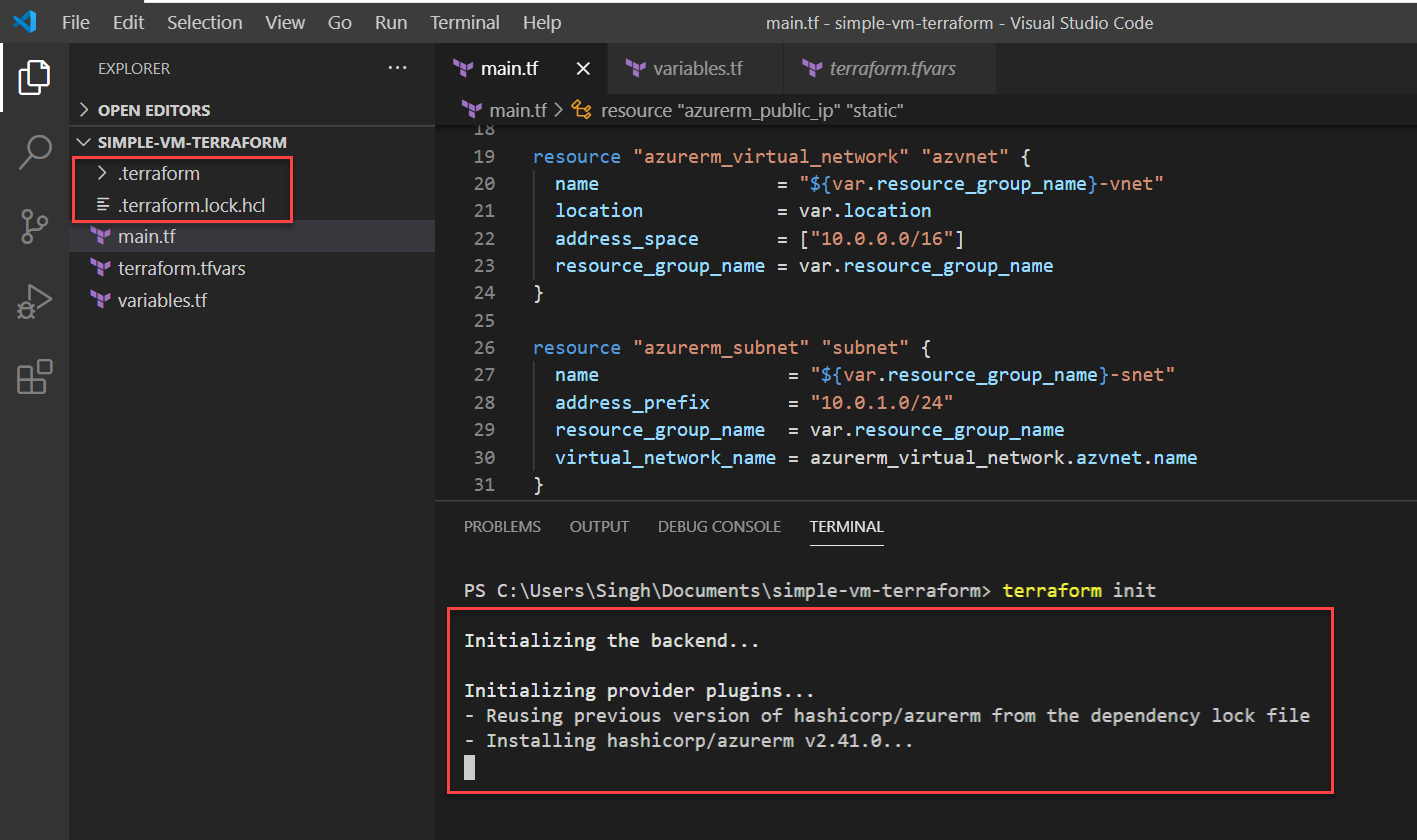
Run the terraform init command to initialize the provides in your terraform code. Running this command will create the local directory called .terraform for the terraform providers. Be sure to add this to.gitignore file before pushing the code to the source control repo.
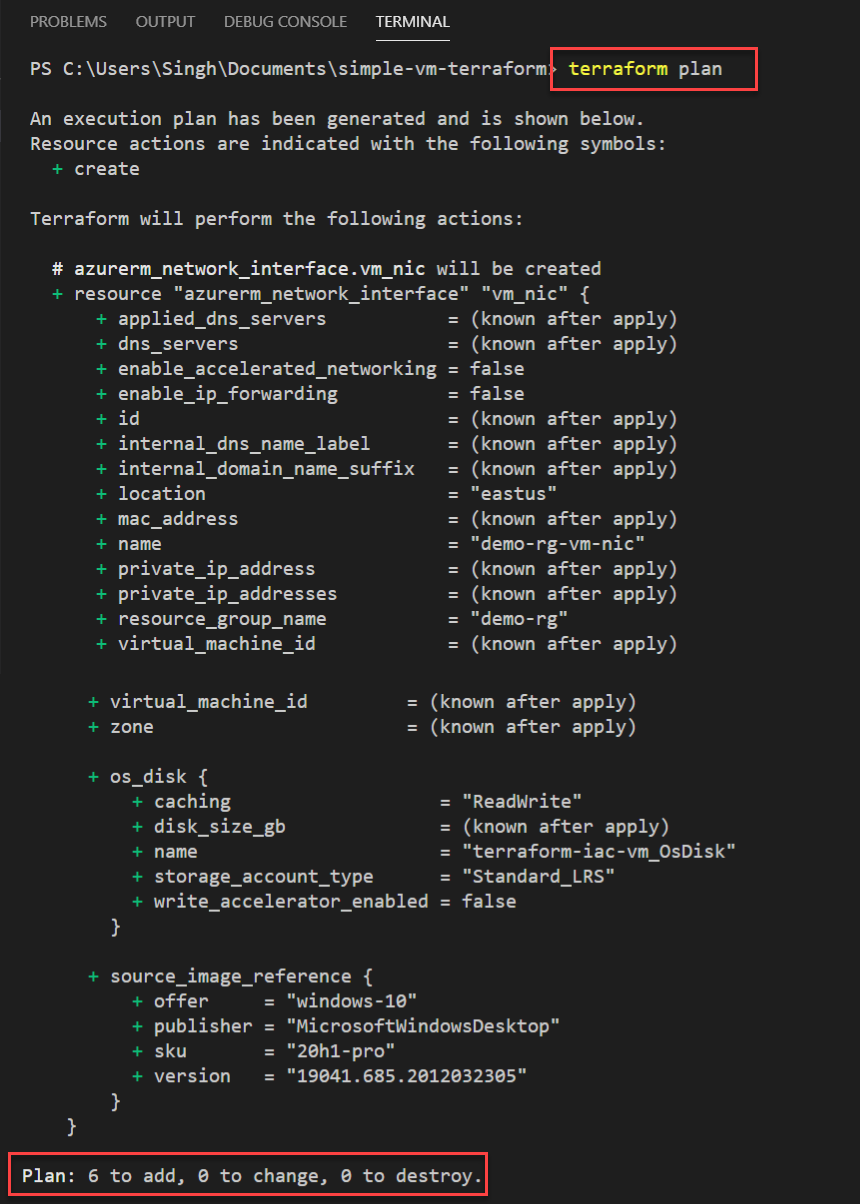
The next step is to plan and see what will be deployed in the Azure as the terraform code is run. Use the command terraform plan to see what resource will be deployed in your Azure Subscription. At this point, terraform is only going to plan the configuration against your Azure environment and NOT going to deploy anything. Here’s a sample output of what the results look like.
Three Common Actions in Terraform Plan
Terraform is a state aware language. That means if you run the terraform deployment twice on the same environment, it is not going to deploy anything if it sees an identical environment already exist. However, if you change any variable name, resource or add anything new in existing terraform code, terraform does not destroy everything to build it from scratch instead, it appends the resource (if possible) to expand the environment without modifying any existing resource that doesn’t need an update. You can usually see this by running the terraform plan where it gives you one of these three actions in the terminal.
- Add
+→ This action adds or deploy the resource as it may be your first time running the code or this resource doesn’t exist already in the Azure subscription. You can expect this when you run theterraform applyfor the first time. - Destroy
-→ This action destroys the resources from the Azure. This can either show up if you run theterraform destroycommand or remove any resource from your configuration file. - Append
~→ This is a special case where you change a value of an existing resource, but the resource does not need to be deployed from scratch and the value can be updated “in-place” without affecting the functionality of that resource. This action can show up when changing “Tags” on azure resources which can be done without re-deploying the resource itself.
Now the last step to perform is to apply the changes and wait for the terraform to build the infrastructure defined in the main file. Run the following command and wait for terraform to complete the deployment. Be sure to enter “yes” once prompted to confirm, in the terminal session.
PS> terraform apply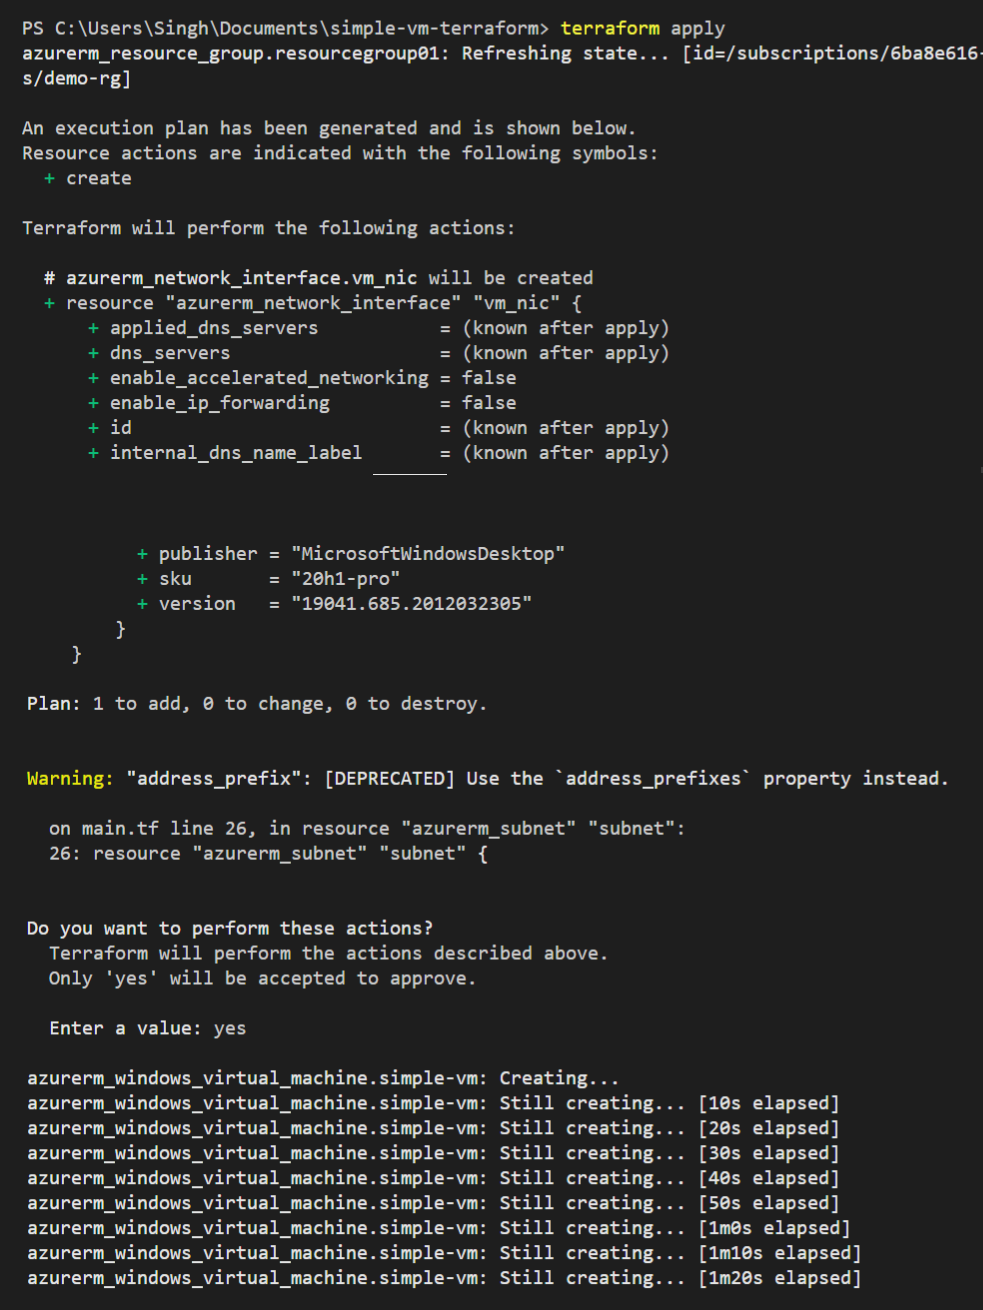
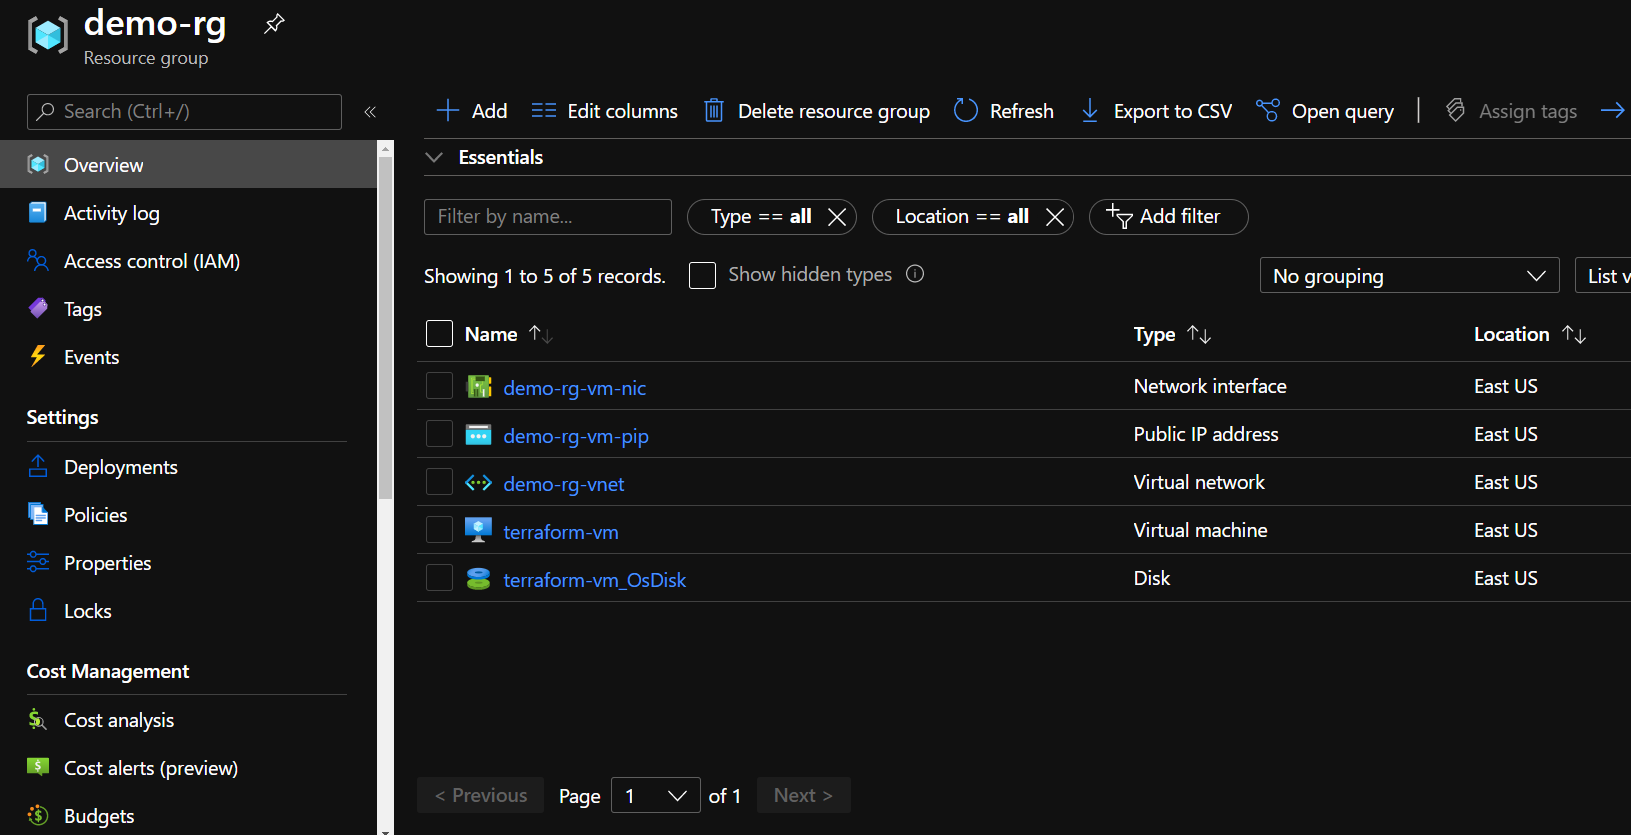
At this point, you should be able to see the resource in the Azure Portal.
Cleanup the Resource
Once the deployment is complete and you have tested the resource, clean up the environment using terraform CLI as shown below:
PS> terraform destroy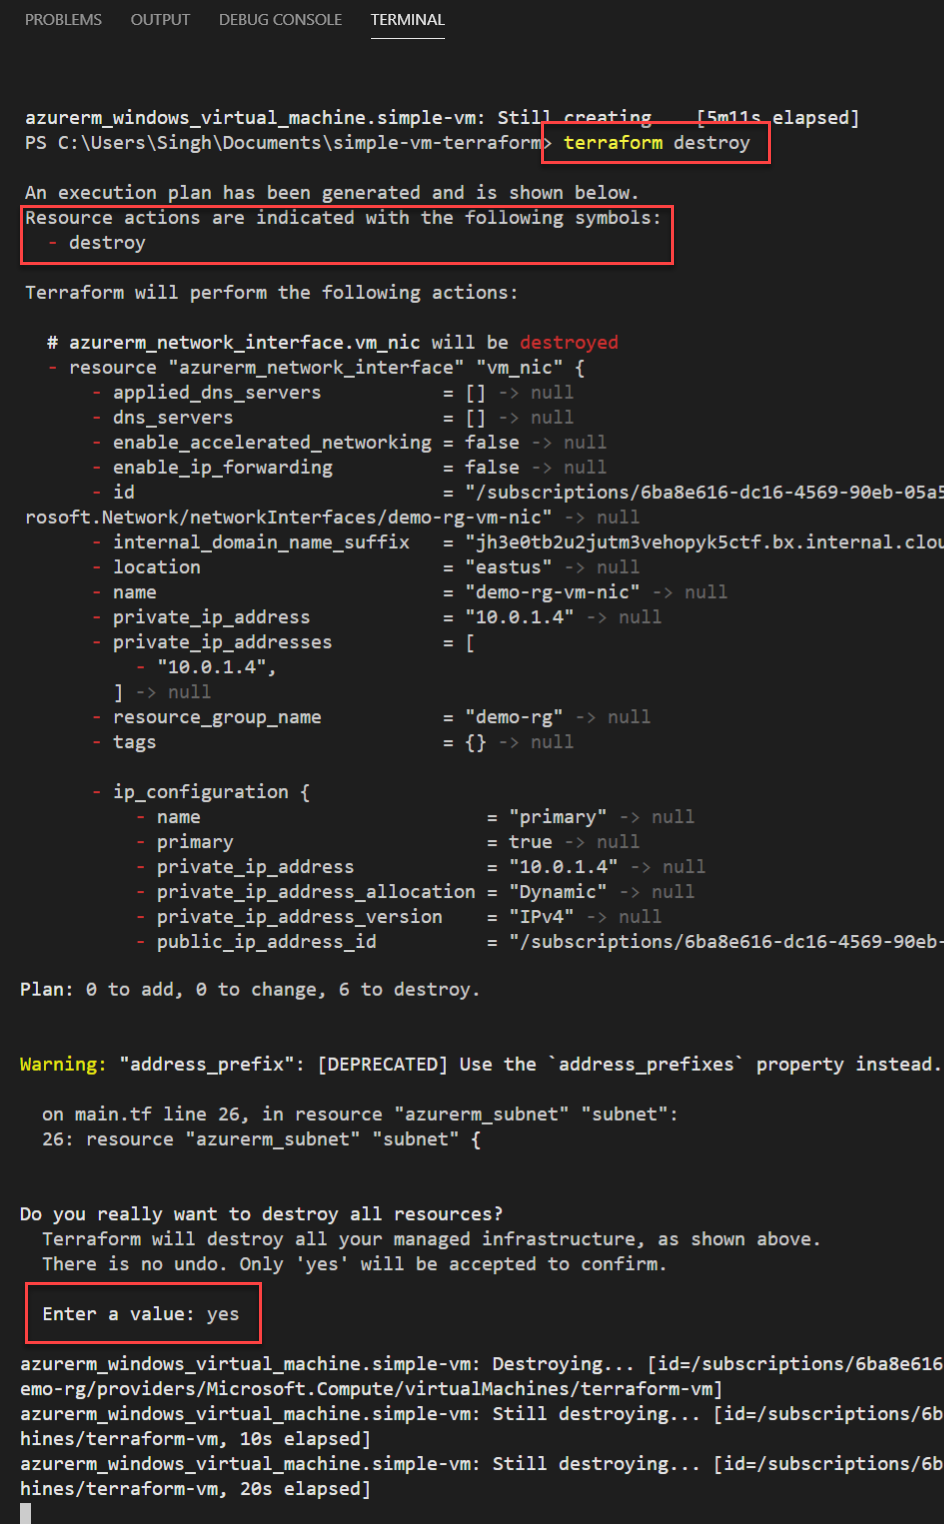
Conclusion
I hope you learned the basics of Terraform and provisioned your first IaC project using terraform CLI with Azure Provider. Be sure to keep an eye on upcoming articles on this series where we will keep building on this small project.
Please consider subscribing to the site if you would like to be notified of new articles directly in your inbox and also hit me up on Twitter if you liked reading this.


