Working with PowerShell can sometimes be surprising when you might expect more data but only see a few items. One of the reasons for that is PowerShell’s display formats. It uses the module’s default formatting when displaying the data without any specific instruction from the user.
PowerShell will often hide the object’s information based on how much you really need to see. However, it gives you the flexibility to decide how you wish to get the data presented to you using multiple formatting options available out of the box in PowerShell.
In this article, you’ll discover different ways to display output from any command in PowerShell.
Prerequisites
If you haven’t checked the previous article in the series, use the links below to go through those articles before going deep into PowerShell formatting.
PowerShell Formatting Overview
PowerShell has a set of commands that gives you control over how you wish to display the output for any particular object. The names of all the cmdlets begin with the verb Format. You can use these cmdlets to decide how you like to see the data.
Run the following command in your PowerShell terminal session to see the list of all the command available for formatting:
Get-Command -Verb Format -Module Microsoft.PowerShell.UtilityFormat the Output using Format-Table
Format-Table is one of the most common formatting styles that you will use when working with PowerShell. The command output in PowerShell follows the default output formatting system.
For example, run the following command in the PowerShell windows and observe the output:
Get-Date
The output displays a standalone date and time without much information. However, the default view of the command only displays necessary information and lets you choose the details you would like to see.
Add the formatting option to the command now using a pipeline and observe the output:
Get-Date | Format-Table
If you wish to change the sequence of the table heading, use the -Property attribute to customize the look of the table output:
Get-Date | Format-Table -Property Month, Day, Hour, Minute, Millisecond
Format the Output using Format-List
Format-List is the second most used command while working with PowerShell outputs. It is super helpful when the output of any command doesn’t give you all the information you need. PowerShell only display’s a chunk of important information and requires you to explore more with the output to find the relevant information for your use case.
While working with the same command as before, use the list format and observe the output in this case:
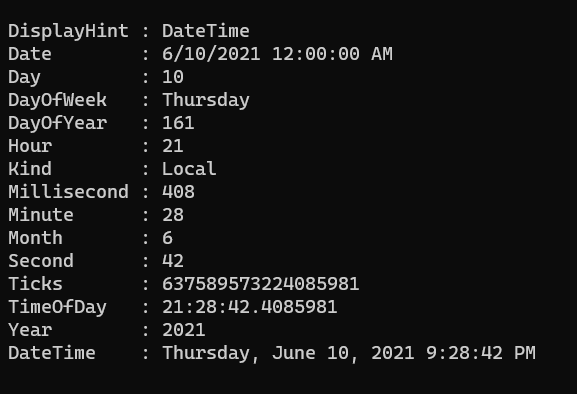
Get-Date | Format-List
The output, in this case, includes a lot more information than the table in the previous section. The list format is the most convenient format when trying to visualize all the data available in the output of any command.
Similar to the previous example, use the -Property attribute to filter the output results as per the need:
Get-Date | Format-List -Property Month, Day, Hour, Minute, MillisecondFormat the Output using Format-Hex
The format-hex displays the hexadecimal value of string input in the terminal. This command is not used widely. However, it is good to know the options available within the formatting section of PowerShell.
The command expects an array of strings to treat as an input. Run the following command in your PowerShell terminal to see the output in hex format:
"PowerShell Hex Format" | Format-Hex
Format the Output using Format-Wide
Another less-traveled path and less frequently used format type is Format-Wide, which displays the list of items in columns and forms a grid.
Run the following command in your PowerShell terminal to review the output:
Get-Process | Format-Wide -Column 5
Conclusion
I hope the article helps you understand some of the fundamental output formatting in PowerShell as you move towards using PowerShell with Azure and Office 365 services.
Reference
If you are looking for more resources, check them the articles below:
Discover more from Parveen Singh
Subscribe to get the latest posts sent to your email.


