DevOps has become a hot topic in the IT industry due to the increased demand for reducing manual efforts and operationalize the workflow using automation tools and techniques. The idea of using the DevOps strategy is to reduce the overall efforts and errors, ultimately building more scalable and stable application environments.
Continuous Integration(CI) and Continuous Development(CD) strategy has become one of the core components and best practices of building agile workloads that can support frequent updates by multiple contributors and still be able to build, test and deploy robust infrastructure.
In the last article, I introduced you to Azure App Service and explained some high-level information about its capabilities and functionalities. I’ll be continuing the series and giving you in-depth tutorials on how to leverage app services to get the maximum out of its capabilities. Check out my previous article below, in case you missed it.
In this article, I’ll guide you through how to create Azure App Service resources and also enable continuous deployment to leverage DevOps capabilities for your application code. Stick with me to the end and you’ll see how painless and straightforward it is to enable CI/CD capabilities for your application.
Assumptions
Before I begin with the configuration and deployment, there are some requirements that you must have in place to follow along:
- You should be familiar with Azure Portal and navigating inside the portal.
- You should have an active account on GitHub or Azure DevOps.
- You should be able to access shell.azure.com using your Azure account or be able to use PowerShell or CLI on your local computer (optional).
Creating a Resource Group for App Service
First of all, you need a resource group that will host your App Service and other dependent resources like App Service Plan and App Insights. You can choose to leverage any existing resource group if you already have one. The creation of a resource group is pretty simple and you can use either PowerShell or Azure Portal for this task as described below.
Creating a Resource Group using PowerShell/CLI
Use the following PowerShell or CLI command based on your preference. Feel free to change the resource group name and location as needed.
New-AzResourceGroup -Name "RGName" -Location "Canada Central"
## OR
az group create --name "RGName" --location canadacentralCreating Resource Group using Azure Portal
If you are comfortable using Azure Portal, follow the steps below to create a new resource group.
- Login to Azure Portal (portal.azure.com)
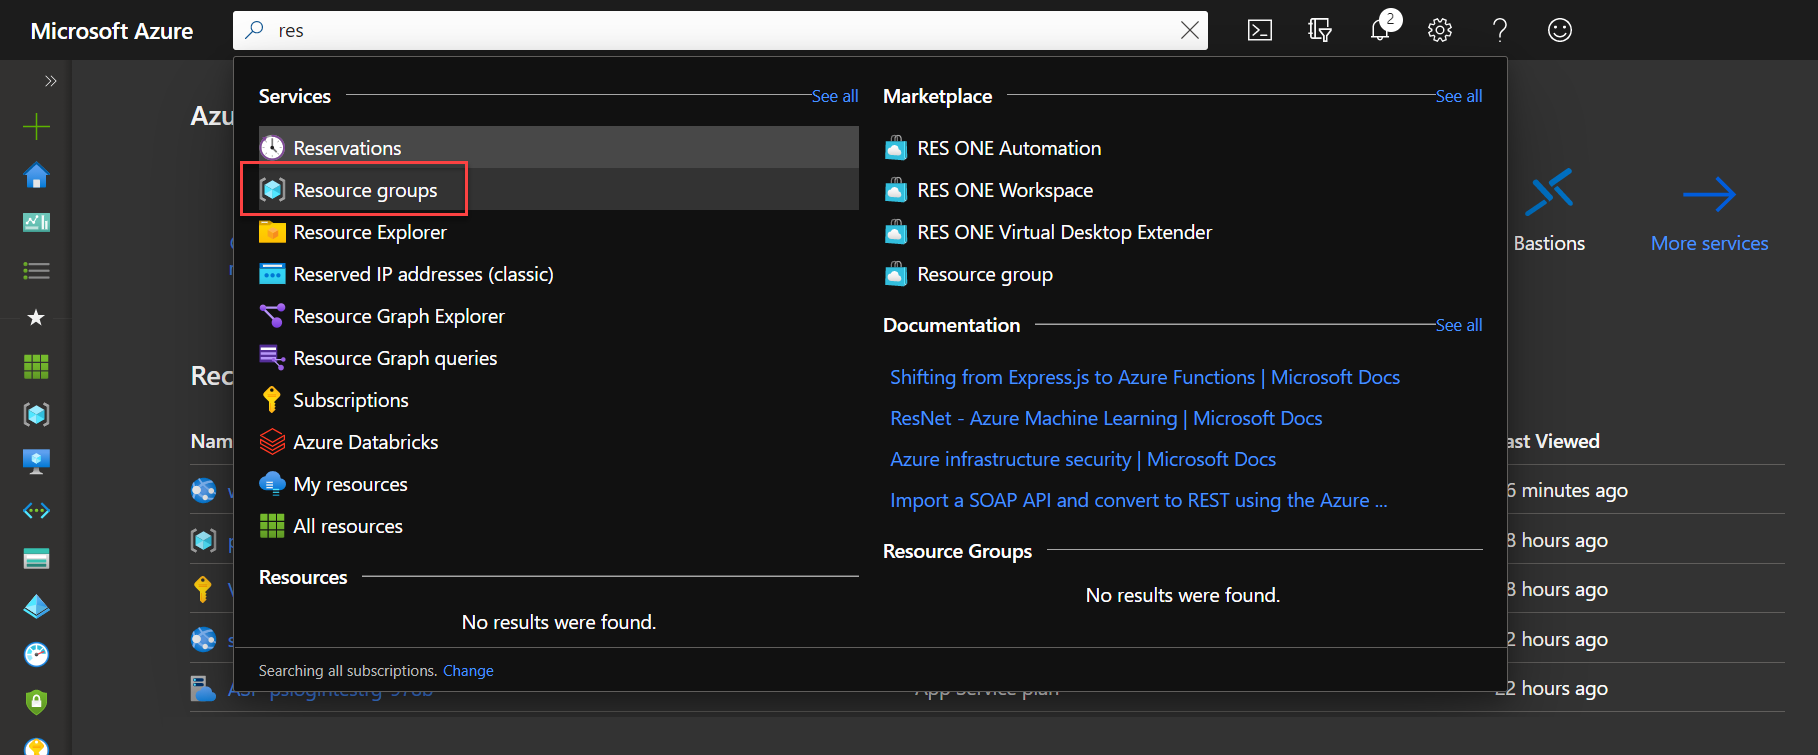
- In the top search bar, search for “Resource Group”
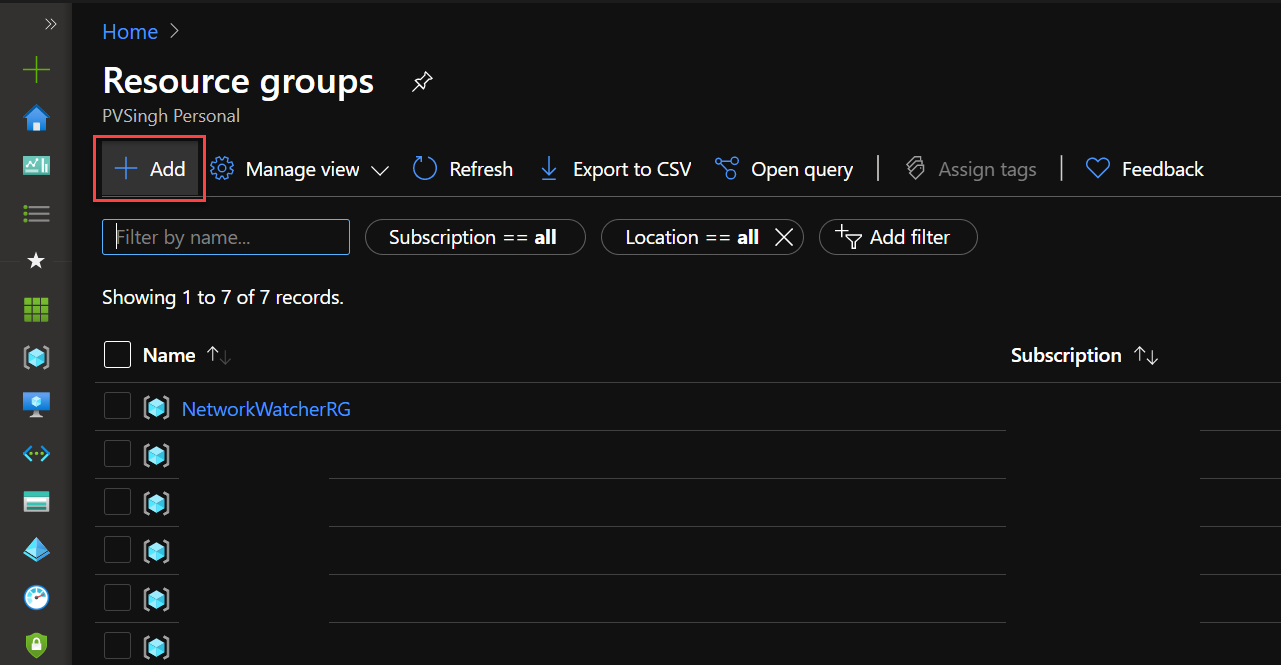
- Click “Add” on the next screen.
- Fill the information for your resource group name and click “Review and Create“. This should give you an option to create the resource group once you review the final configuration.
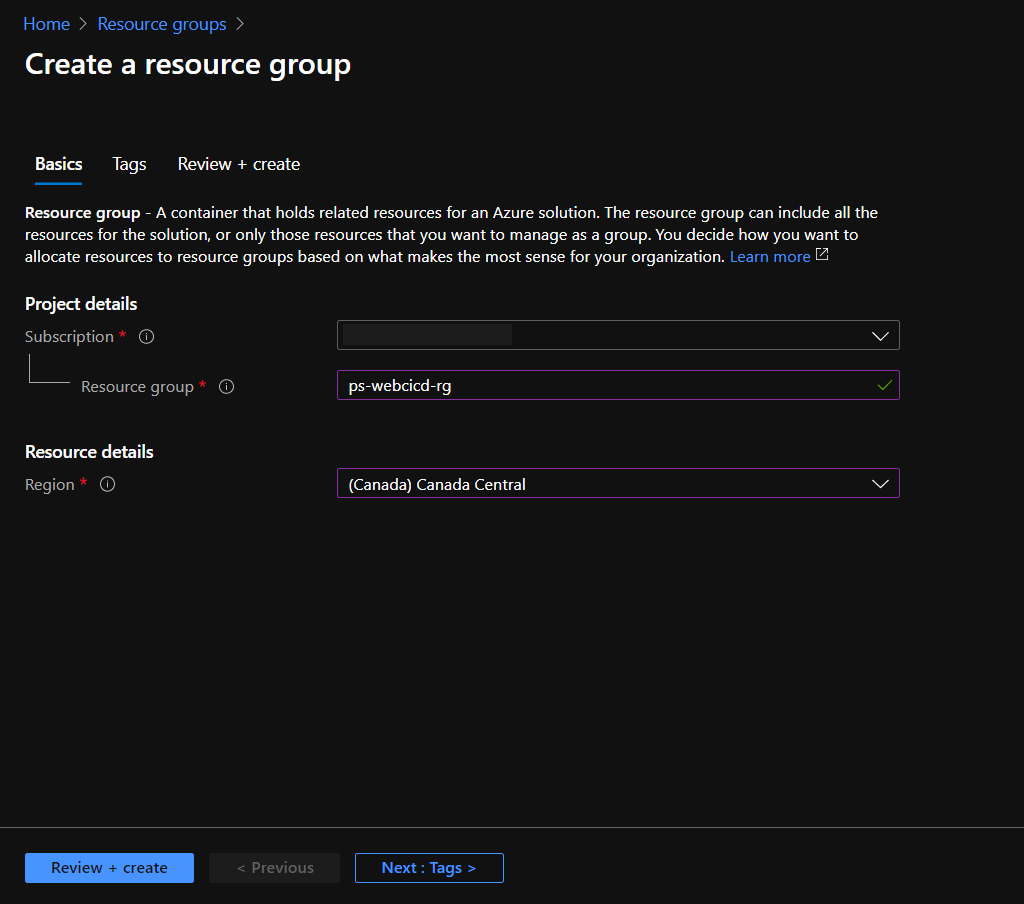
Once you deploy the resource group, move to the next section for some more interesting work now.
Creating Azure App Service Resource
Before setting up the CI/CD Pipeline, a Web App resource is required that’d connect with your Repository of choice for the code integration. You can deploy the necessary resources using either PowerShell or Azure Portal. I’ve provided the steps for both options, feel free to choose one of them to deploy the app service resources.
Using PowerShell for App Service Deployment
Creating App Service using PowerShell or CLI involves deploying dependent resources like App Service Plan before the app service itself. App Service Plan is used to host the application and its runtime environment. Follow through the steps below and be sure to change the variable names based on your resource naming convention.
$Location = "East US"
$ResourceGroupName = "ps-webcicd-rg"
$PlanName = "AppServicePlan01"
$AppName = "CICDApp-$(Get-Random)"
$Plan = New-AzAppServicePlan -ResourceGroupName $ResourceGroupName -Name $PlanName -Location $Location -Tier "Free"
$App = New-AzWebApp -ResourceGroupName $ResourceGroupName -Name $AppName -Location $Location -AppServicePlan $PlanNameUsing Azure Portal for App Service Deployment
Are you a fan of using Azure Portal instead? I’ve got you covered!
Follow the steps below to deploy your app service resource using the Azure Portal.
- Navigate to the resource group that you wish to use for your App Service resource.
- Click “Add” on the top left to see the list of resources to choose from.
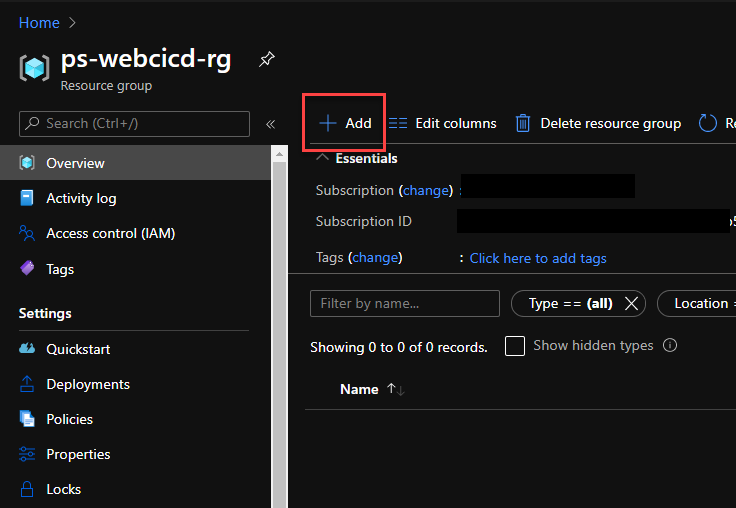
- Choose “Web App” from the list.
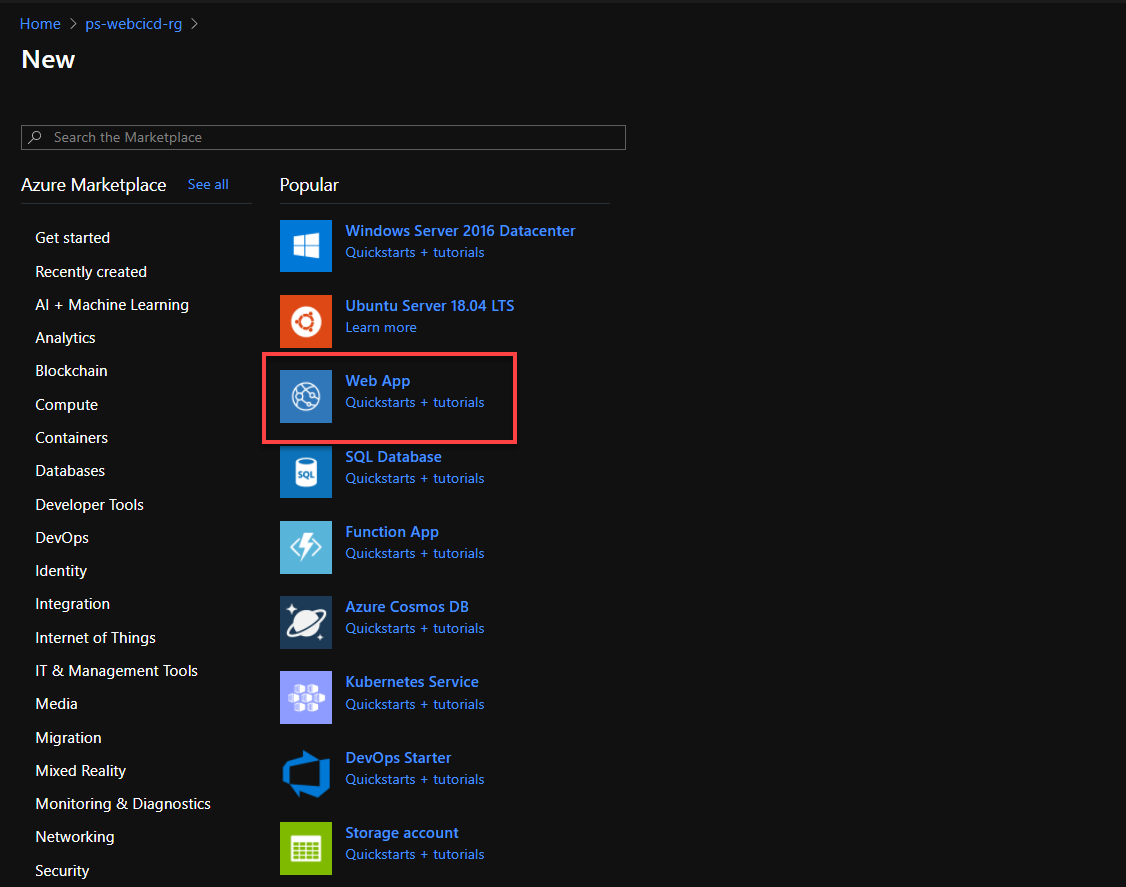
- Fill out the details as per your application’s usage. I’ll be using NodeJS with “Node 12 LTS” Runtime. Be sure to use “F1” Free tier for your application to avoid any resource cost. It’s FREE of cost 😉
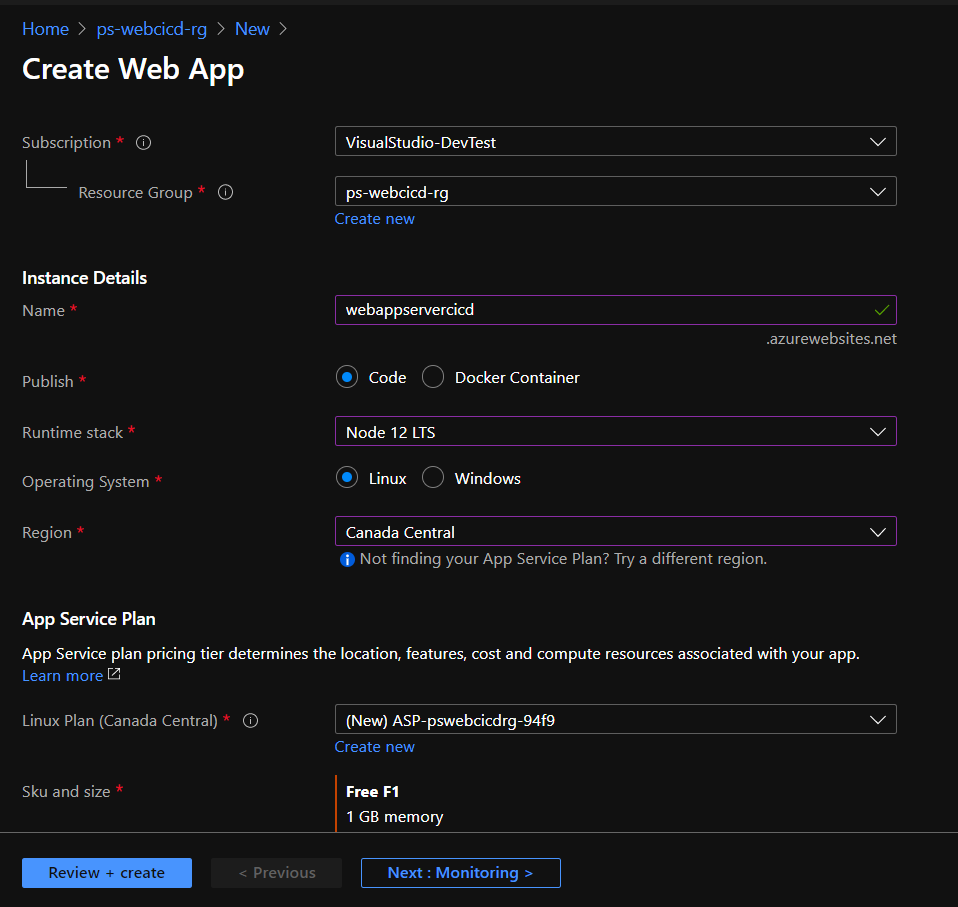
- Finish the next steps by clicking “Review and Create“.
Now with that, you deployed your web app and an app service plan from a single panel. In the next step, you’ll configure the continuous deployment for the newly created app service with GitHub and Azure DevOps.
Setting up Continuous Integration and Continuous Deployment (CI/CD)
At this point, you should have your application up and running with a generic web page that you get out-of-box. The next step is to configure the deployment repo for your application. To do this, you’ll be connecting the app service with GitHub using an option in the app service called “deployment center“.
Before you move forward with the configuration, use the link below to copy, clone or fork my Repository that contains a sample node web application so that you have a sample code to play with during the setup. Store the code in either GitHub or Azure DevOps Repo depending on which platform you choose for connection. I’ll be using this repository as a CI/CD source for the demo of both Azure and GitHub Repos.
The next final step to this configuration is to enable Repo access for continuous development. To do this, you need to navigate to the newly deployed app service resource and choose Deployment Center from the left panel.
Refer to this same page whether you want to connect Azure Repos or GitHub repo. I’ll be explaining both approaches from here.
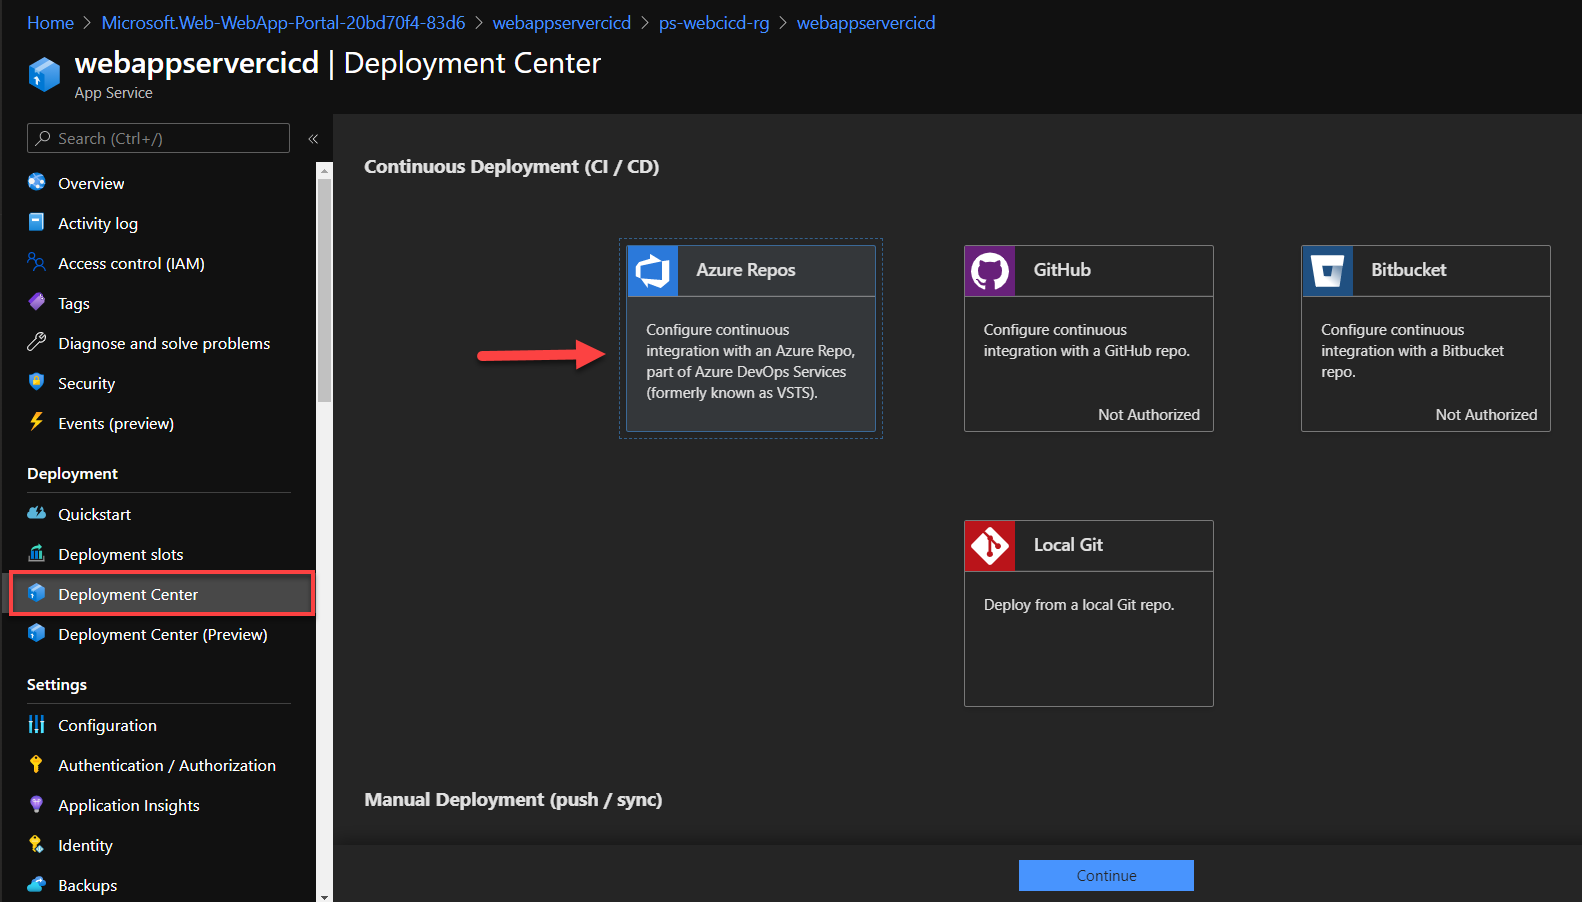
Configuring CI/CD with Azure Repos
If you are connecting your Azure Repos with Azure App, make sure you have already created an Azure DevOps Organization to store your project files. Once ready, continue with the steps below.
- Click on “Azure Repos” and press Continue
- Azure Repo supports Azure Pipeline build which creates a pipeline and release build for you in Azure DevOps that is automatically triggered on code updates.
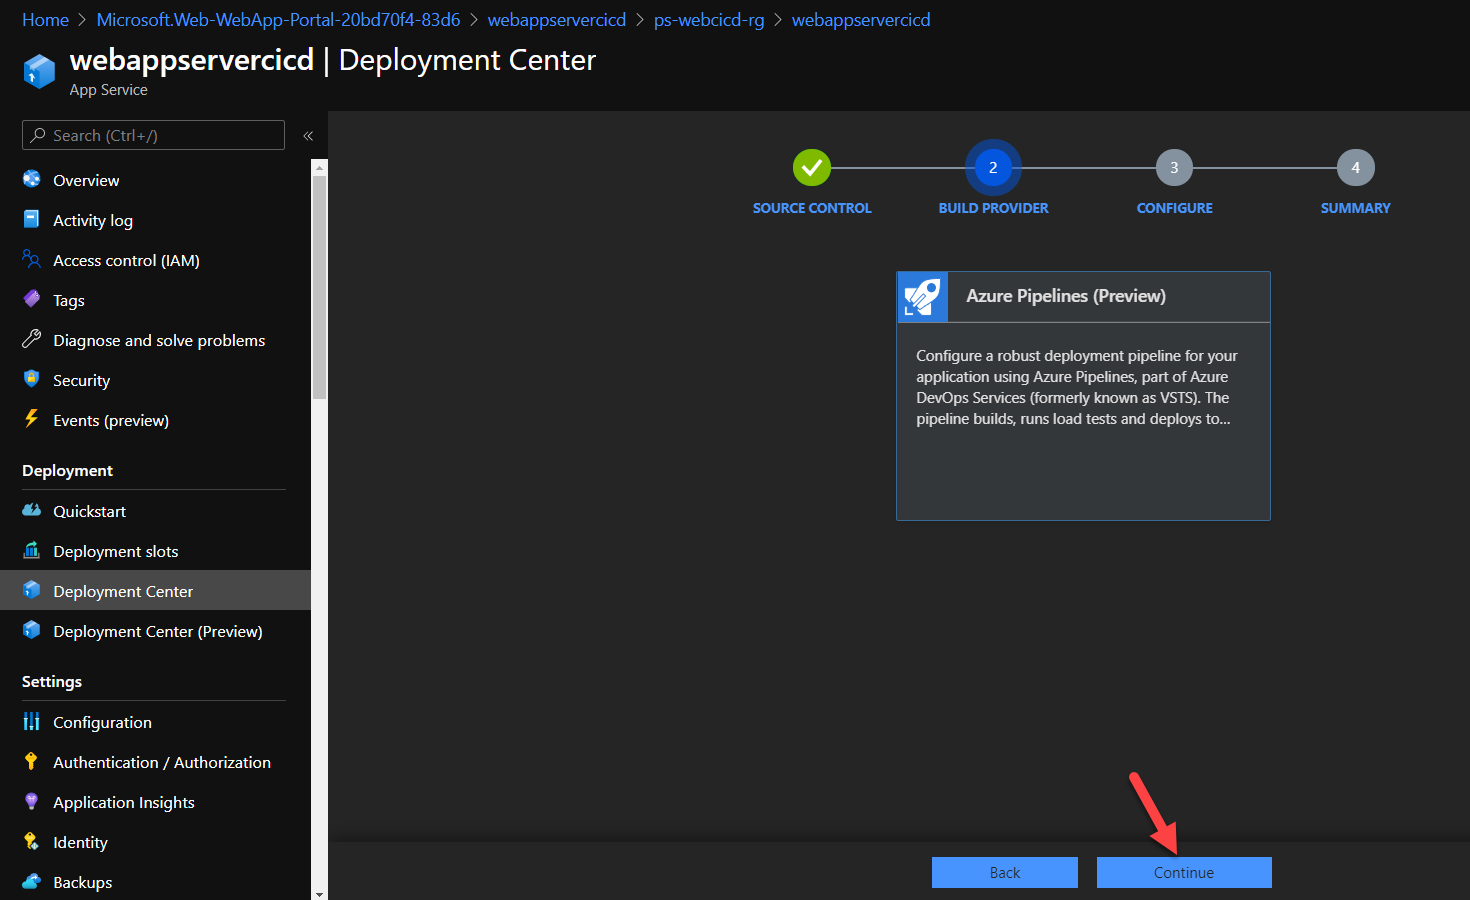
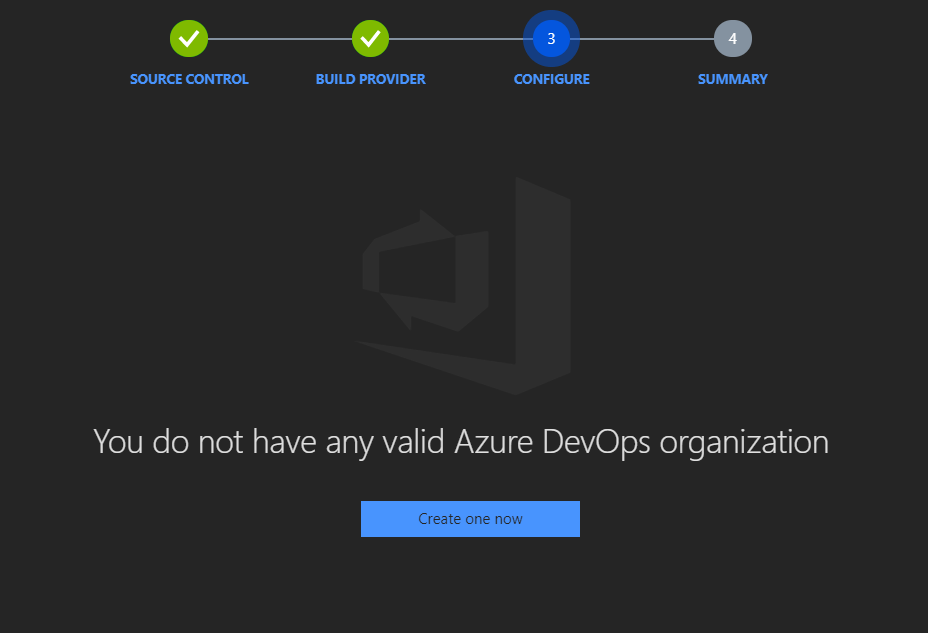
- If you see the image below when trying to connect, you probably haven’t created the Azure DevOps Organization and Projects yet. Follow the steps here to configure your Project and store repos. Once the project is configured, refresh the Azure Portal and follow the steps again to add Azure Repo for deployment center integration.
Make sure that the Account used for Azure Portal Login has permissions to the DevOps Organization as well or it won’t be able to access any projects and repos.
- Once the Connection is successful with the Azure DevOps, you should start seeing the Organization that you have access to and the projects within each organization.
- Choose the repo that you copied or cloned earlier. Since it’s a Node project, make sure you set the startup command to
npm start.
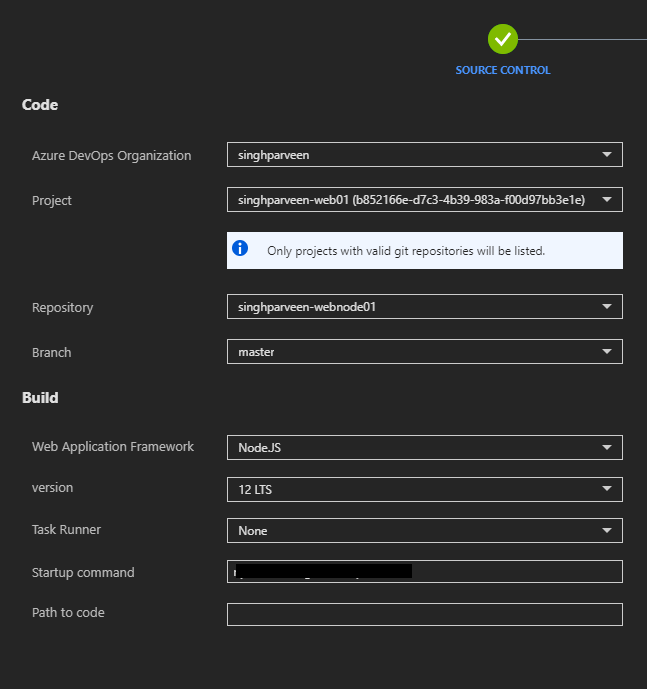
- Click finish when done and your application should be up and running now without much effort.
Configuring CI/CD with GitHub Repos
If you wish to use GitHub Repos instead of Azure Repo, follow the same steps to choose Deployment Center from the application blade.
- Unlike last time, choose “GitHub” instead and press Continue.
- You might need to authorize and allow permission to your GitHub account. Use the sign-in form when prompted to authenticate to GitHub and connect your repos with App Service.
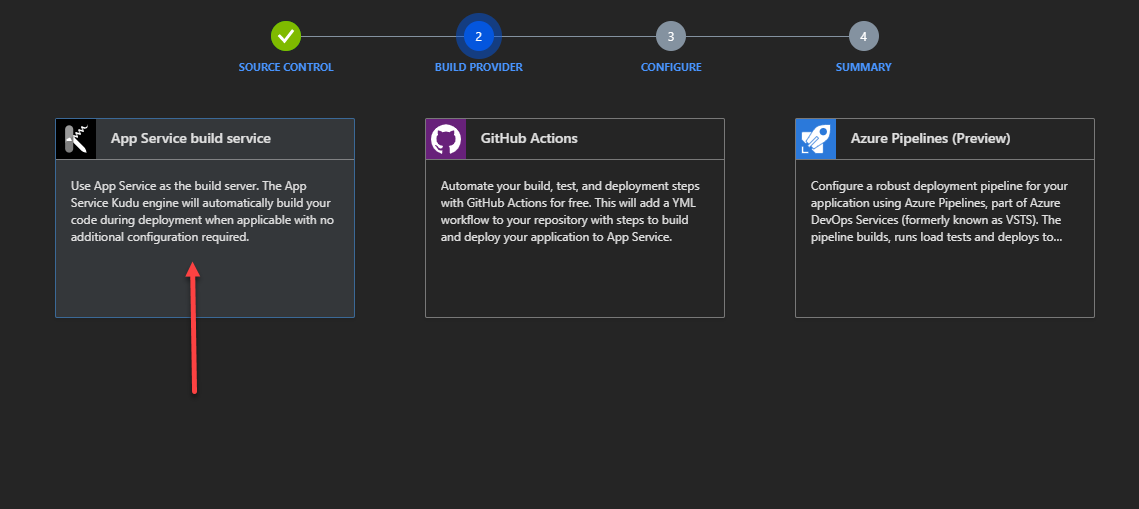
- Choose the “App Service Build Service” for your build provider as it’ll compile your code automatically during deployment.
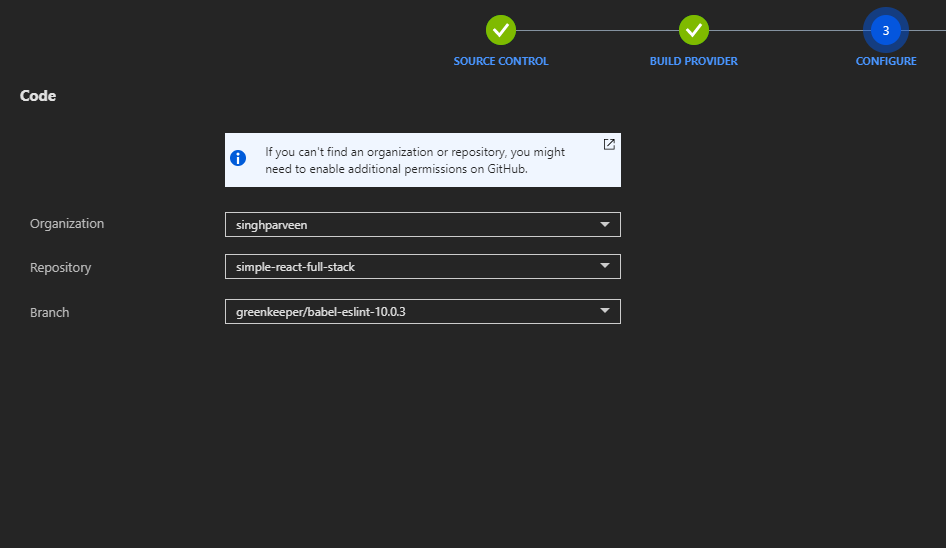
- Choose the repo that you copied earlier and finish the process.
- Just within a few minutes, your application should be up and running on App Service.
At this point, your application is fully integrated with App Service and any changes that you make to your code repo will be synced and changes will reflect in real-time.
Conclusion
I hope that sets you up for success with deploying CI/CD Pipeline for your Azure App Service to sync code updates to your web application without any effort during the change process.
Leave a comment down below if you liked what you read, and I will see you in the next one.
If it’s your first time here, check out other articles in the series:
Part 1: Up and Running with Azure App Service
Part 2: Continuous Deployment for Azure App Service
Part 3: Using Deployment Slots with Azure App Service
Part 4: Setup Custom Domain for Azure App Service
Part 5: Deploying Next.JS App on Azure App Service
Part 6: Next.JS App with Cosmos DB on Azure App Service
Part 7: Why Should You Use Azure App Service?
Part 8: Easy Auth for Azure App Service
Part 9: How To Clone An Azure Web App?
Discover more from Parveen Singh
Subscribe to get the latest posts sent to your email.


